Store items are the products you will display for sale. After successfully creating categories, you can list items under them. For example, Breakfast (Category) -> Garlic Bread (store item), Lunch (Category) -> Pizza (store item), Ice cream (Category) -> Vanilla Ice cream large (store item), etc.
GonnaOrder does not restrict the number of categories and items you can have in a single store, nor are there added costs for having more categories or items.
On This Page
- Add a Store Item
- Set Item Descriptions
- Highlight Items With Icons and Emojis
- Configure Prices and Discounts
- Marking Items as Visible and Orderable
- Same Day Ordering
- Count Against Slot Count
- Set How the Product Loyalty Points are Calculated
- Update an Item
- Synchronize with External Applications and Set Item VAT
- Delete an Item from the Store
- Delete Multiple Items from the Store
Add a Store Item
Every item in your store must belong to a category. Therefore, you must create one or more categories before adding items. A category can have multiple items. Also, note that categories that do not have items listed under them do not appear in the customer menu.
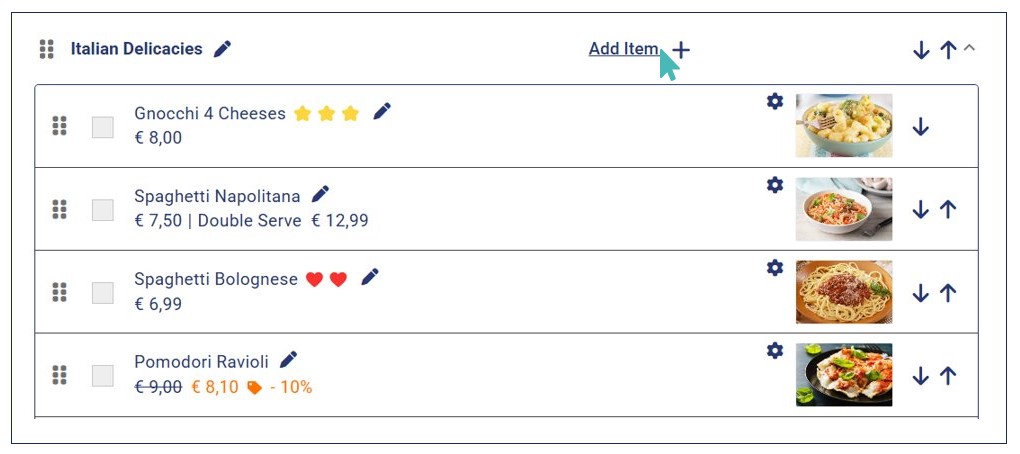
To create a store item, click Catalog on the side menu and navigate to the name of the category under which you want to add it, click on Add Item, and continue.
Naming a Store Item
The name should be brief and self-explanatory. Say, it should be easy for people to know what the product is about.
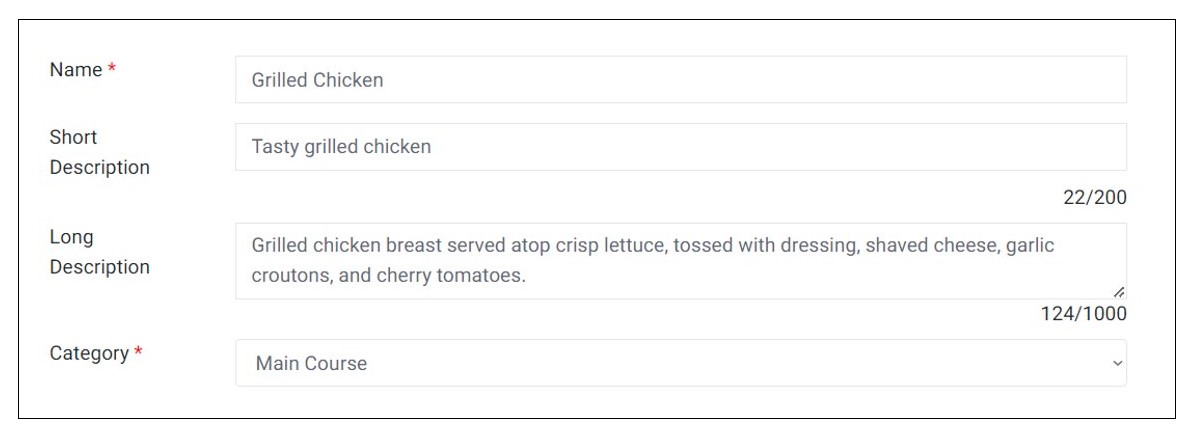
Set Item Descriptions
GonnaOrder allows you to create descriptions for your items. These descriptions help describe your product so that customers can better understand the item they’re about to order. You can set both short and long descriptions, ensuring that customers get all the information they need before ordering the item.
Short Description
A short description is a concise sentence about the product, usually up to 200 characters. It should clarify your product so customers understand what they are ordering. The short description appears on the menu and the item details page, just below the item name.
Long Description
You can optionally add a long description to your product. It is useful when you want to explain more about your product or when you want to provide customers with more information about a store item. The long description (up to 1000 characters) appears on the item details page after the customer has clicked on the item on the menu while the short description appears below the product name on the menu even without having to click the item.
The description field allows you to have new lines, bold words or phrases, write in italics, and link to external websites.
GonnaOrder will automatically detect a new line and a link to a website after you save the description. To add bold text, type two asterisks before and after the phrase or word, **bold**: bold. You can add an italicized phrase by typing two underscores before and after the phrase, __italic__: italic.

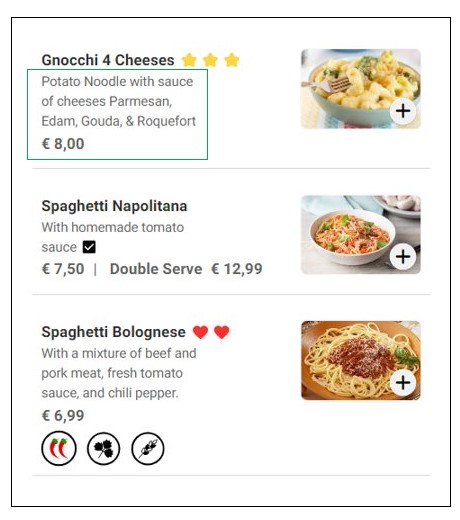
Highlight Items With Icons and Emojis
Icons and emojis can help attract customer attention to your items. You can add icons to the catalog name and short description, item name, short description, price description, and long description.
Please note that not all icons are supported.
You can copy and paste the following examples to your catalog (Only copy the symbol):
| Star: ⭐ | Sparkles: ✨ | Sparkle: ❇️ | Coffee: ☕ | Eight spoked asterisk: ✳️ | Ballot box with check: ☑️ |
| Heavy checkmark: ✔️ | Eight pointed black star: ✴️ | Heart: ❤️ | One: 1️⃣ | Two: 2️⃣ | Three: 3️⃣ |
| Four: 4️⃣ | Five: 5️⃣ | Six: 6️⃣ | Seven: 7️⃣ | Eight: 8️⃣ | Nine: 9️⃣ |
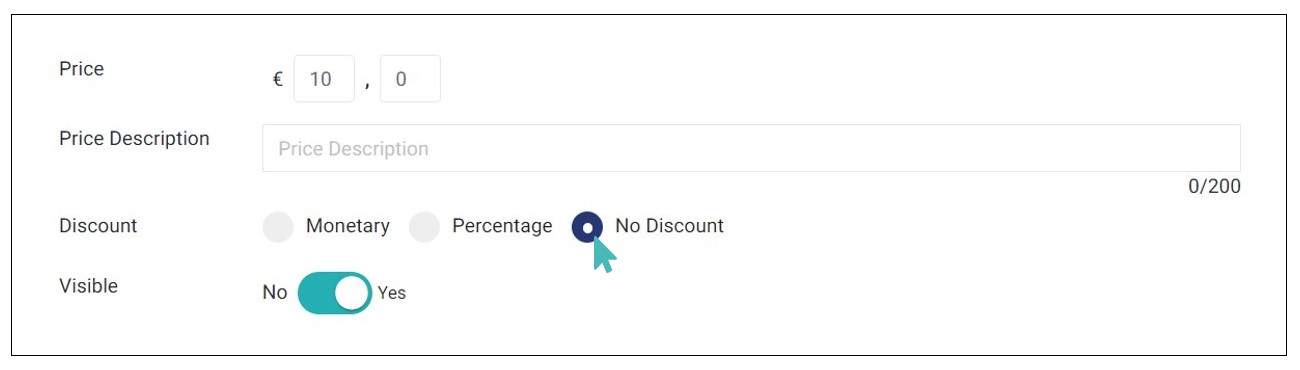
Configure Prices and Discounts
Every product in your store can be associated with a price. However, these are optional; you may leave them blank and update them later. The currency used for prices in your store is selected based on the country/region of operations. To learn more about price, see how to set up prices & discounts.
Tip
Store items, price variants, and options can have negative prices.
Manage Discount for a Store Item
You can set a discount while creating your product. It is also possible for you to add a discount when editing a store item.
GonnaOrder has three possible discount choices:
- Monetary Discount(Fixed Discount): You can provide discounts on the price amount of the product. Example: 5$, 10$, 15$.
- Percentile discount : You can provide item discounts based on the percentage of the offer price. Example: 5%, 10%, 14%, 15%,…,100%
- No discount: This is the default selection for the discount. It implies that the amount you set as the price of the item is what the customer will pay. You can change this and pick either of the above discount options at any time.
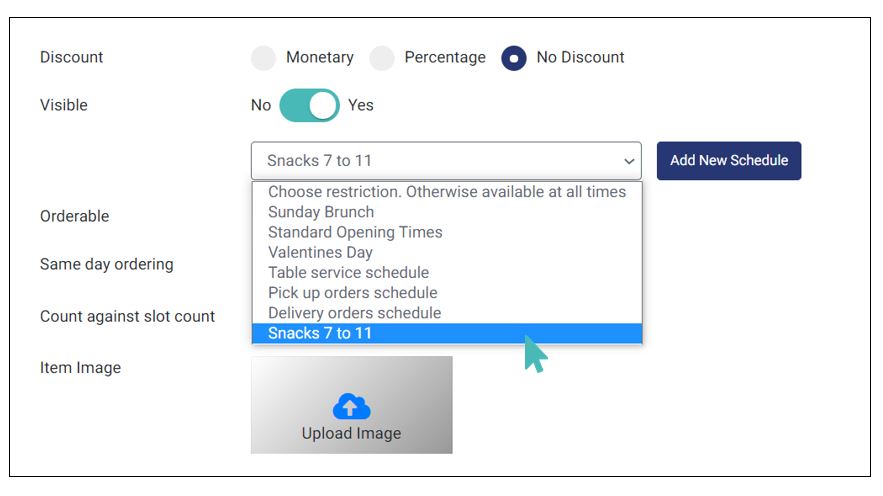
Marking Items as Visible and Orderable
You can choose to mark an item as Visible and Orderable or not. If you are not ready to sell products immediately or want to finalize some changes to the item, you can toggle the visible button to No. Notice that you can also schedule when an item is visible. This option comes in handy when you offer a specific item on specific days. See more about this on the Item Availability Based on Schedules section.
When the visible and orderable buttons are toggled to Yes, your product will be displayed, and your customers will be free to order.
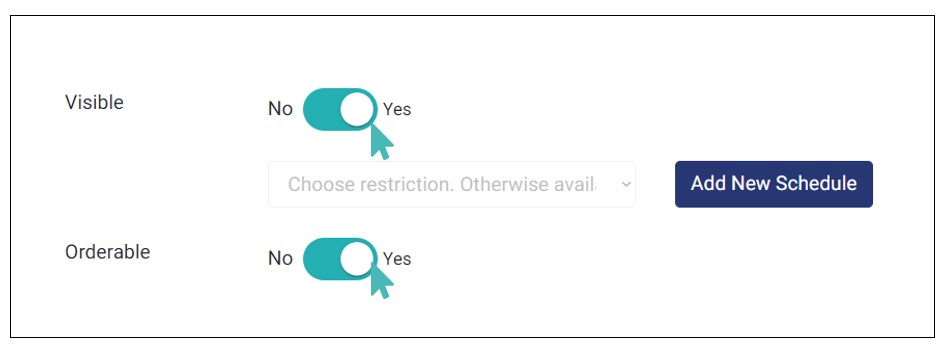
On the other hand, if an item is either set to Not Orderable or Not Visible, then it would be greyed out in the GonnaOrder store administration interface. Further, non-visible items will not be included in the store menu. Customers will see products marked as not orderable on the store menu but cannot add them to their orders. Read more on how to mark items as visible or orderable.
Item Availability Based on Schedules
You can add Time Restrictions to your store item. Adding time restrictions to your product will restrict your customers from ordering that item during the restricted time. Here, you can make an item available to customers within a specific duration of the day. For instance, you can use this setting to restrict customers from ordering snacks between 7 and 11 AM daily. For this, you need to know how to configure item availability based on schedules.
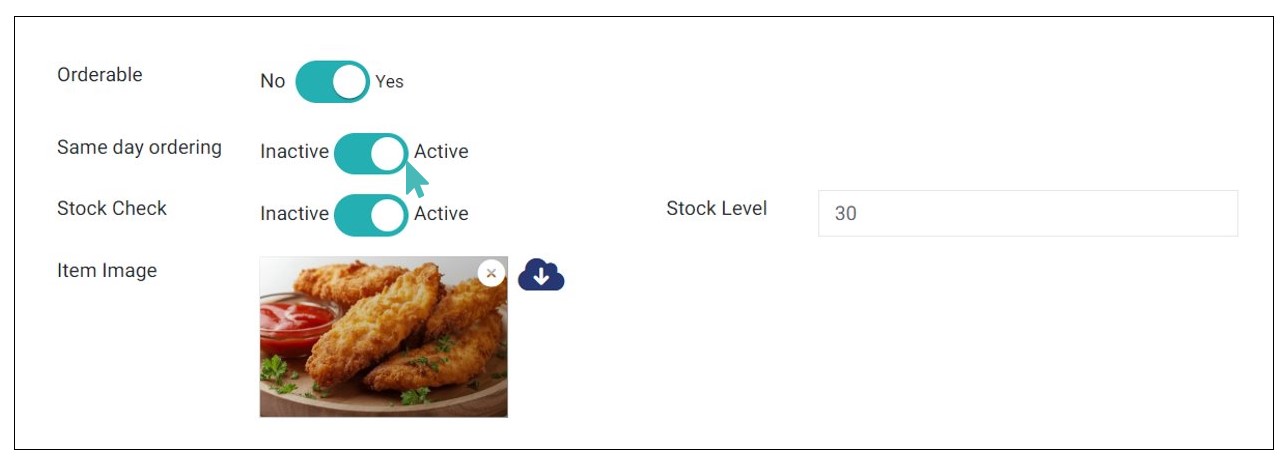
Same Day Ordering
This item-level setting allows you to specify whether you can receive orders for a particular product and fulfill them on the same day. This is the Same day ordering feature. When this setting is activated, customers can pick up or have their orders delivered from your store on the same day they place them. Otherwise, you can use same-day ordering to require customers to specify a date, other than the order date, when they would like to pick up or receive their order.
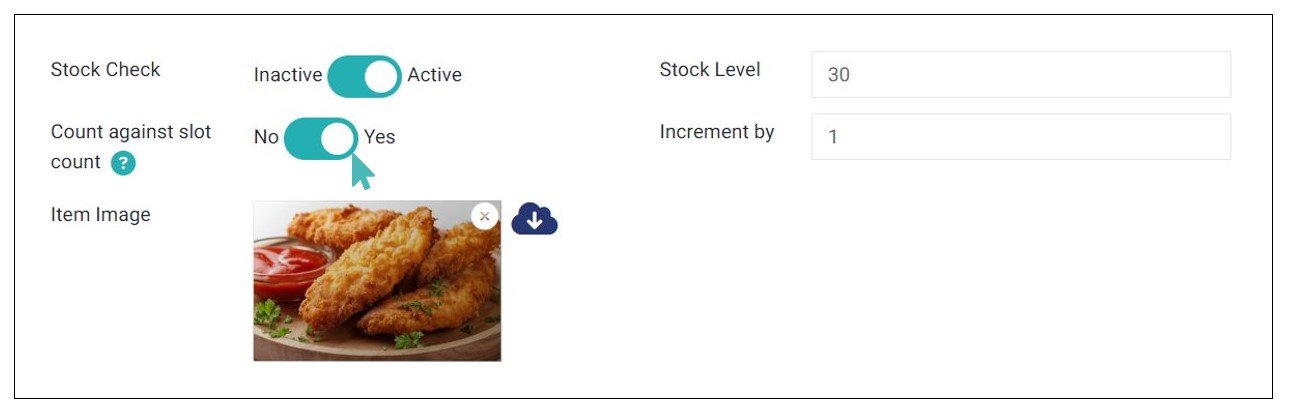
Count against Slot Count
The Count against slot count setting indicates whether an item is included in a customer order and will increase the number of items received for a slot. Only complex or time-intensive products should count toward the maximum number of items per slot. If a store serves Pizza and Coca-Cola soft drinks, we may consider Pizza a complex product.
You must set the maximum items per slot under Settings > Schedules before you can mark any item to count against slot count.
The Increment by field refers to the numeric value added to the slot count every time a customer submits an order, including one item of the product in question. The number depends on the complexity of the product relative to standard store items.
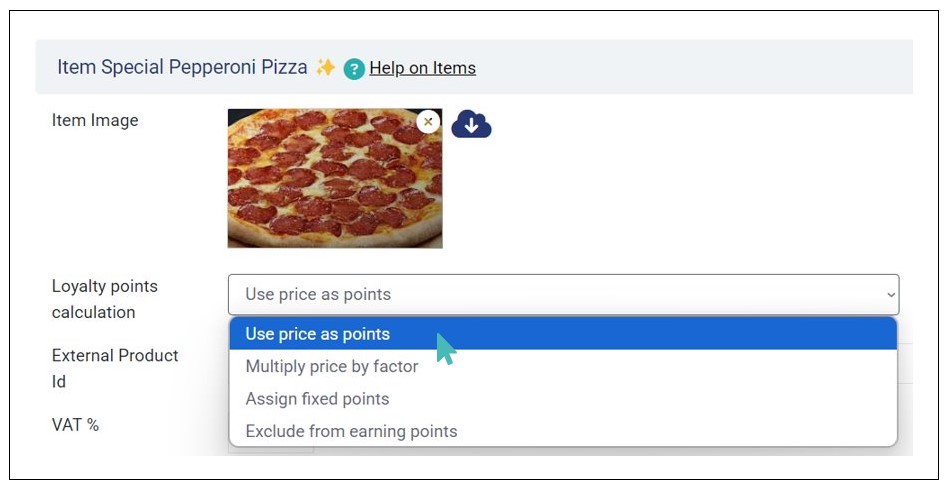
Set How Product Loyalty Points are Calculated
GonnaOrder allows you to configure how loyalty points will be calculated for each product. This implies that each product can have more or less loyalty points regardless of its price. GonnaOrder offers the following options for calculating loyalty points of a product.
Use price as points
Multiply price by factor
Assign fixed points
Exclude from earning points
To set the product’s loyalty points calculation criteria, open the item details page and find the Loyalty points calculation field then select the desired criteria from the dropdown.
Use Price as Loyalty Points
As the name suggests, the Use price as points option uses the store items’ price as loyalty points. So, if a product (e.g., Special Pepperoni Pizza) is priced at 9 EUR, it will earn a 9 points. For example, if a customer places an order with 2 Special Pepperoni Pizzas at 9 EUR each, they will earn a total of 18 points, which is equivalent to the amount spent on the order.
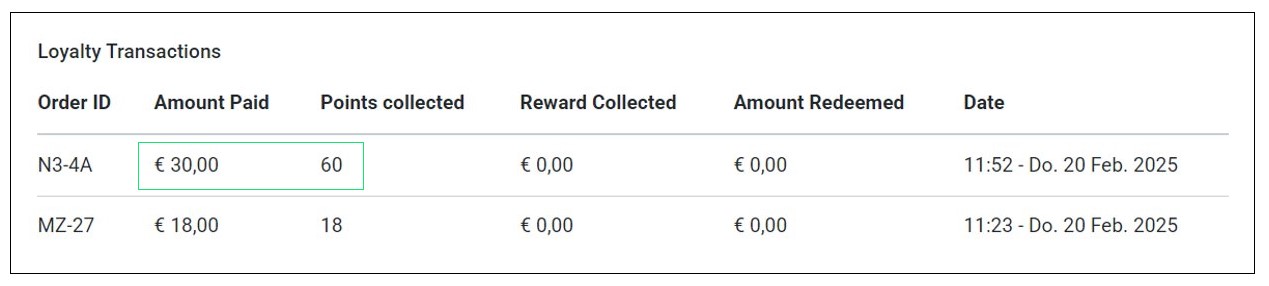
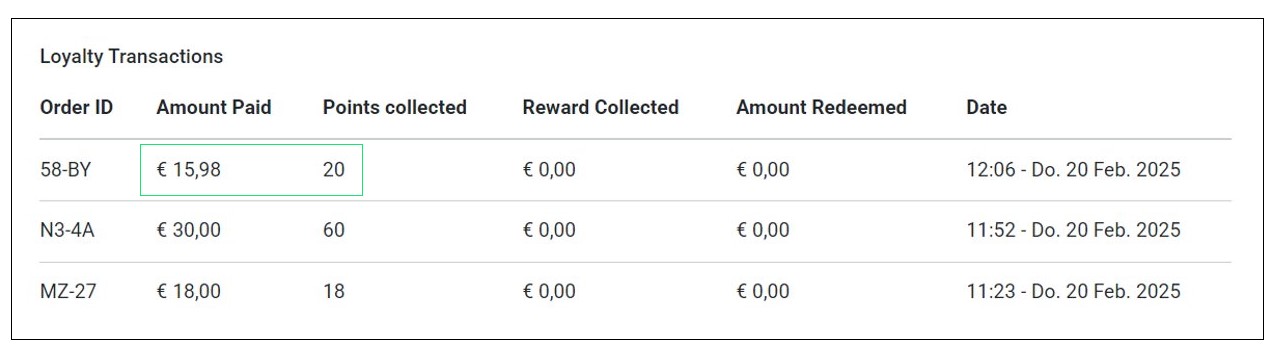
You can view the amount spent and loyalty points collected on the order under the customer’s loyalty transactions on the customer 360 dashboard.

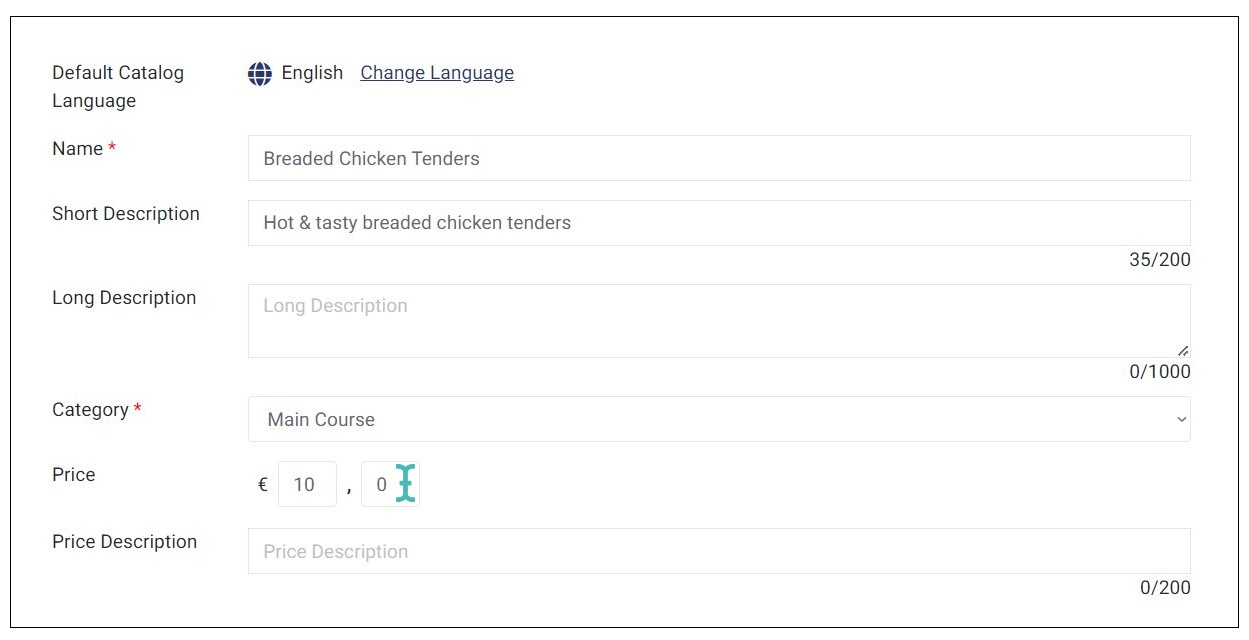
Multiply Store Items’ Price by a Factor
This loyalty points calculation option multiplies the item price with the set factor to determine the number of points an item will earn. It requires you to set the factor that the item price will be multiplied by to get the points. You can set the multiplier factor as 0.5, 2, 3, 4.5., etc., as you wish.
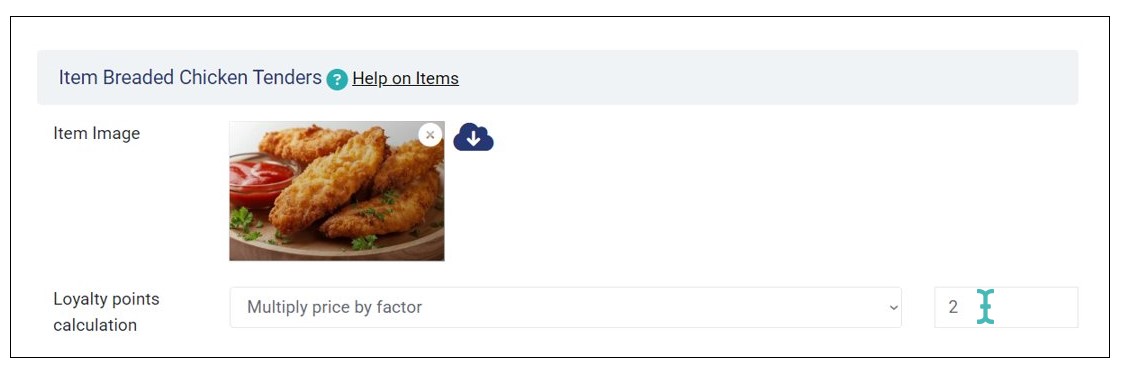
For example, if the price of an item, say Breaded Chicken Tenders, has a price of 10 EUR and the factor is set as 2, then the item will earn 20 loyalty points. Therefore, if a customer places an order with 3 breaded chicken tenders, they will earn a total of 60 loyalty points despite spending a total of 30 EUR.
Assign Fixed Points for a Store Item
When you set this as the preferred loyalty points calculation method, the item will earn the specified points, regardless of the price. Therefore, you must enter the number of points you want the item to earn.
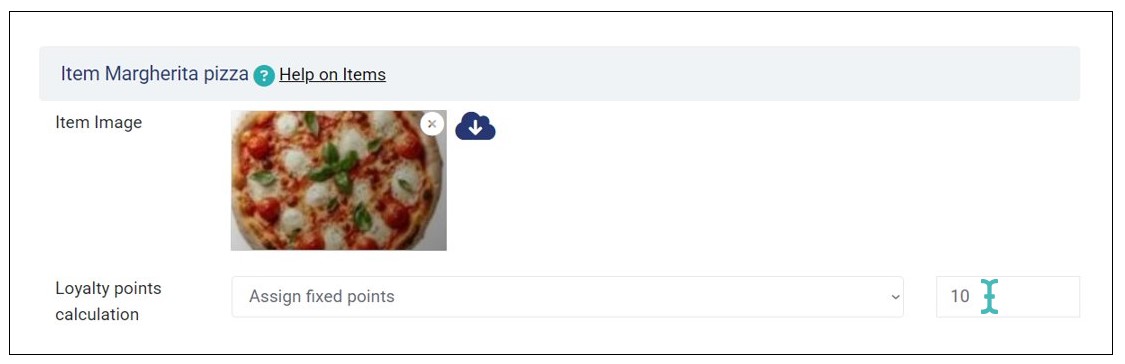
For example, if an item, say Margherita pizza, has a price of 7.99 EUR and you set its fixed points at 10, then the item will earn 10 loyalty points. So, if a customer places an order with 2 margherita pizzas, they will earn 20 loyalty points despite spending 15.98 EUR on their order.
Exclude from Earning Points
When you exclude an item from earning points, customers will not earn any loyalty points from the specific item. This implies that the specific item has no impact on the loyalty points balance.

When a customer submits an order with items that are excluded from earning loyalty points, it will show zero (0) on the Points collected field under loyalty transactions in the customer 360 dashboard.
Notes
- If you choose the Multiply price by factor option and set the factor as 1, the item’s points are the same as it’s price. Therefore, it will behave like the Use price as points option.
- When you exclude an item from earning points, it will earn zero points.
- Use price as points is the default loyalty points calculation method.
- Once you set the preferred loyalty points calculation method, you must click Save for the setting to take effect.
- You can view and manage customer loyalty points on the customer 360 dashboard.
How are Loyalty Points Calculated for Item with Options?
When an item has options, the initial price of the item plus the option price in the order is considered and the selected loyalty points calculation method is used to get the points. For example, if you have selected the use the price as points method and the item price is 10 EUR and the option selected is priced at 1.5 EUR, then the points will be 11.5.
If a customer selects the same item and option when the loyalty points calculation method is Multiply price by factor, where the factor is 2, then the points collected is 23 (achieved by multiplying final price (11.5) by 2).
Saving a Store Item
GonnaOrder provides three save buttons, as explained below.
- Save: When you click this button, GonnaOrder will save the product and take you back to all items available in the current category.
- Save & Continue: This button saves your product to the store (creates a new store item or saves changes) and keeps you on the current item details editing page.
- Save & Add New: Lastly, you can use the Save & Add New button to save a store item and create another new item in the same category.
Update an Item
You may want to update items already saved in the catalog for various reasons. For example, you want to change the price of a product, or you want to enable stock management. To update a specific store item, click on the name of the item’s category and then click the Edit icon.

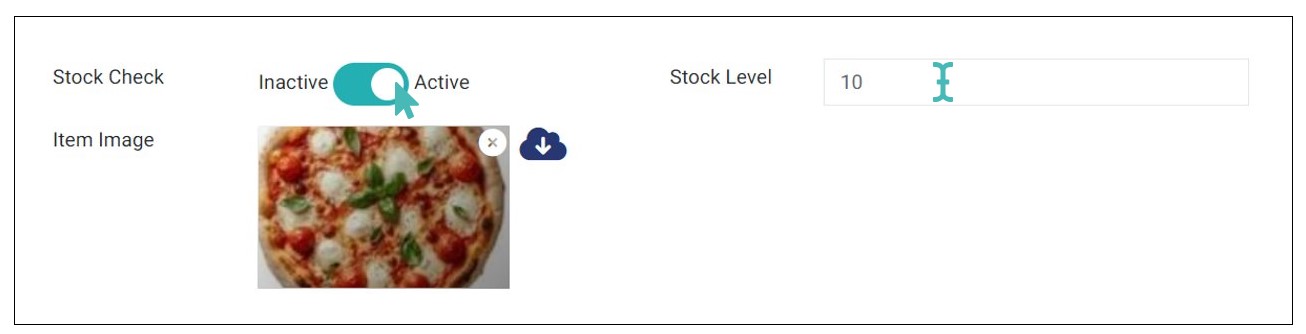
The item details page has details about a product, including the Stock Check setting unavailable on the add item page. Besides editing other fields, you can also provide the number of items in stock for any product you edit. The stock level can be anywhere between zero (0) and 100. See Setup stock features to understand how stock check works.
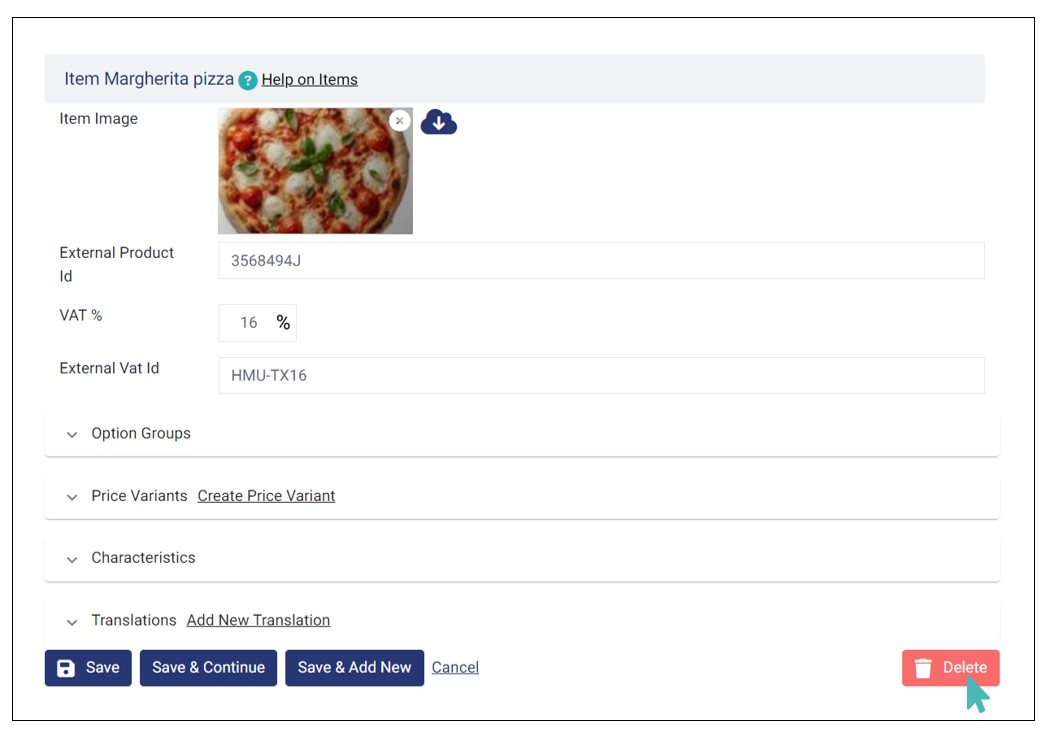
Synchronize with External Applications and Set Item VAT
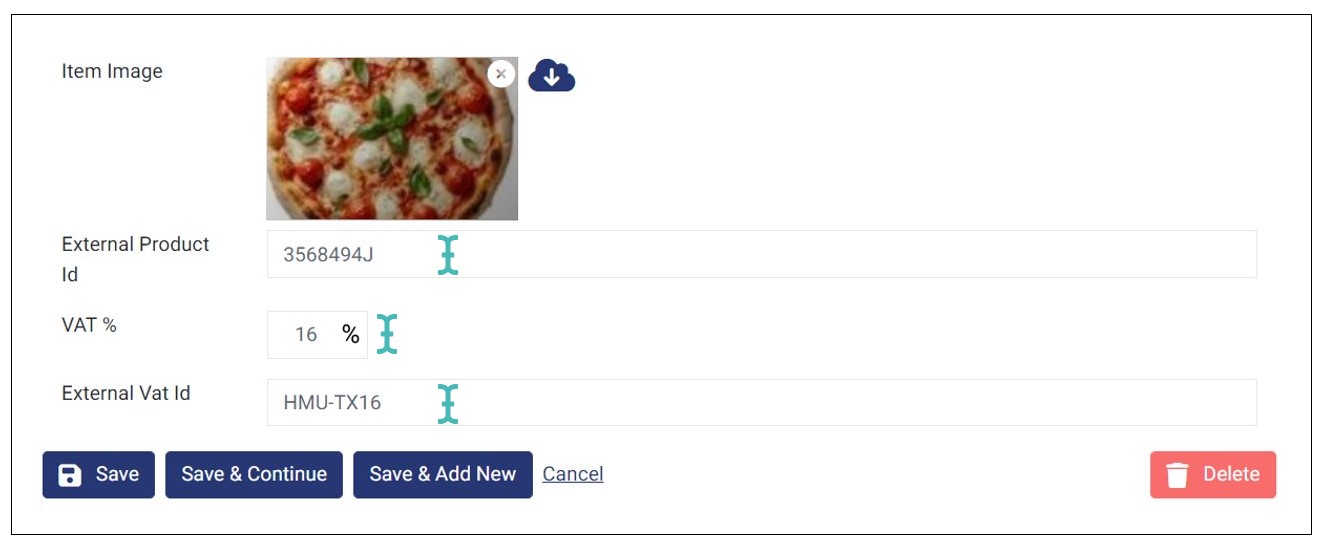
External product ID
The External Product ID field is helpful to you and your store if you have enabled integrations with external applications, e.g., POS via HubRise. It helps GonnaOrder communicate with external applications effectively when customers place orders via GonnaOrder or a connected POS.
For your integrated applications, e.g., POS via HubRise, you must ensure that a single external ID on GonnaOrder and the external application refer to the same item.
Item VAT
Some of the items in your store may have special VAT requirements. In that case, you will need to set up an item level VAT value, but only after you have set the default -store-wide VAT value. It is important to note that item-level VAT takes precedence over store VAT. Further, note that GonnaOrder uses VAT information to improve store statistics. VAT information is also displayed on order receipts.
You do not have to set the VAT value for every product since the default store VAT is sufficient for most products. Also, notice that the item VAT field is only available if you have set a store VAT.
External VAT ID
The external VAT ID field allows you to specify a tax ID that may be used on a linked application. It is mainly applicable for stores that use Powersoft POS.
Delete an Item from the Store
To delete a specific store product, click on the name of that category in which the item is placed and then click the Edit icon next to its name.
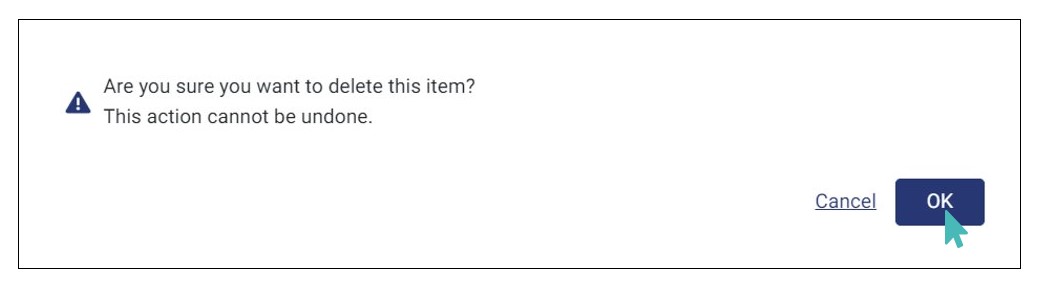
Click Delete at the bottom right corner of the page. This will be a good time to decide if you want to discontinue the product from your store or if marking it as not sellable will not meet your needs.
When you are sure you want to delete the store item, click OK on the confirmation pop up that appears. This will remove the product from your store and your dashboard. Notice that the action is irreversible.
Delete Multiple Items from the Store
You can also delete multiple items from the catalog. To delete items in bulk, select the checkbox before each item that you want to delete and click Delete.
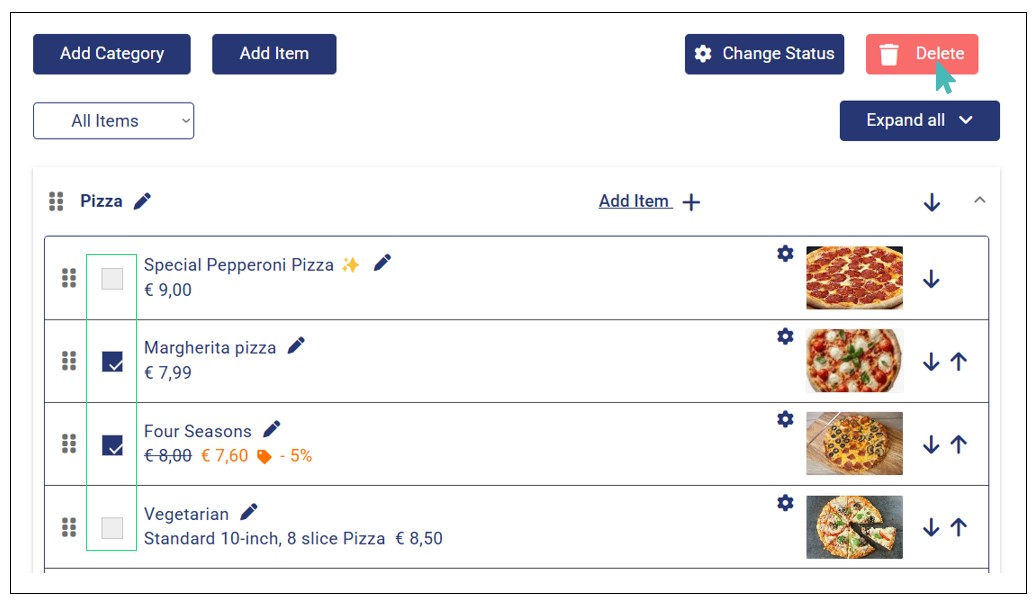
Click Delete on the top right corner of page. A confirmation window appears. Click OK to confirm the deletion. Note that this action is irreversible.
