As a store owner, GonnaOrder gives you freedom to make table reservations on behalf of the customers. This ensures that the customer will find the table available when they arrive at your restaurant, hotel, bar, or café. By reserving a table for a specific date and time, customers are guaranteed of their spot, which eliminates the waiting period to get a free table. This results in a more satisfying customer experience and faster table turnover.
On This Page
- Create Tables
- Find a Table
- Create a Reservation
- View Table Reservations
- Change Reservation Details
- Update Reservation Status
- Delete a Reservation
Create Tables
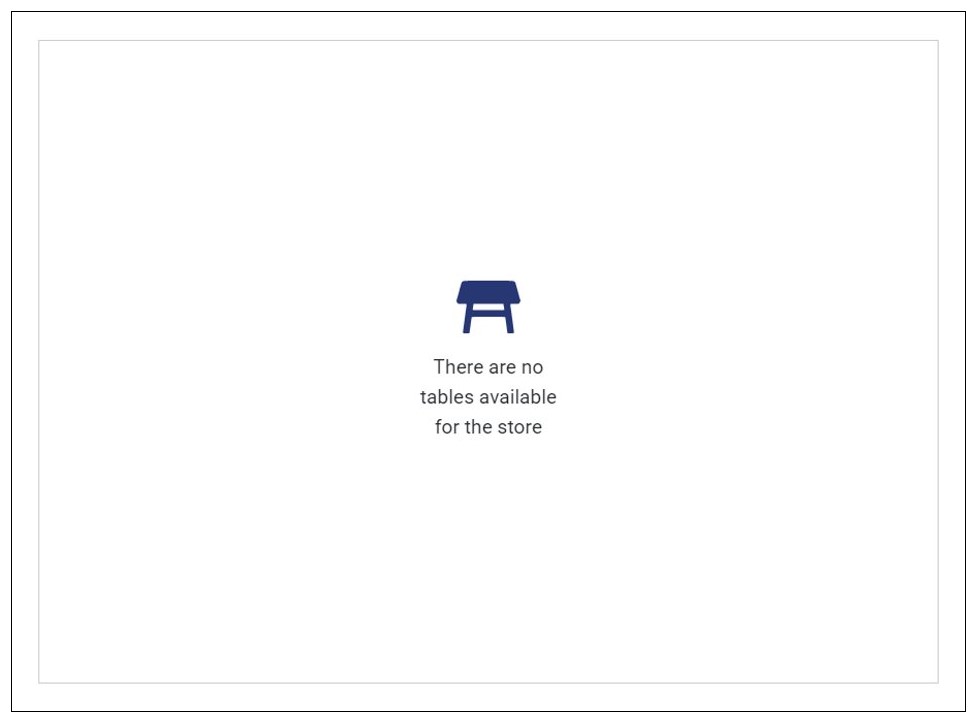
For you to start accepting reservations at your store, you must first create the tables to be reserved. You can either create the tables in bulk or via Excel. Otherwise, GonnaOrder notifies you that you have no tables in your store, hence, you cannot create or support customer reservations.
When creating tables, note that each table may a varying capacity. For example, one table may have a maximum capacity of five, while another one may have a maximum capacity of eight.
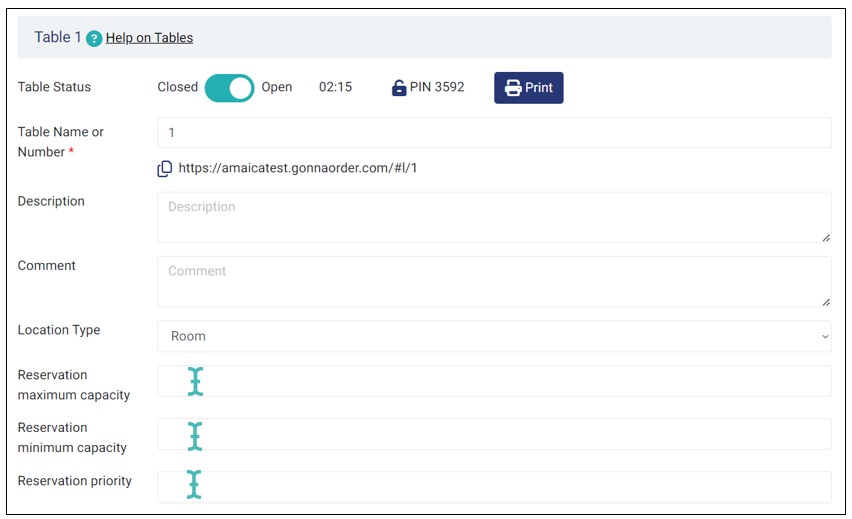
GonnaOrder’s reservation system lets you set the minimum and maximum capacity for each table. This ensures all customers are accommodated appropriately, as you or your customers cannot reserve a table for more people than its maximum capacity. Also, you can assign table priority in numbers. So, if one table is already reserved the next reservation is assigned to the next high-priority table.
To set the table reservation capacity and priority, go to Tables on the left menu of your store’s dashboard. Click the table for which the capacity needs to be set. Enter the minimum, maximum and priority values in the field as shown below. When done, scroll down and click Save, and your table(s) are ready for reservation.
If you have not created tables, click the Add table.
For more information on how to create tables, refer to the Manage Tables article.
Find a Table
With table reservations’ maximum and minimum capacity set for each table, you can now book a table for your customers without the fear of not being able to fulfill the reservation. This feature allows you to find available slots based on the number of people and reservation timelines.
To find a table for a customer, click Reservations on the left menu and navigate to Find a Table.
When you click the Find a Table button, a pop-up will appear, where you can select the number of people you wish to reserve a table for as well as the available time slots.
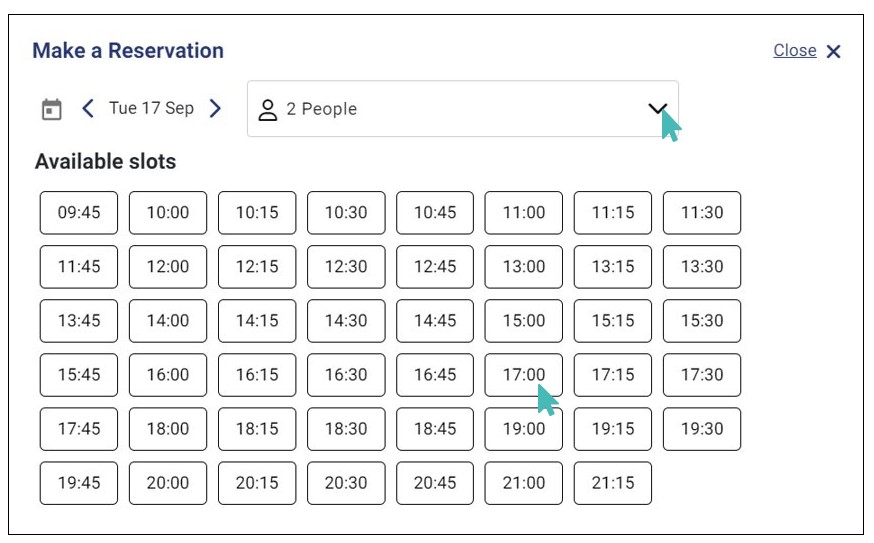
Once you select the above details, proceed to enter the time period (start time and end time) and the table number you want to reserve. You can also include the name of the reservation, phone number of the customer, add notes to the reservation(optional), and select the reservation status. View more information about these details on the Create a Reservation section.
Confirm the reservation details you just entered and click Submit.
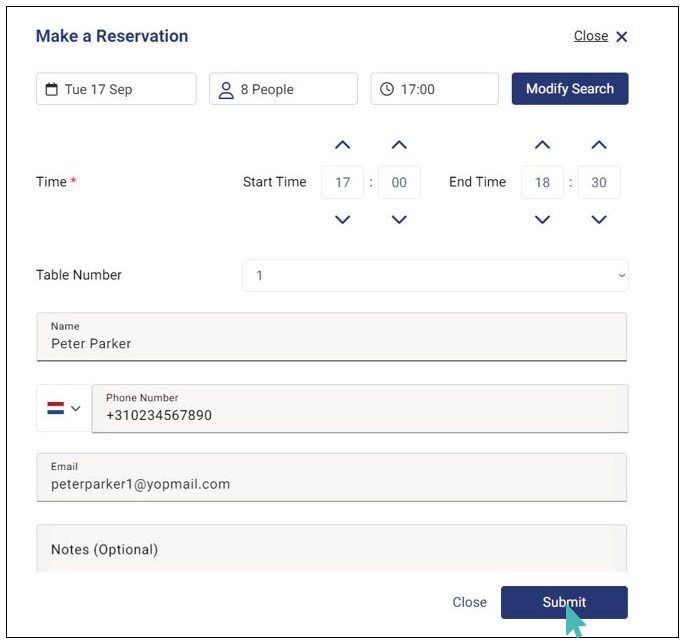
If you’re unable to submit the reservation either due to inadequate table capacity or overlapping reservation time, click Modify Search on the top right corner of the dialog box and select a different slot from the available slots.
Create a Reservation
Other than finding a table, you can directly create reservations for your customers based on their requirements. To create a reservation, go to Reservations on left menu of your store’s dashboard and click Create Reservation.
Here, enter the following table reservation details:
- Date: This is the date for the table reservation. You can set a same-day or future date reservation depending on the customers’ requirements.
- People: Here, you set the number of customers who are reserving the table at that particular date and time. Note that the number of people should not exceed the maximum reservation capacity or go below the minimum reservation capacity.
- Time: This is time within which the customer will be assigned to the reserved table. For instance, if a customer wants to reserve the table between 8:00am and 8:50am, you will choose the Start Time as 8:00am and End Time as 8:50 am. Note that you can only reserve a table within the time that it has not been reserved.
- Table Number: This is where you choose the table number you want to reserve. Here, you will find a drop-down list of all tables you have created in the Tables section.
- Name: You can include the customer’s name when making the reservation. This enables you to easily identify the customer.
- Phone: Here, you input the customer’s phone number. This number will appear when you view the reservation and can be valuable should you want to contact the customer.
- Email: Input the customer’s email on the email field. Like phone number, you can use the email to follow up on the customer’s experience with your reservation system.
- Notes (Optional): Here, you can add a note or comment on the reservation.
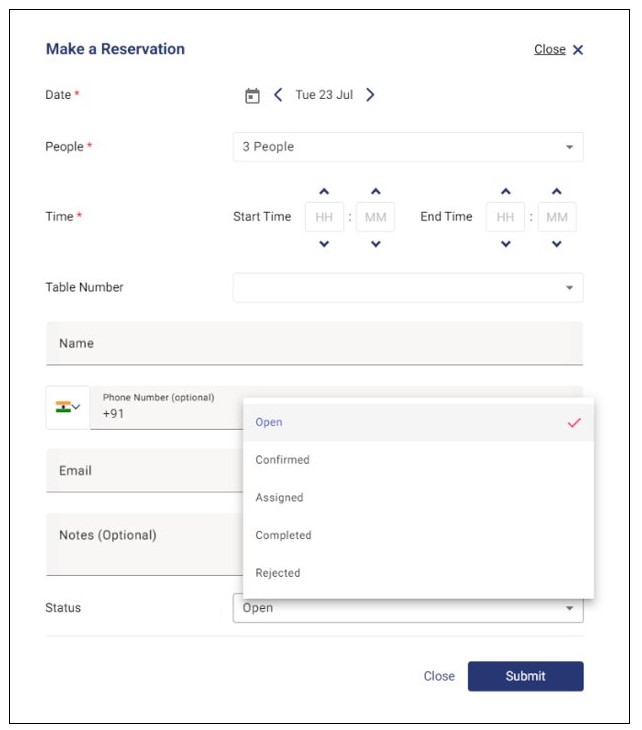
- Status: This is where you choose the status of the reservation. The reservation status can be Open, Confirmed, Assigned, Completed, or Rejected. Note that you can later update reservations from one status to another. For more information on updating the status, refer to the Update Reservation Status section.
Once you confirm the reservation details, click Submit and the reservation will be updated on the timeline and listed in the status tab you selected.
Dealing with Errors When Submitting a Reservation
There are two common errors that you may encounter when submitting a reservation on GonnaOrder. Here is a quick overview of these errors and how you can address them.
- Error Due to Overlapping Reservation Time Period
- Error Due to Table Capacity Requirements
If the selected reservation time for a particular table overlaps partially or fully with that of another reservation, you will not be able to submit the reservation. Instead, you will get a notification informing you that the table is already reserved within that period.
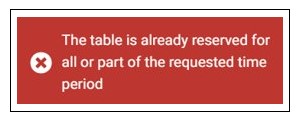
Solution: Select a different time period for the reservation. Alternatively, you can choose a different table that is not reserved within that specific time period.
As initially discussed in the table capacity section, you can set the minimum and maximum capacity of each table. In that case, if you choose fewer or more people than the table’s minimum or maximum reservation capacity, you will not be able to submit the reservation. Instead, you will get a notification, informing you that the table’s capacity cannot handle the chosen number of people.
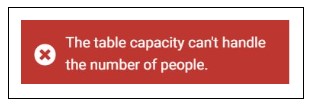
Solution: Choose a different table that can accommodate the number of people you want to reserve a table for.
View Table Reservations
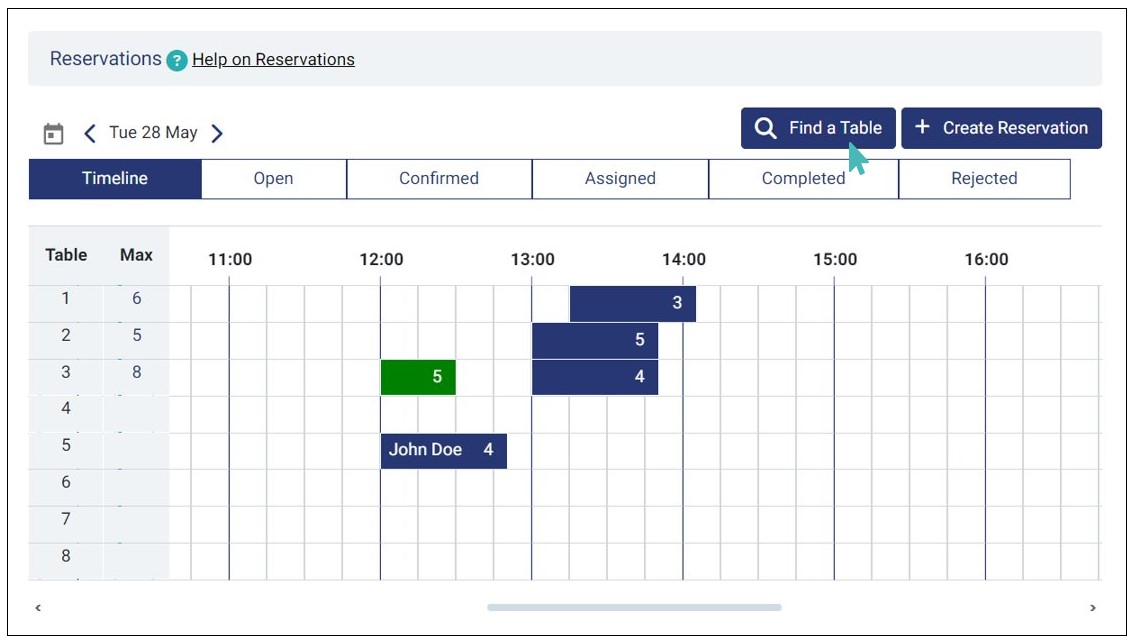
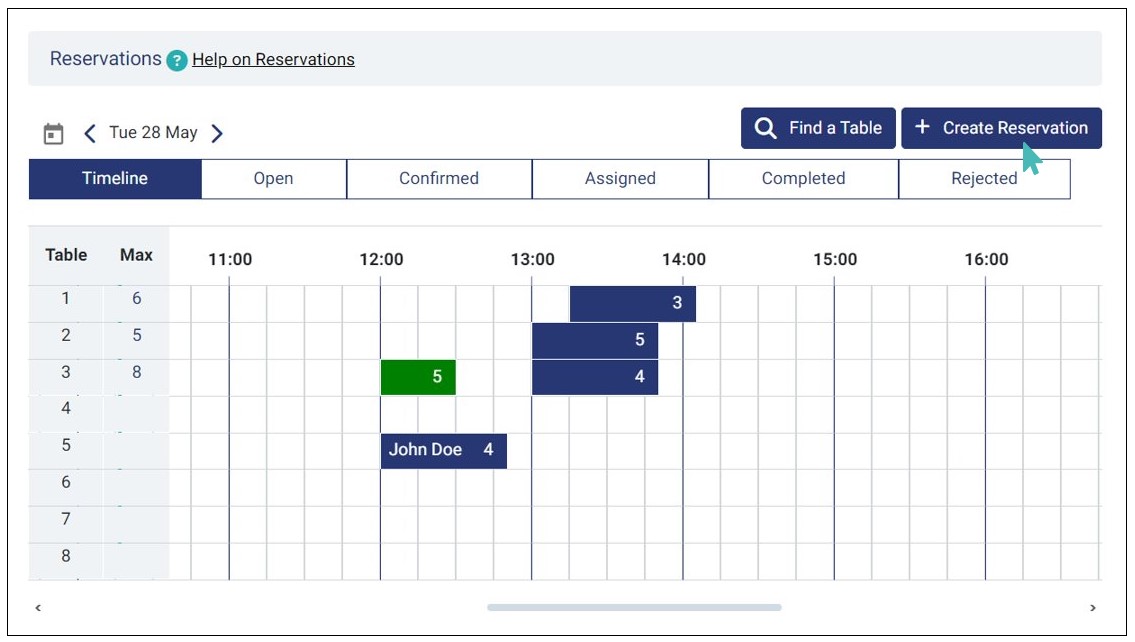
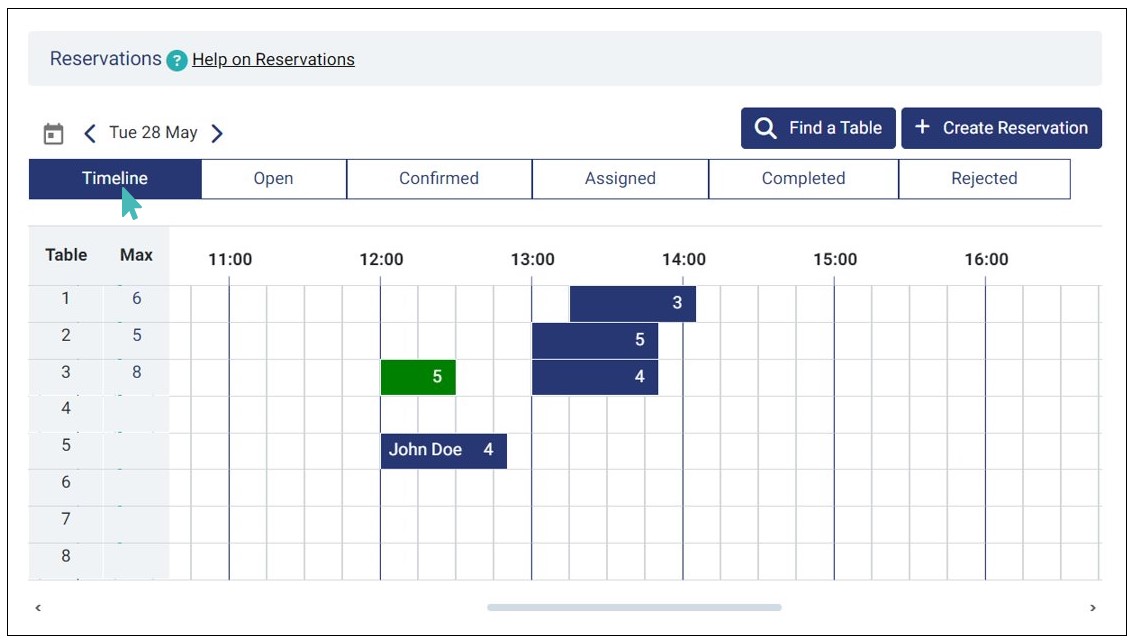
GonnaOrder allows you to view the reservations you created in the previous section. You can view the reservations on the timeline. Go to Reservations on the left menu and click the Timeline tab.
Note
Reservations that have been completed are marked with a green color on the timeline (see timeline above).
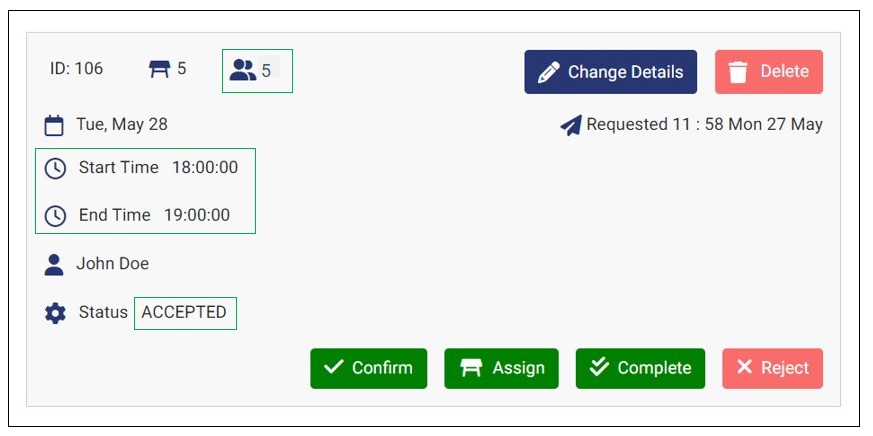
You can also view the individual reservation details by clicking the specific reservation on the timeline. For example, let’s say you click the reservation with the name John Doe. In that case, you can see all details about the selected reservation.

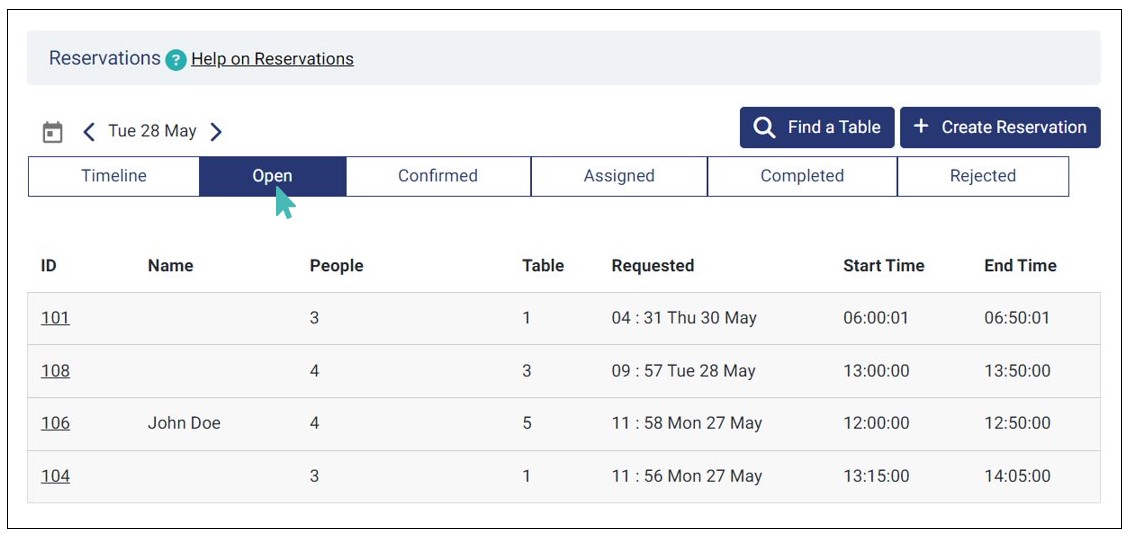
View the List of Table Reservations on Different Status Tabs
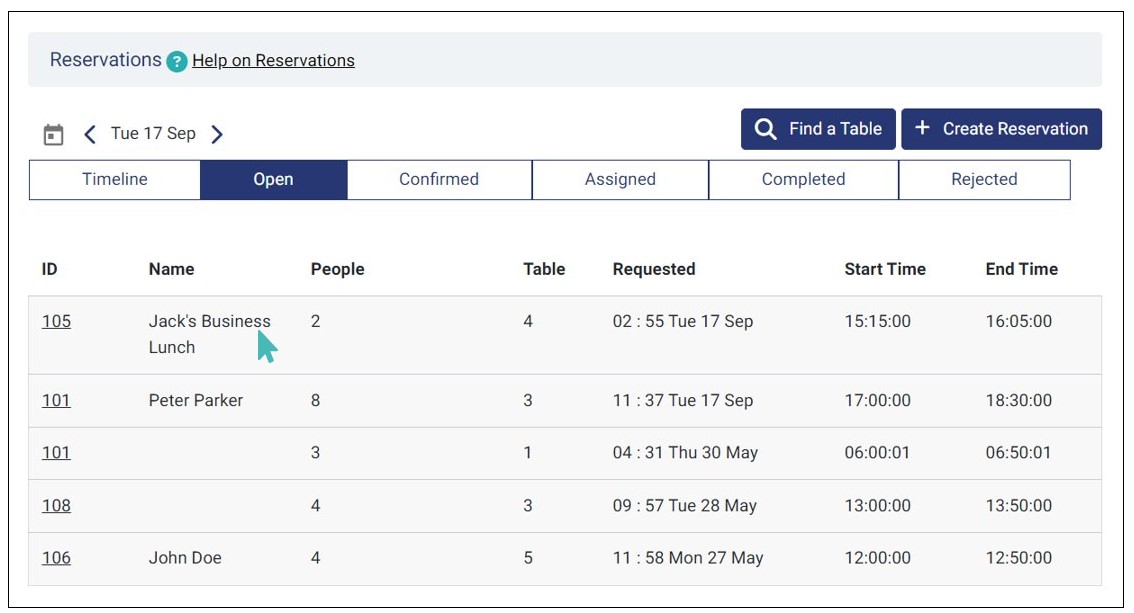
Apart from viewing reservations on the timeline, you can view them as a list. GonnaOrder provides several status tabs under which table reservations are listed based on their status. A reservation may fall under one of the following statuses:
- Open: These are the requested reservations that are yet to be to be acted upon.
- Confirmed: The table reservations that fall under this category are the ones that have been accepted.
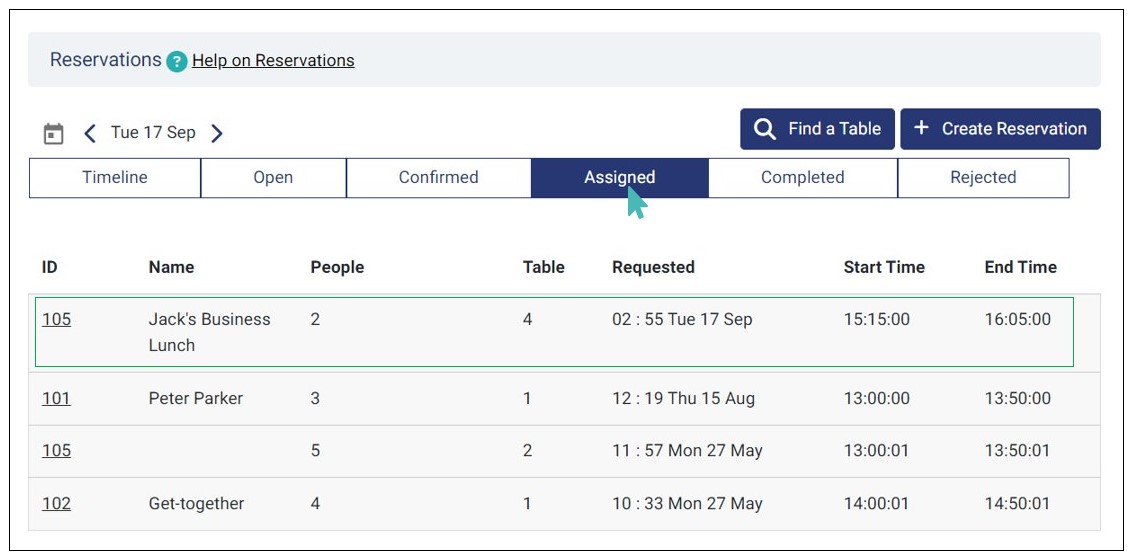
- Assigned: The assigned tab contains a list of all assigned table reservations.
- Completed: This is where you can view all the completed reservations, which means the customer(s) honored the reservation.
- Rejected: Here, you will find a list of reservations that, for one reason or another, have been rejected.
To view the reservations as a list, go to Reservations on the left menu and click the status of the reservations you want to view. For instance, if you click Open you will see a list of all the requested reservations that are yet to be accepted, assigned, completed, or rejected.
Similarly, if you click the other statuses (Confirmed, Assigned, Completed, or Rejected), you will be able to see the respective list of reservations.
Change Reservation Details
You may want to change the reservation details due to various reasons, such as customer’s request to change reservation time or number of people. GonnaOrder’s reservation system allows you to change the reservation details with just a few clicks.
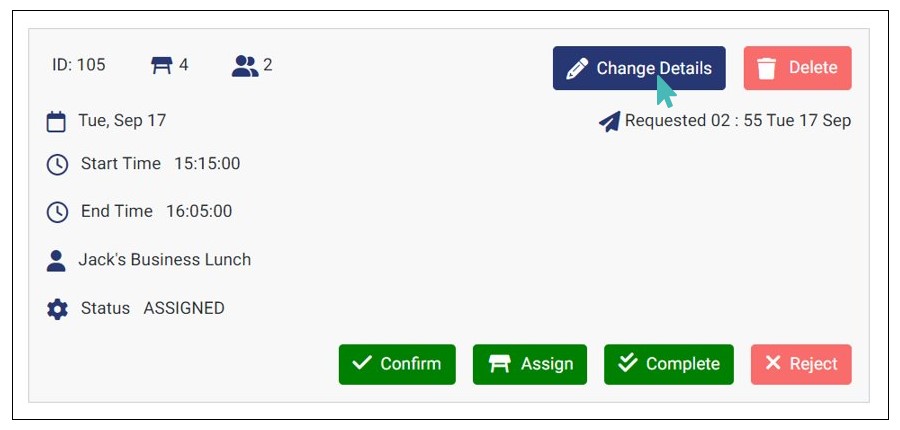
To edit table reservation details, go to Reservations and click the reservation you want to change its details from the timeline or respective statuses. Click Change Details and set the new reservation details on the pop-up that appears.
Let’s say you want to change the number of people, reservation time, and status of the reservation with the name John Doe. Simply click the reservation and tap the Change Details button.

Update the affected fields from the pop-up that appears.
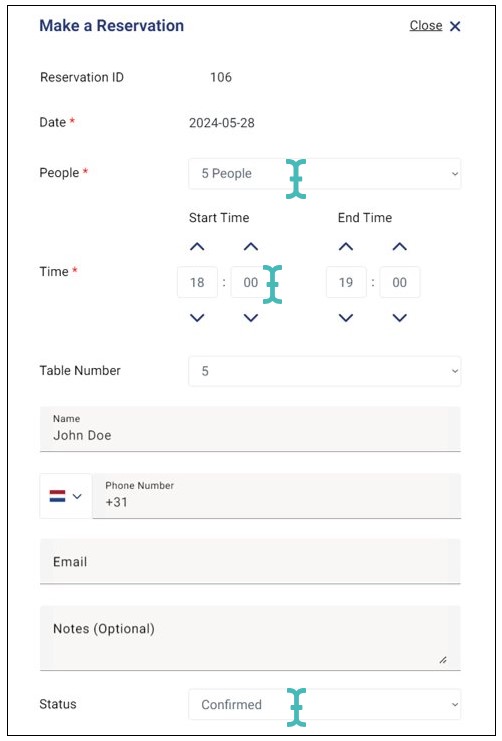
Finally, click Submit and the new reservation information will reflect immediately when you view the reservation. In this case, you will have updated the number people from four to five, reservation time from 1200 – 1250hrs to 1800 – 1900hrs, and status from open to confirmed.
Note
You can update the reservation time, number of people, table number, name, phone, email, notes, and status. However, you cannot change the reservation ID and date. Therefore, if you want to reschedule a reservation to a later date, you should consider deleting it and creating an entirely new reservation with the correct date.
Update Reservation Status
As highlighted in the previous section, a table reservation can have one of the five statuses, that is, Open, Confirmed, Assigned, Completed, or Rejected. GonnaOrder allows you to update a reservation from one status to another with a click of a button.
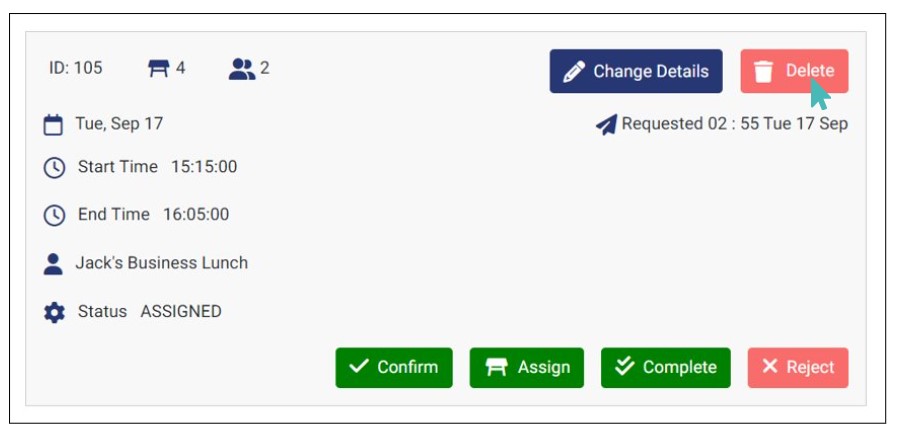
For instance, a reservation with the name Jack’s Business Lunch, is currently under the Open status. Let’s say you want to update its status to confirmed, assigned, completed, or rejected.
In that case, you can click it and select the appropriate action to update its status. For example, you can click Confirm to move the reservation to Confirmed.
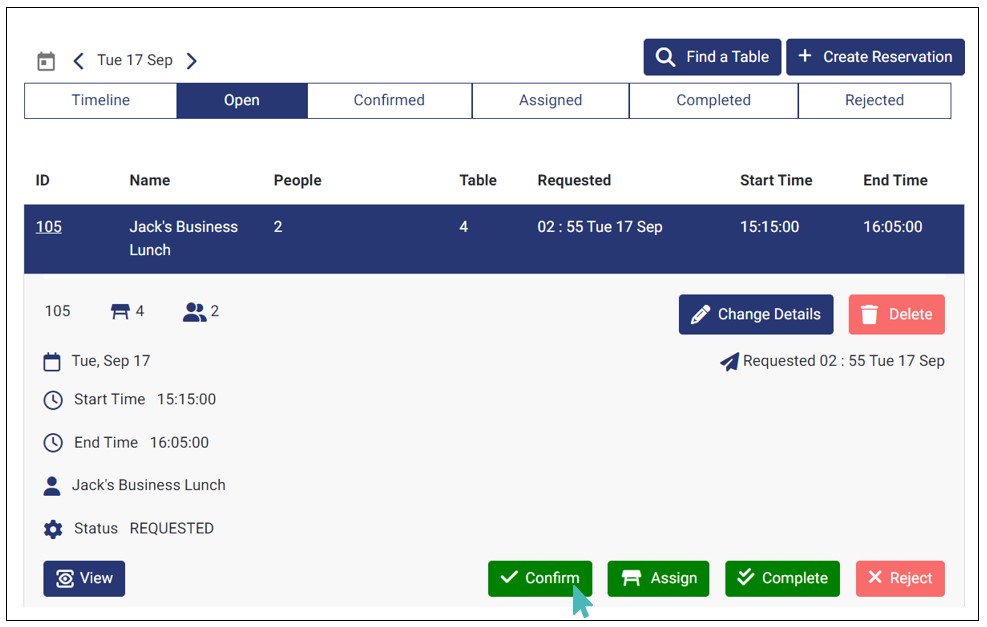
In doing so, you can now view the reservation on the list of Confirmed table reservations.
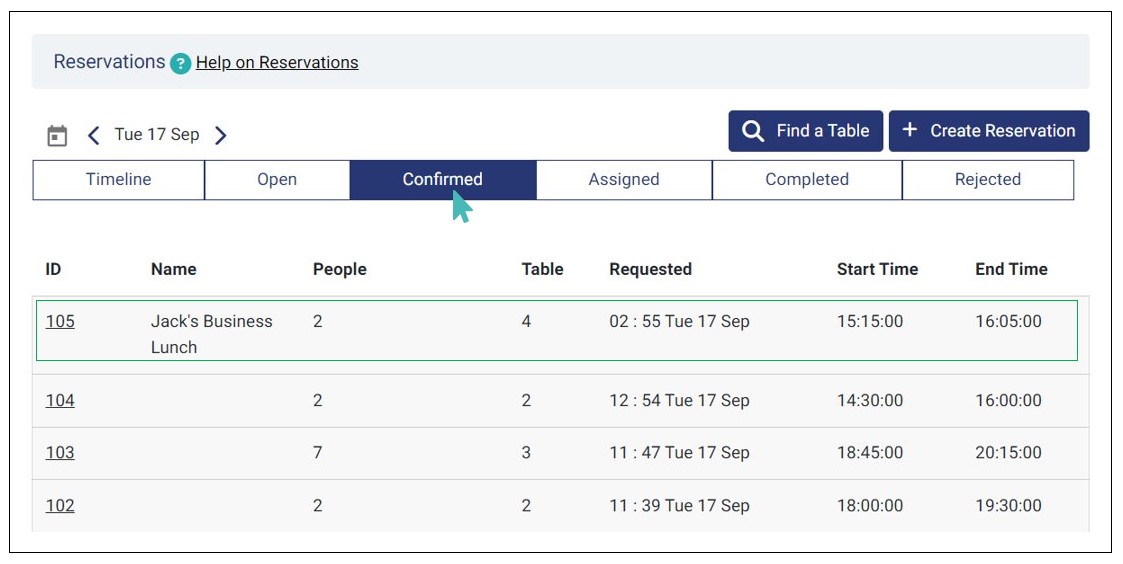
Similarly, if you click Assign, the reservation will move to the list of Assigned reservations.
The same will apply if you click Completed or Rejected. In that case, the reservation will go to the respective statuses.
Alternatively, you can update the status of a reservation from the Change Details section. To do so, go to the reservation you want to change its status and click Change Details.
From the Make a Reservation dialog appears, scroll down to Status and select the desired status from the drop-down list.
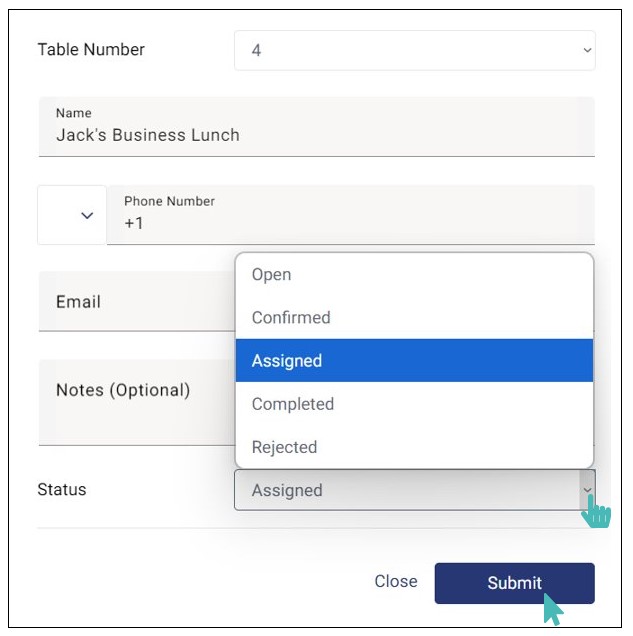
Finally, click Submit to save the new reservation status.
When you choose Open, the reservation will go to Open reservations while Confirmed updates the status of the reservation to Confirmed. The remaining options (Assigned, Completed, and Rejected) will update the reservation to the respective statuses.
Note
If you have enabled the email customer on reservation status change setting and have provided the customer’s email when creating the reservation, they will be notified about every status change.
Delete a Reservation
GonnaOrder allows you to delete a reservation if you no longer want to keep it in your list of reservations. To delete a table reservation, go to Reservations and find the reservation you want to delete from the timeline or respective statuses.
Click the reservation and then Delete.