The Order Capture tab under Settings is where store managers can configure delivery modes, Ordering, Show or Hide comments for orders, and One click ordering.
On This Page
- Select Delivery Options
- Enable Customer Ordering
- Activate Order Capture – Waiter Ordering
- Enable Shopping Basket Only Mode
- Allow Customer Authentication
- Activate Member Only Authentication
- Hide or Show Comments
- Add Items to Order with a Single Click
- Clear Basket and Order on Inactivity
- Set Billing Address as Hidden, Optional, or Mandatory
- Set Terms and Conditions Acceptance Mechanism
Select Your Delivery Options
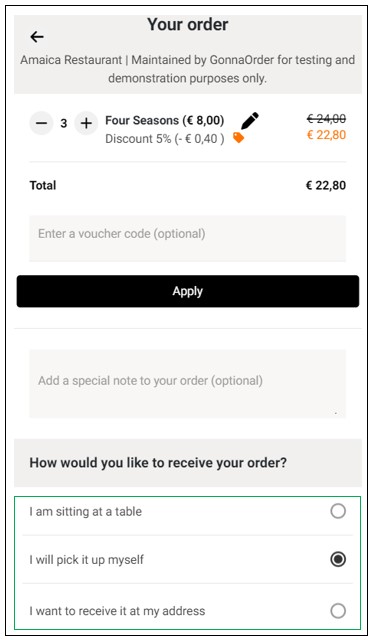
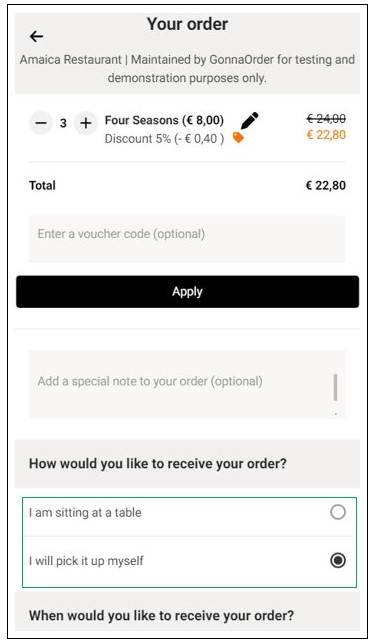
Delivery modes allow you to specify how you can serve orders to your customers. GonnaOrder has three delivery modes you can choose from or combine to serve your customers best.
- Serve at Table (Table Ordering): This delivery mode appears first on the list and will be useful to you if your restaurant has in-house serving tables. With this delivery mode, the customer usually sits within your premises and places an order via a QR code menu on the table or your GonnaOrder online store. This option will only work after you create tables for your store.
For more information on how create tables, refer to the Tables article. - Pickup: This applies to customers who want to pass through your physical store outlet while picking up their orders. Customers submit orders at the office or from home and pick them up in your physical store.
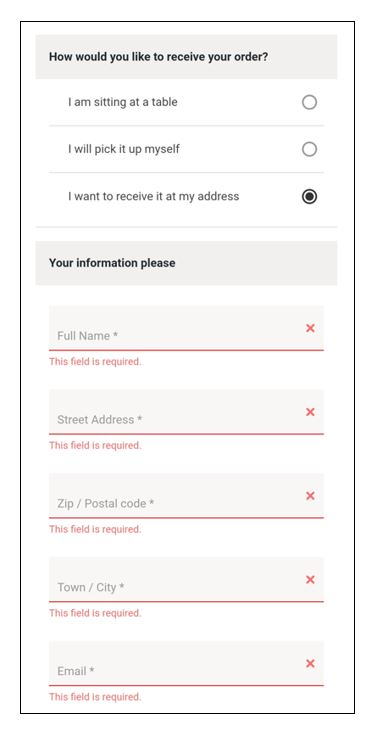
- Delivery at Address: With this delivery model, customers can place orders in your store and specify that they want them delivered at a specified address. You can select this mode if you have secured the services of riders or if you have other delivery logistics in place. Customers choosing this delivery mode for their order are required to provide identifying information about themselves and the location to which the order will be delivered.
To select delivery modes for your store, click on Settings from the store side menu and then click Order Capture. Selecting one or more delivery modes will automatically toggle the Ordering button to Active.
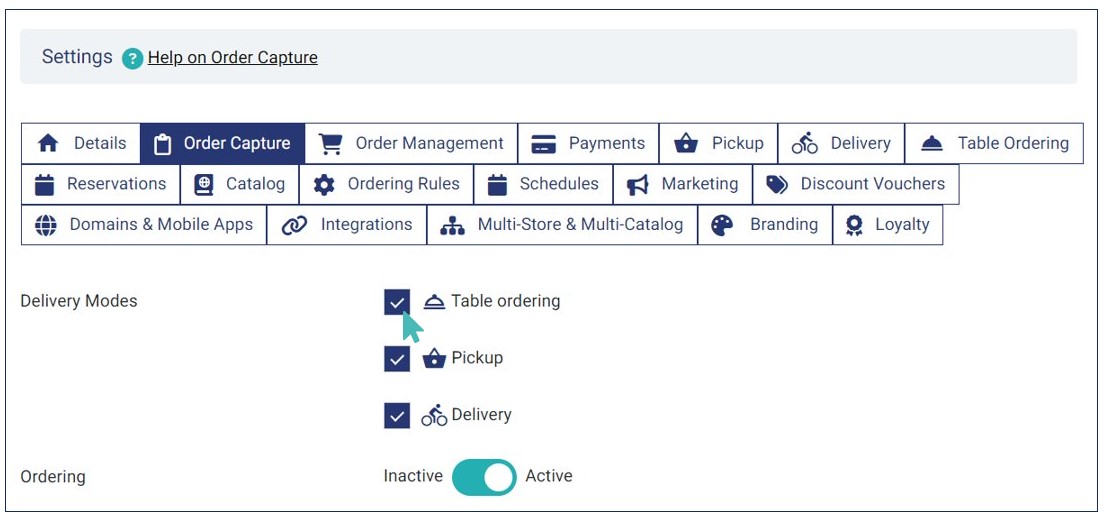
Only the delivery modes you choose are available when the customer places an order. For example, if you select all delivery modes, then all the three options are available to customers when placing an order. On the other hand, if you select table ordering and pickup, then the delivery option won’t be available on the customer’s end.
Note
Customers can choose the date and time for the Pickup and Delivery options. For more information on how to choose date and time, refer to the Configure Order Desired Time, Schedule and Slots Settings article.
Enable Customer Ordering
This ordering setting is used to control whether or not customers can submit orders to your store online. You can only enable customer orders if you have activated at least one delivery mode. When enabled, customers can add items to the basket and checkout. Store staff can also select items and submit customer orders using the order capture facility.
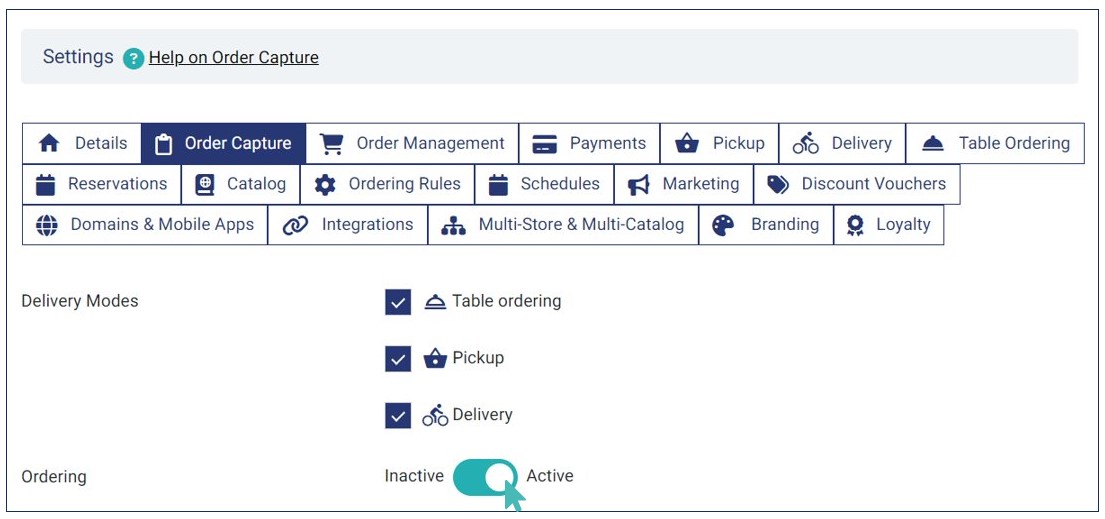
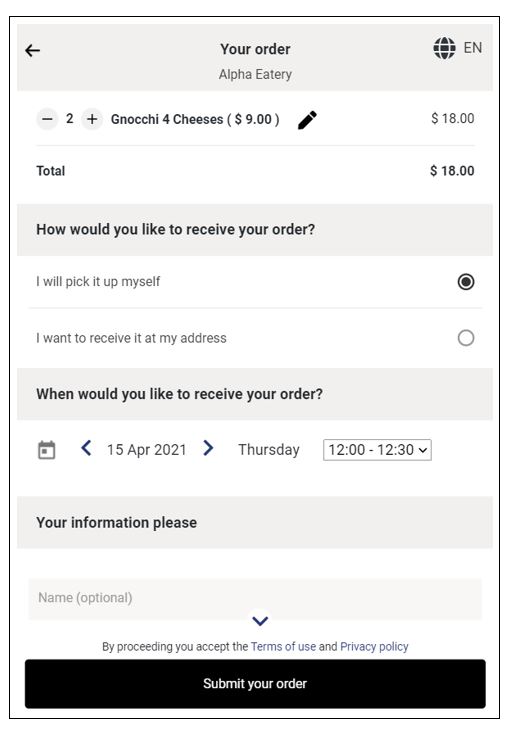
If you deactivate ordering, customers will use your catalog as a menu but cannot order or pay online. Two additional ordering settings appear when customer ordering is deactivated; Order Capture and Shopping Basket. By default, Order Capture is active while Shopping Basket is inactive when you deactivate customer ordering.
To deactivate customer ordering, toggle the ordering switch to Inactive.
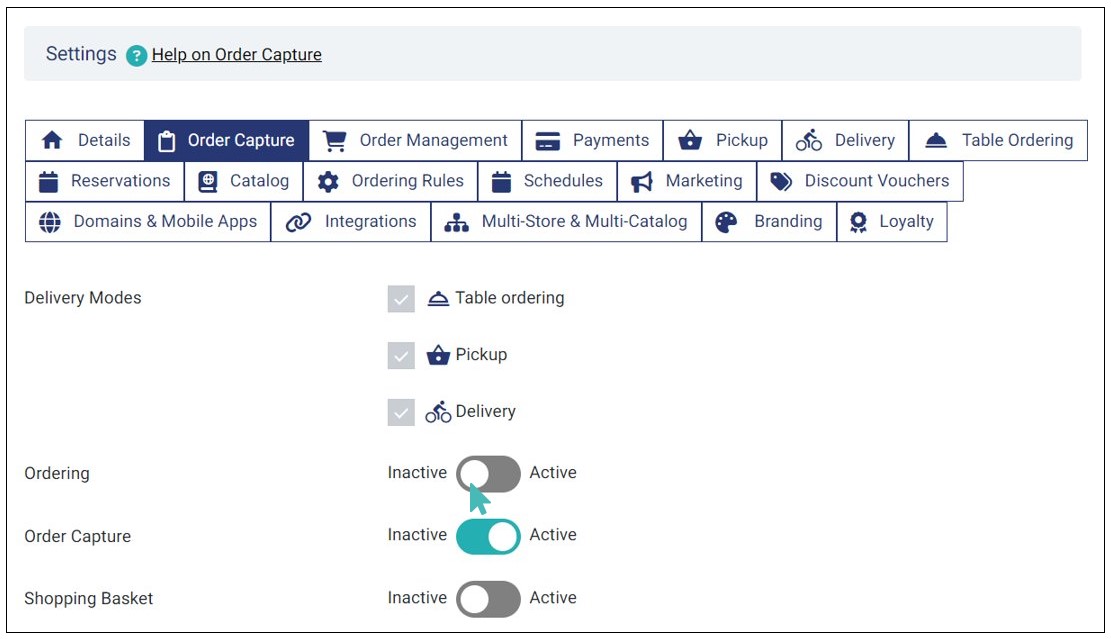
The customer menu will appear as follows when ordering is inactive:
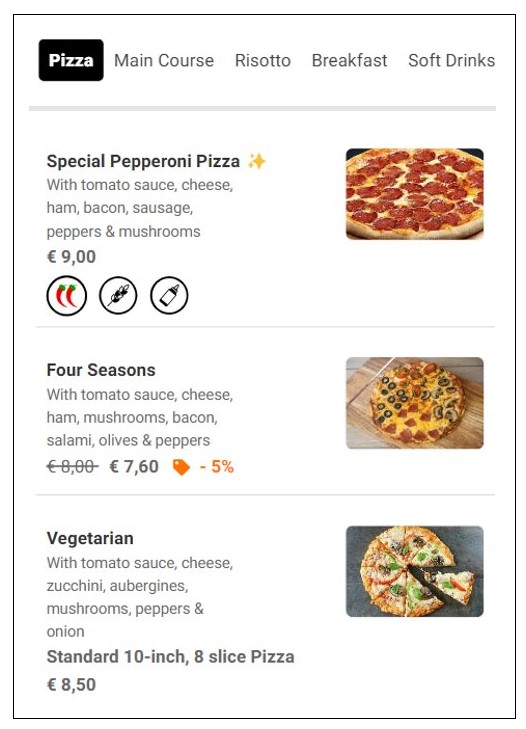
Activate Order Capture – Waiter Ordering
Order capture is a feature that allows you to capture orders for customers in GonnaOrder – as you would do on a POS. It makes it easier for waiters to submit orders on behalf of customers without leaving the store’s administration panel.
The feature is available to your store staff whenever customer ordering is enabled. Enabling customer ordering also activates order capture, so a store cannot support customer orders without also supporting staff orders.
However, it is possible to support staff orders while keeping customer orders inactive. In this scenario, the manager deactivates customer ordering but keeps the Order Capture setting active.
This configuration allows customers to view your menu without allowing them to submit or pay for orders online. In that case, the role of taking orders solely belongs to the store staff.
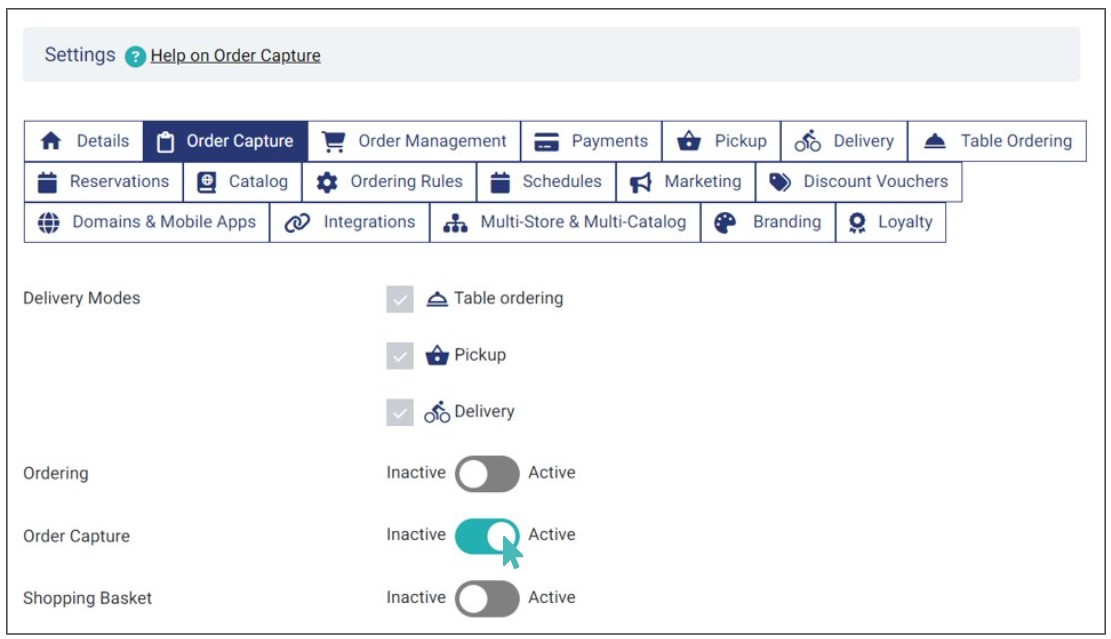
Below are the configuration checks to deactivate customer orders and enable staff orders:
Confirm that at least one delivery method is selected
Deactivate ordering
Activate order capture

Learn more about the order capture feature
If order capture is deactivated, neither the customer menu nor the order capture interface for admin users allows new orders to be submitted to your store. However, store users can still add items to the shopping basket, regardless of whether the Shopping Basket setting is active or not.
This scenario, where both customer and staff ordering is inactive, should be reserved for exceptional cases where the store does not wish to receive any orders.
Tips
- A store that supports customer orders (through the customer menu) must also support staff orders via order capture. Turning on ordering automatically enables the order capture setting.
- Store staff can add items to the shopping basket even when the shopping basket setting is deactivated.
- When Ordering is activated, the order capture feature and shopping basket are automatically activated and hidden from the Order Capture settings.
Enable Shopping Basket Only Mode
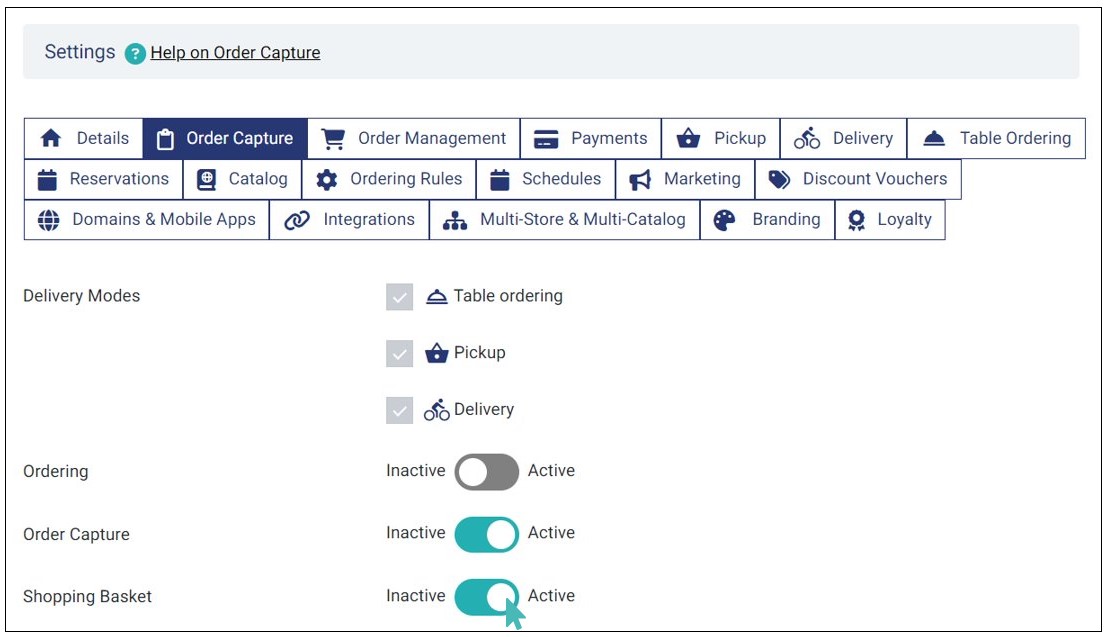
The Shopping Basket feature lets customers browse your menu and add items to their basket, even when ordering is inactive. While customers can’t place orders when ordering is deactivated, they can still explore the menu and prepare their basket for later.
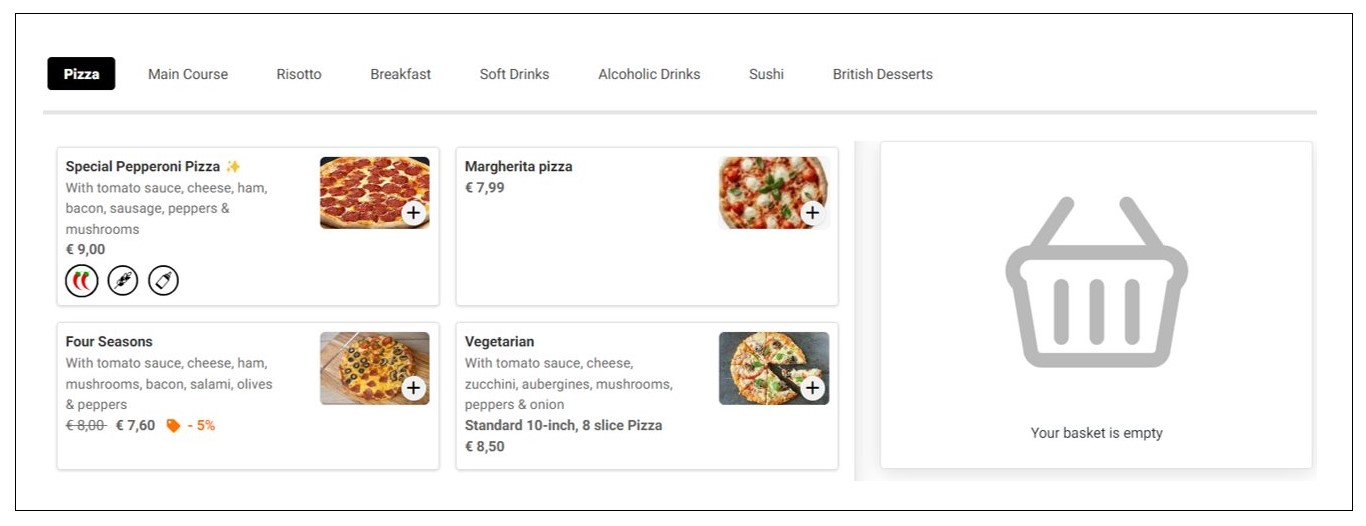
Here is how the customer interface appears when the user is yet to add any item to the cart.
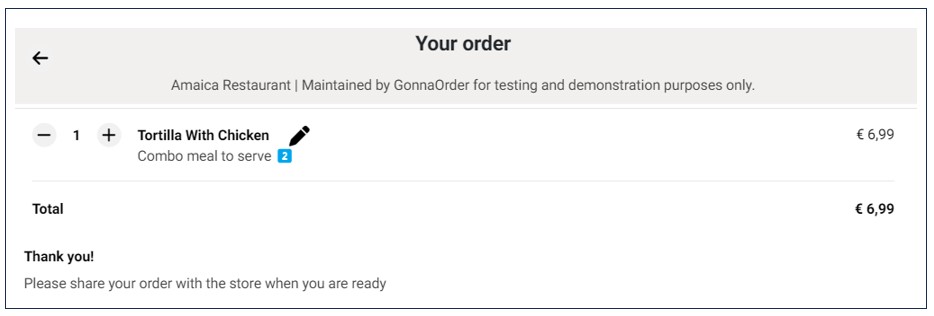
When this setting is enabled (Shopping Basket active & Ordering inactive), desktop users will see their selected items displayed on the right side of the catalog. Below is an example of how the shopping basket appears when a customer selects an item from the menu.
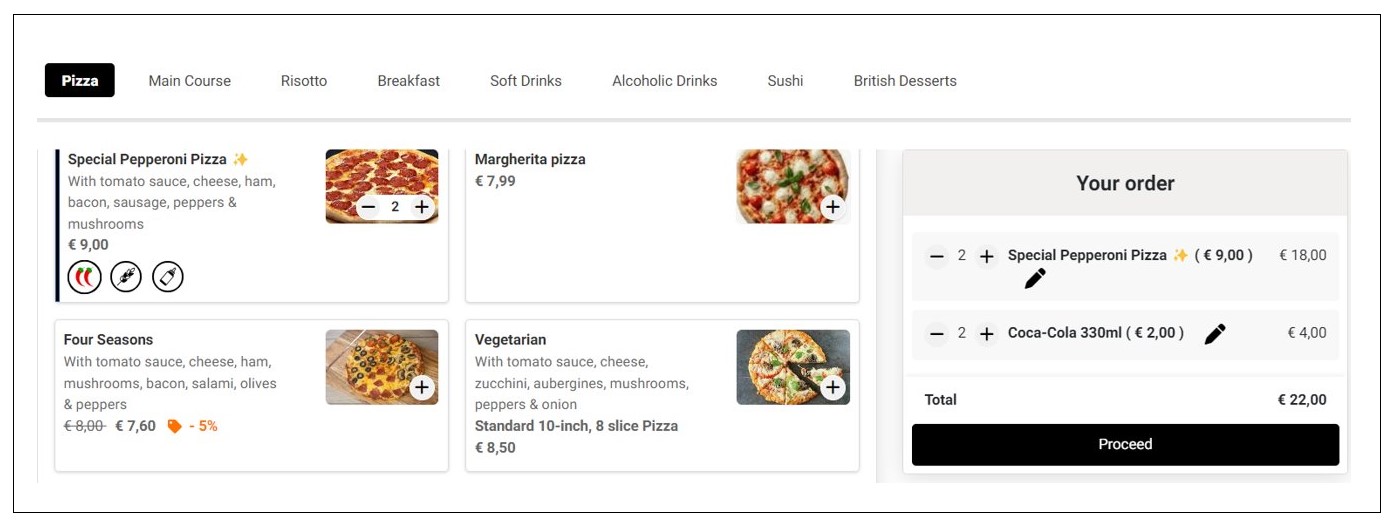
However, on clicking Proceed, the order will not be sent to your Orders Dashboard. Instead, customers will need to manually share it with store staff for further processing. That is to say, you cannot confirm or reject the order through your store dashboard, and neither can you print nor download the order.
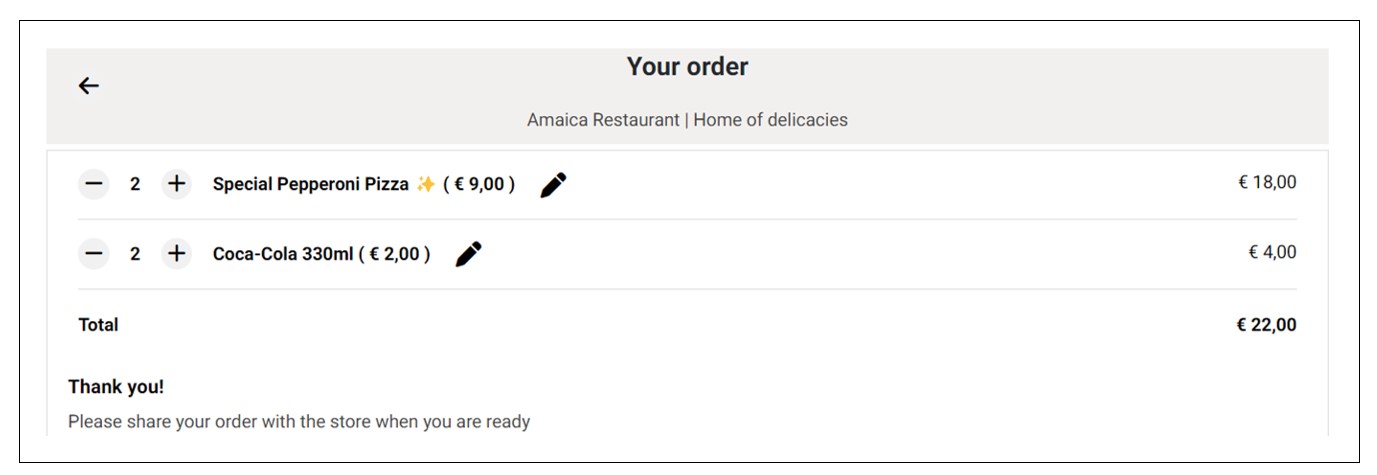
When you activate customer ordering, the Shopping Basket setting is automatically enabled and disappears from the Order Capture Settings.
Deactivating ordering and shopping basket turns your catalog into a digital, view-only menu. Customers cannot add items to the cart or submit orders.
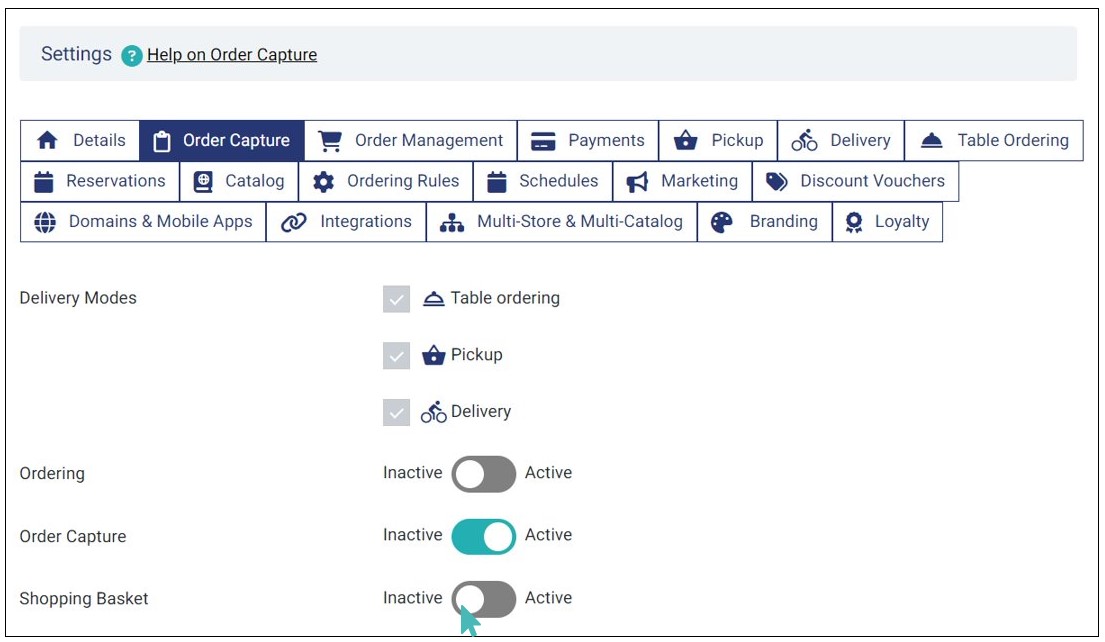
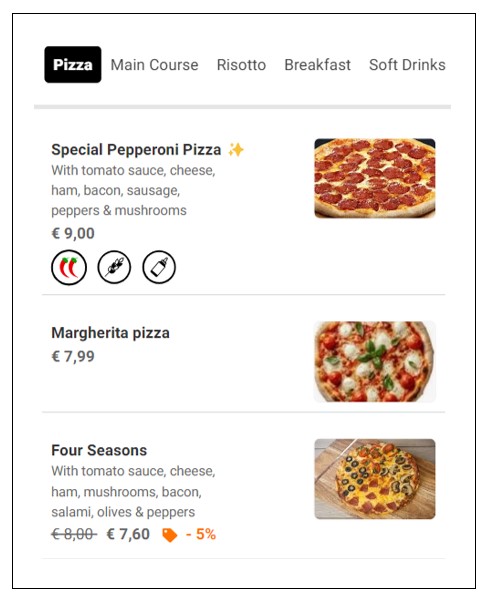
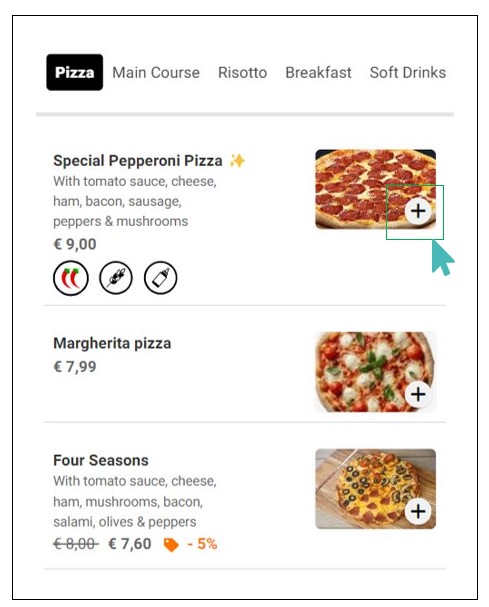
Here is how the menu compares when you deactivate shopping basket versus when it is active on mobile interface.
Notice that when shopping basket is inactive, the plus sign is only be available if an item has options or a long description. Otherwise, it will not appear on the interface.
Tips
- You can create a view-only digital menu for your store by deactivating ordering and shopping basket.
- The shopping basket feature only works with the customer menu. It does not affect how store staff operates the order capture facility.
- By default, shopping basket is inactive when you deactivate customer ordering.
Allow Customer Authentication
The customer authentication feature enables customers to easily place orders in your store without the hassle of entering their details every time they want to order. It allows them to login with their social accounts or email, facilitating smooth ordering in the future.
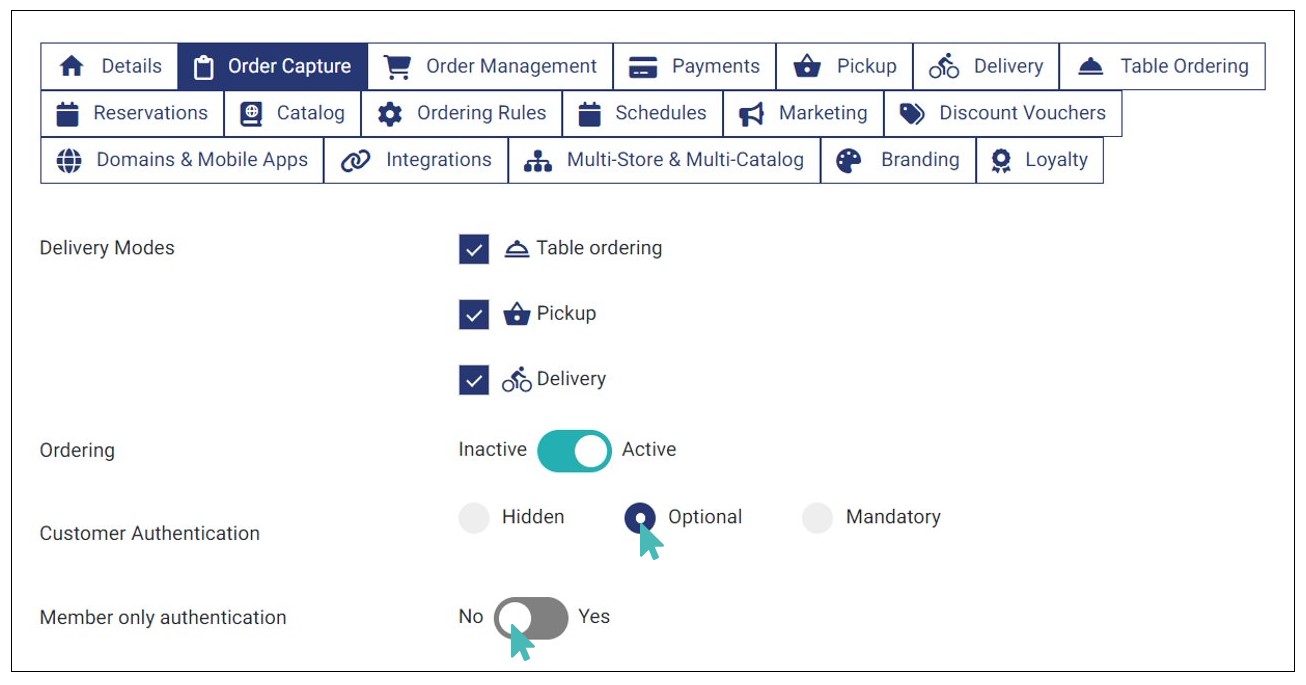
You can set customer authentication as Hidden, Optional, or Mandatory depending on your needs. Simply navigate to your store Settings > Order Capture and choose the preferred option under the Customer Authentication setting.
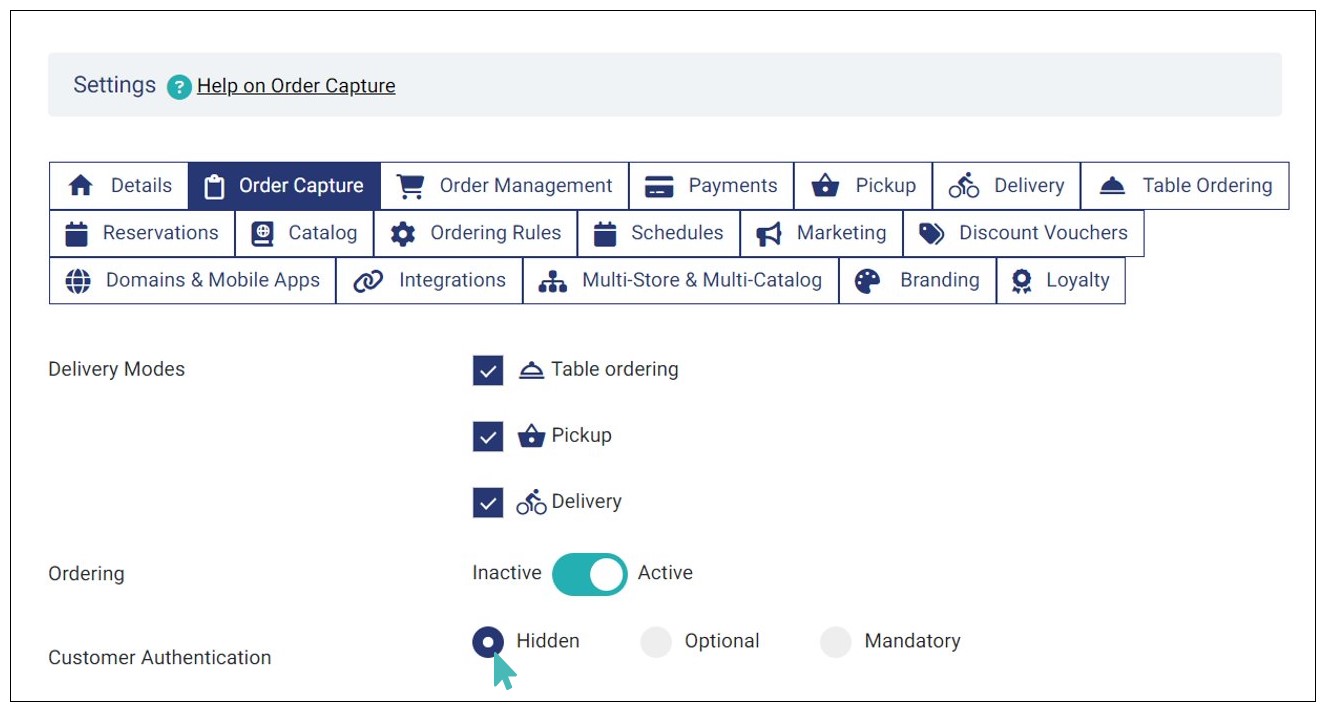
When customer authentication is set to hidden, customers can submit the order without signing up or authenticating themselves. Also, the login options are not available in the customer checkout page.
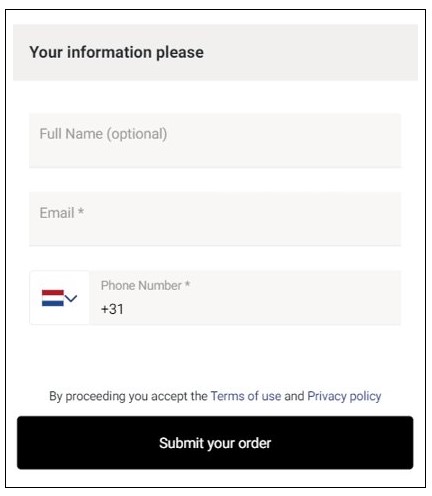
When Customer Authentication is set to Optional, customers can login using their email or social accounts and then proceed to submit the order. Also, they can submit an order without logging in. The login options are available on the checkout page.
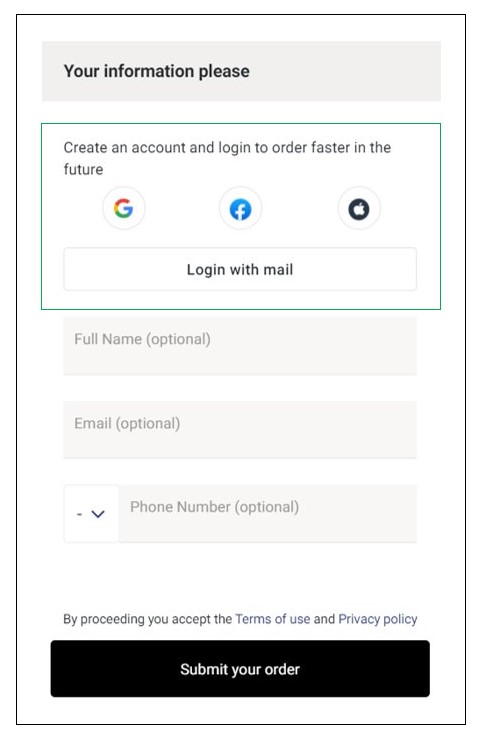
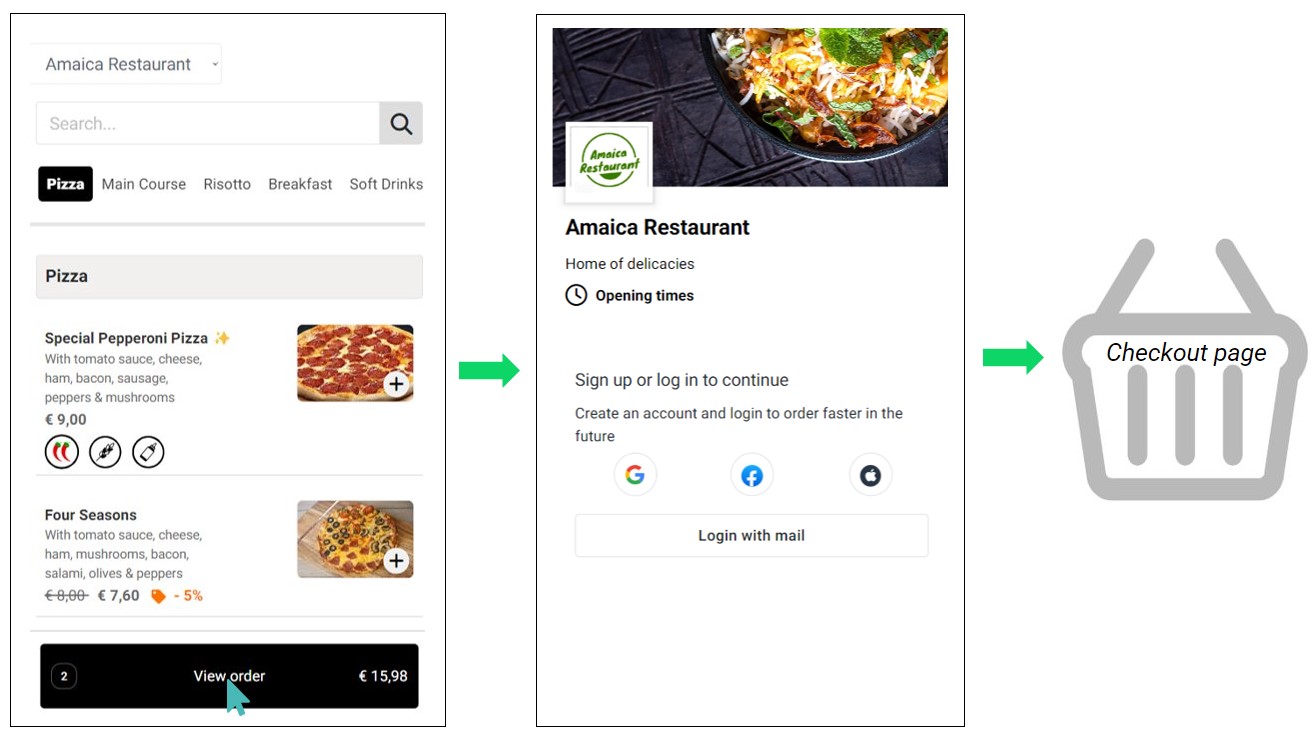
On the other hand, when customer authentication is set to Mandatory, customers must login before submitting an order. When a customer selects items and proceeds to checkout, they are redirected to login page where they must login to continue to the checkout page.
The ordering process is as follows:
Activate Member Only Authentication
When you set customer authentication as optional or mandatory, an additional Member only authentication setting appears. You can activate or deactivate this setting by toggling the button to Yes or No respectively. By default, the member only authentication setting is inactive.
As the name suggests, the member only authentication controls who can submit an order at your store. This setting helps businesses like caterings that work with a set of people and want to offer services to a specific group.
Tip
The Member only authentication setting is designed to limit the users who can submit orders to your store. Only existing customers can submit orders to your store when you activate this setting.
Since this setting is associated with customer authentication, you can achieve the following combinations:
- Customer Authentication – Optional & Member Only Authentication – Inactive
- Customer Authentication – Optional & Member Only Authentication – Active
- Customer Authentication – Mandatory & Member Only Authentication – Inactive
- Customer Authentication – Mandatory & Member Only Authentication – Active
Here is how each scenario impacts order submission in the customer interface.
Customer Authentication – Optional & Member Only Authentication – Inactive
When customer authentication is optional and member only authentication is inactive, customers can place orders without logging in. They may choose to log in to an existing account or register a new one, but neither is required.
The customer checkout page will contain the sign in options using social accounts as well as login via mail.

Customer Authentication – Optional & Member Only Authentication – Active
Like the first scenario, customers can submit orders without logging in. However, if they choose to log in, they must be a store member who has previously ordered using the same credentials.

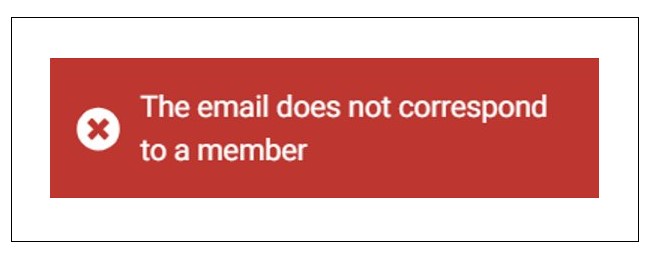
If a customer tries to login with a new account (one that is yet to be registered in the store), then a member validation message appears, and they cannot submit the order unless they provide an existing account login credentials.
Customer Authentication – Mandatory & Member Only Authentication – Inactive
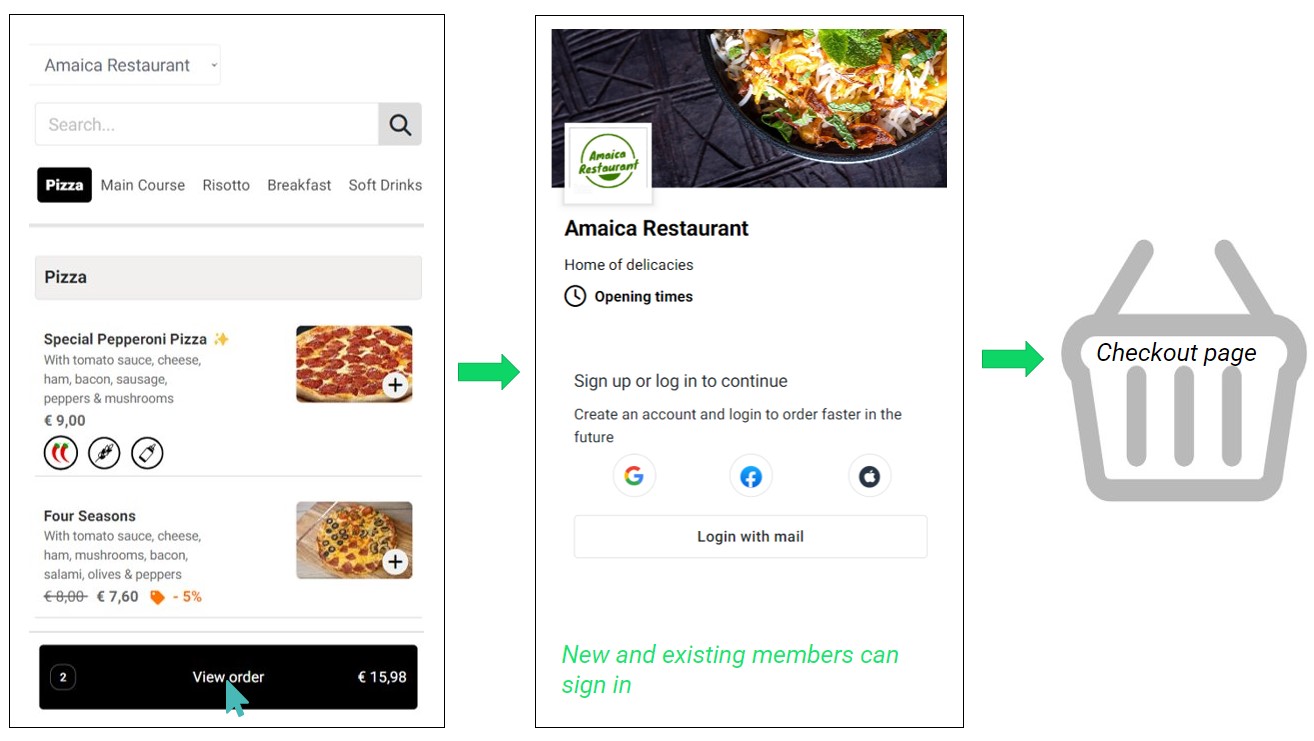
When customer authentication is set to mandatory, customers must login or sign up before submitting an order. Combining this with the inactive member only authentication, a customer can login with an existing or a new account and submit the order.

With this setting, the customer has to login to proceed to the checkout page. Therefore, once the customer selects the order items and click Proceed (desktop) or View order (mobile), they are redirected to a login page. On this page, they can then login using an existing account details or sign up with new account details to proceed to the checkout page and submit the order.
This setting comes in handy when you want customers to provide the details for various reasons, such as tailoring marketing campaigns or analyzing their data to enhance services.
Customer Authentication – Mandatory & Member Only Authentication – Active
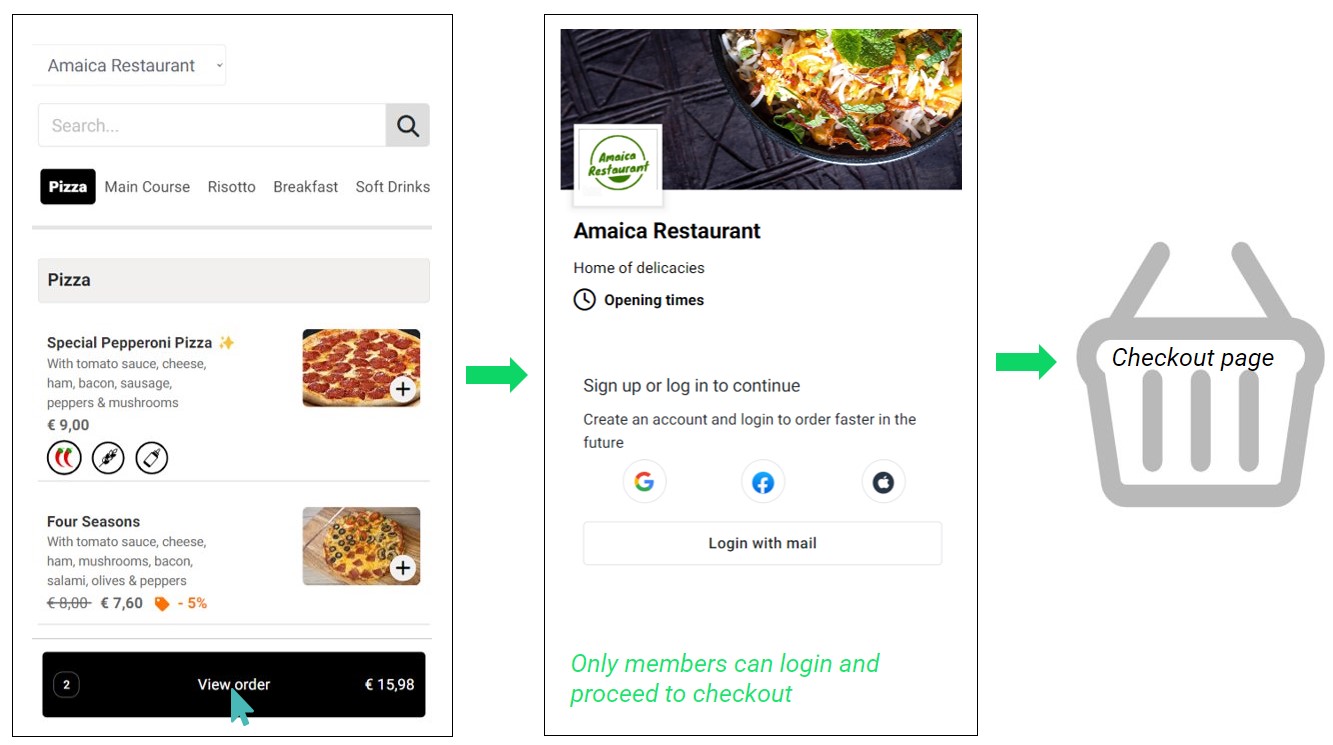
Lastly, you can set customer authentication as mandatory as well as the member only authentication setting. This setting requires customers to login before proceeding to checkout or submitting the order. However, unlike the previous combination, it is exclusive to registered members only. Therefore, the customer must login using registered account credentials.

Non-existing or new users cannot login or sign up to proceed to the checkout page. Instead, they will get a member validation error message.

To become a member, a customer can provide their details to the store owner who can then add them to the store. See more on how a store admin can Add a New Customer to the store.
Here is how the ordering process looks like:
Note
This setting is helpful when a store owner wants to offer services to existing members only. While the store admin can still add new customers, they must be careful when setting this combination as it can lead to missed revenue opportunities from new customers, especially those who want to register themselves to the store.
Hide or Show Comments
A customer may submit two types of comments alongside their order: order comments and order items comments.
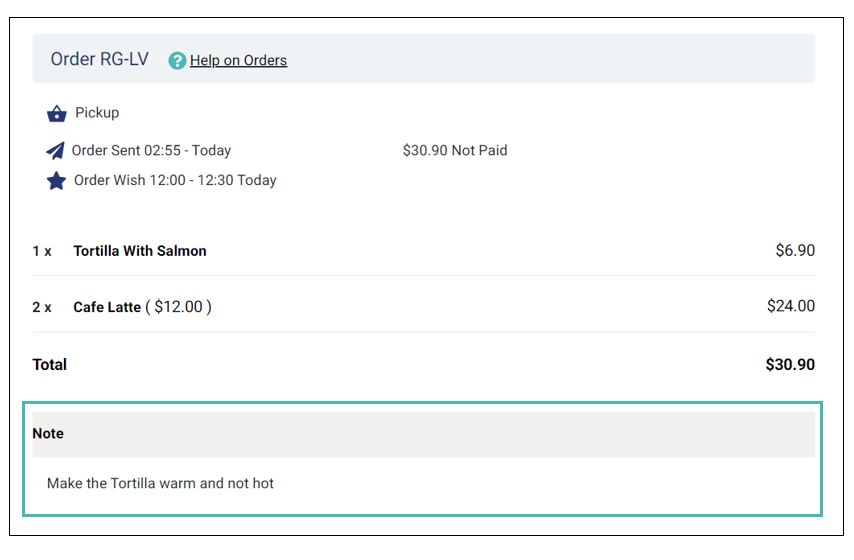
Customers can type order comments on the checkout page just before submitting an order. This comment will then appear as a note at the bottom of the order details page when you view the order in your store.
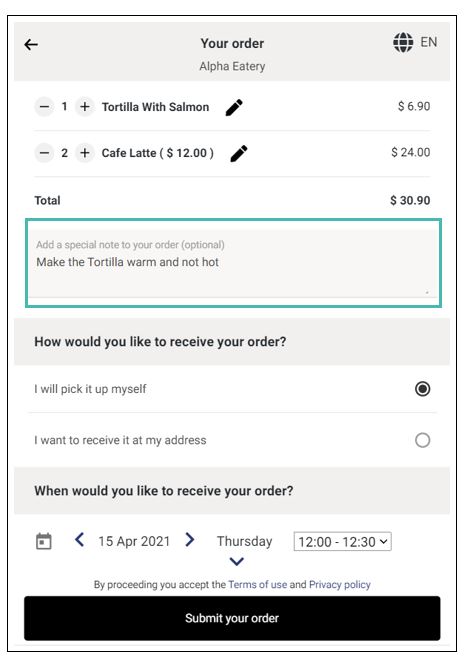
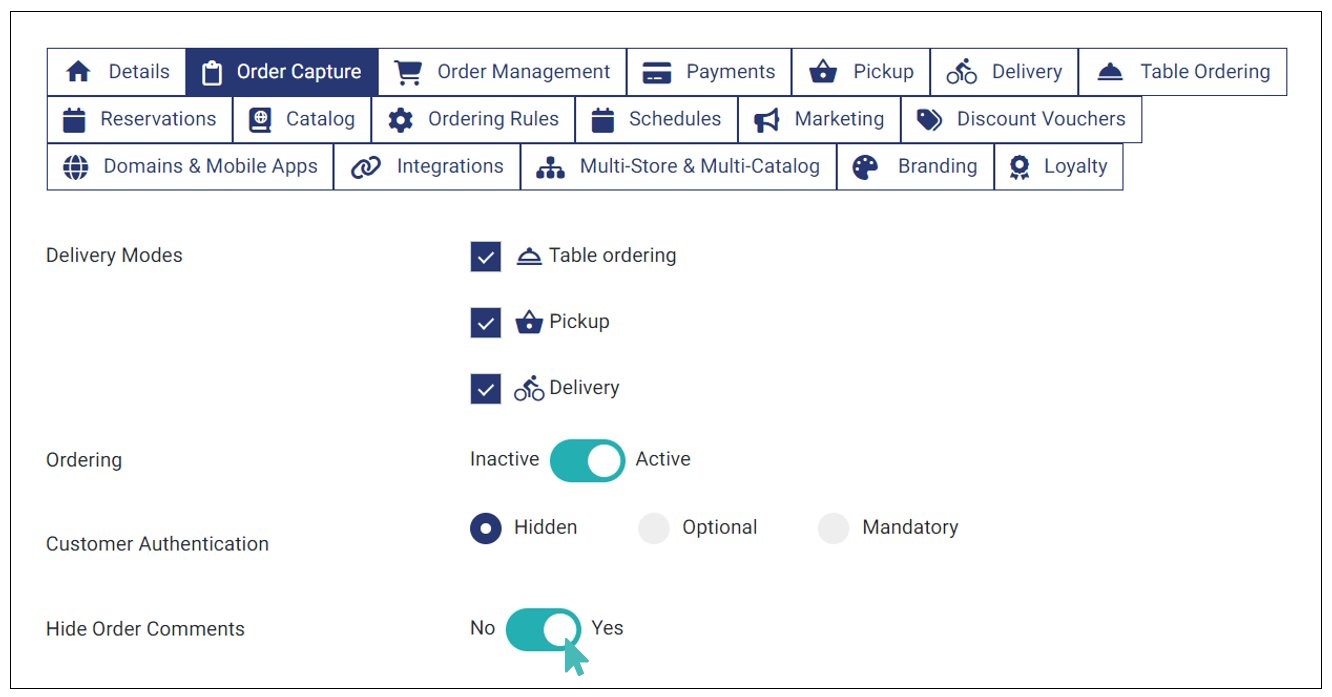
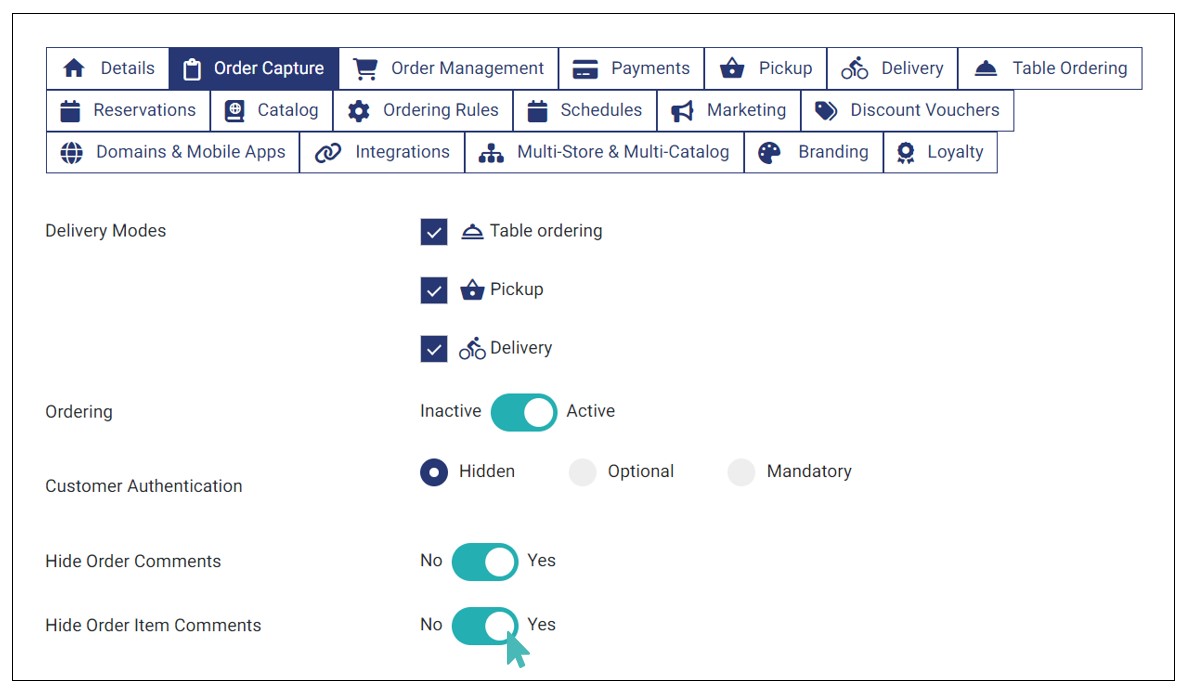
You can hide the order comments field from customers, so you no longer receive special instructions or comments. Visit your store dashboard and go to Settings > Order Capture. Find the Hide Order Comments switch and toggle to Yes. Customers will no longer be able to submit order comments along with orders as the comment field will not appear.
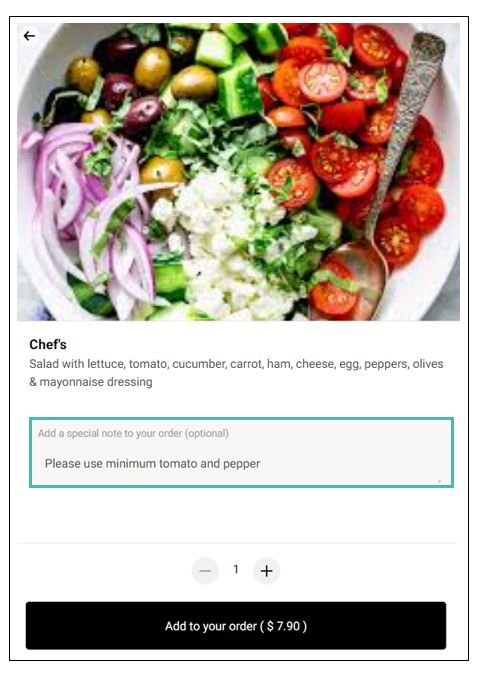
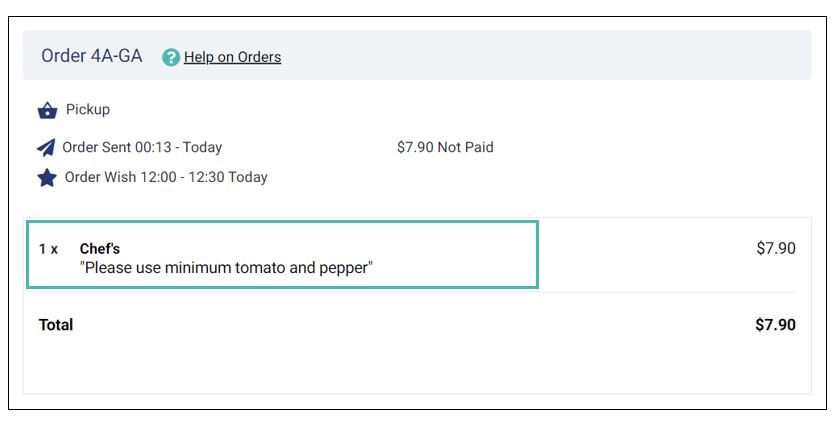
Other than order comments, customers may also add a comment for every item they include in their order. The comment input field is available to users on the product details page just before one adds an item to the cart. Order items comments appear under the item name on the order details.
To hide order items comments, go to your store dashboard, and under order capture settings, toggle the Hide Order Items Comments switch to Yes. Customers can no longer leave comments for the items they add to the cart as the comment field will not appear.
Add Items to Order With a Single Click
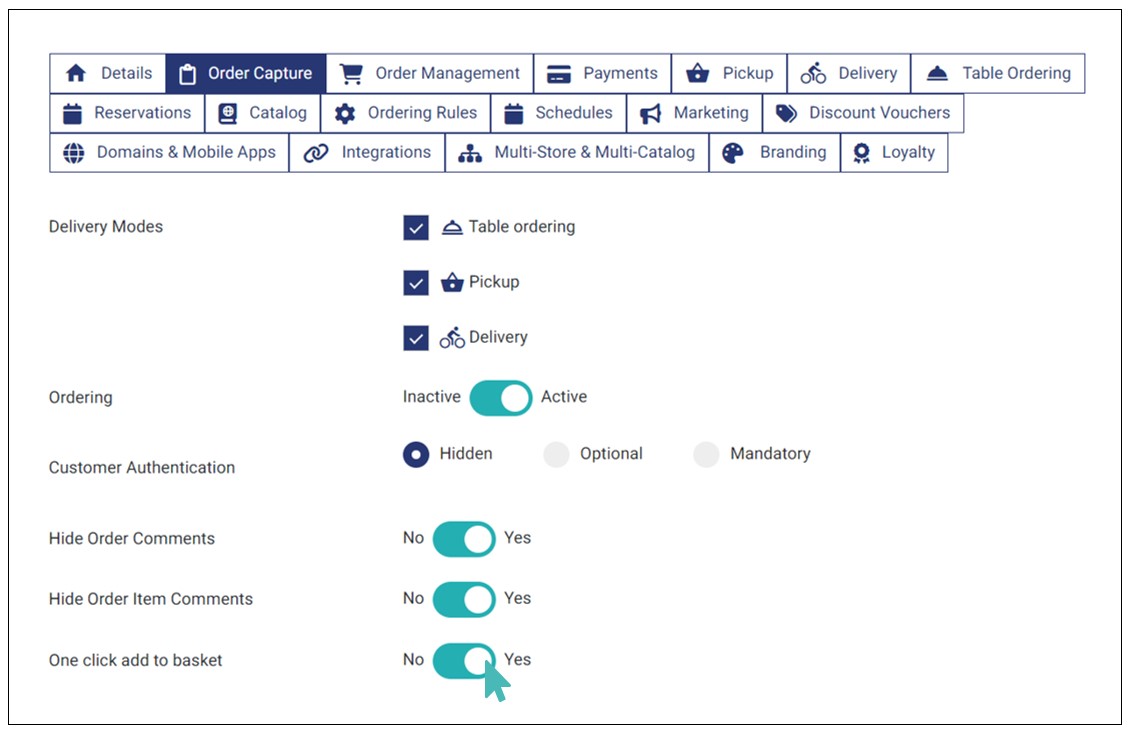
A customer can add an item to their order with a single click. This helps reduce the number of clicks a customer makes to complete an order. By default, this setting is enabled for new stores.
You can enable this feature by going to Settings > Order Capture and toggling the button labeled One click add to basket to Yes.
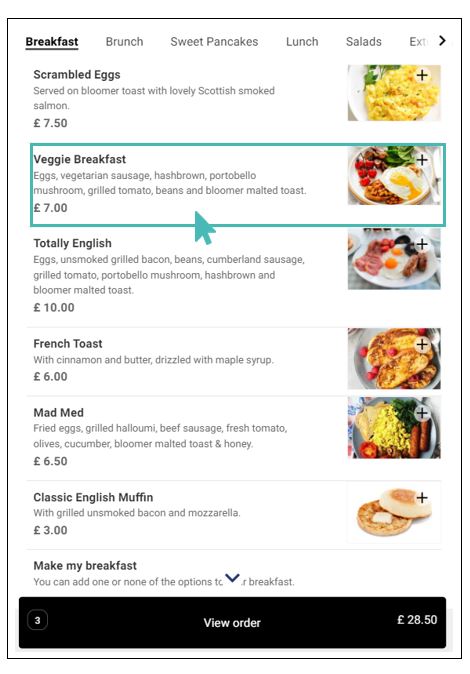
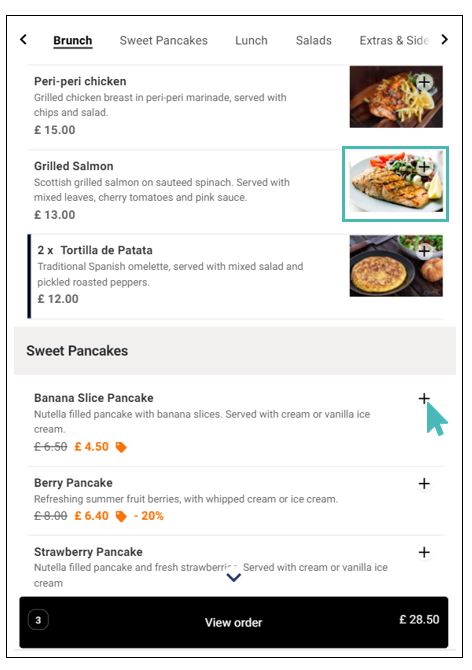
Customers can click on the + symbol on a store product to add an item to the shopping basket. If a store product has an image, then clicking on the image once will add the item to the shopping basket.
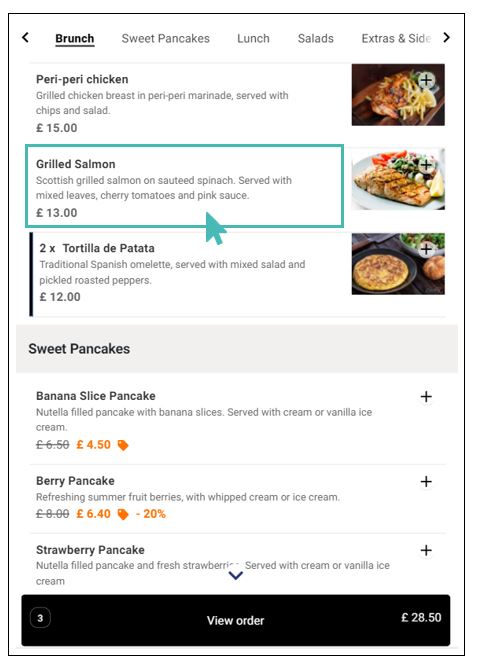
If the user wants to view the details of the store product, they should click on the item’s name, description, or price. Additionally, a one-click add-to basket only applies to items not associated with option groups or price variants.
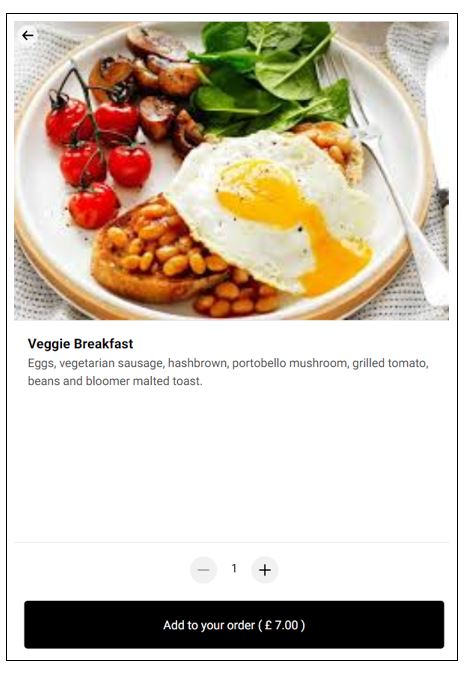
When One click add to basket is inactive, customers can click anywhere on the product(including the image and the plus symbol) to view the product details page. The customers can then click Add to your order to add the item to the basket. This means more clicks even when the customer knows what they want to order.
Tip
- The one-click add-to-basket feature is enabled for all new stores by default. You can turn off this setting if you want customers to always view the long description before adding an item to their order.
- One-click add-to-basket only applies to items not associated with option groups or price variants.
Clear Basket and Order on Inactivity
GonnaOrder understands the importance of customer privacy. As a result, we have integrated a mechanism whereby a storeowner can enable customers to clear basket and order on inactivity. This means that customers’ basket and order can be automatically cleared if they’re inactive for some time.
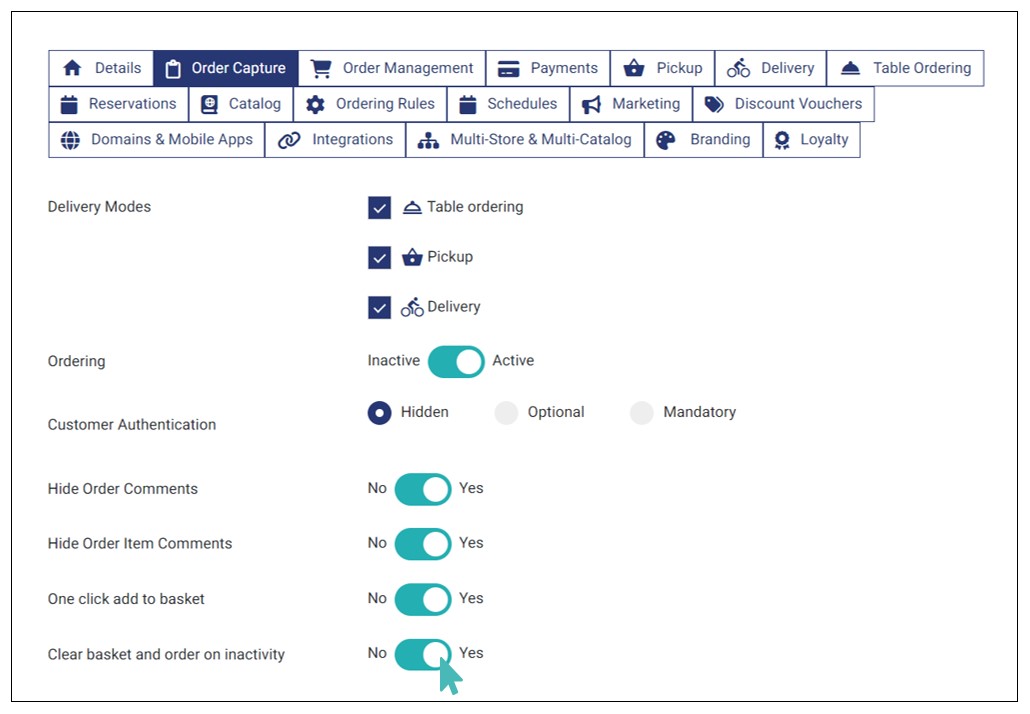
To activate this setting, go to Settings > Order Capture and toggle the Clear basket and order on inactivity switch to Yes.
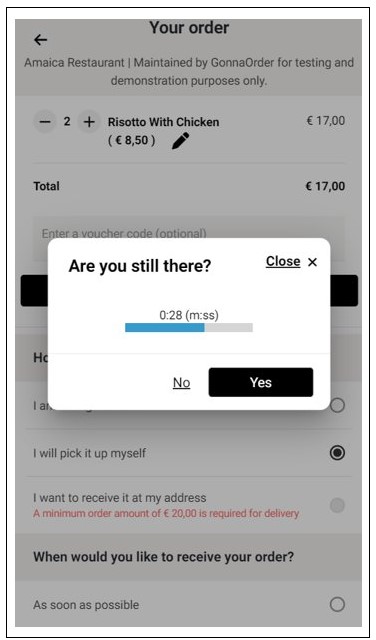
When activated, customers receive a pop-up notification informing them about their inactivity on the following pages:
Landing/menu page (if there’s an item(s) in the cart)
Item details page (if there’s an item(s) in the cart)
Checkout page
Thank you page
They can choose whether to continue ordering by clicking Yes or clear their basket and order by clicking No. If no action is taken and the countdown elapses, then the order and basket as well as other details such as delivery address (in the case of checkout & thank you page) are automatically cleared.
When deactivated, the basket and order details on the checkout page are not cleared even if the customer stays inactive for long.
Note
- The clear basket and order on inactivity setting is important for the pickup stores. On their phones, customers want to be remembered to avoid retyping their details but on the pickup store screens they would like their details to be forgotten to avoid exposure of personal data. Therefore, activating this setting on pickup store screens can be crucial in protecting customer privacy.
- By default, the clear basket and order on inactivity is inactive for new stores.
- Customers only see the inactivity popup when they have added at least one item to the cart.
Set Billing Address as Hidden, Optional, or Mandatory
GonnaOrder lets you determine whether customers need to submit their billing address information when submitting an order. You can set this requirement as:
Hidden
Optional
Mandatory
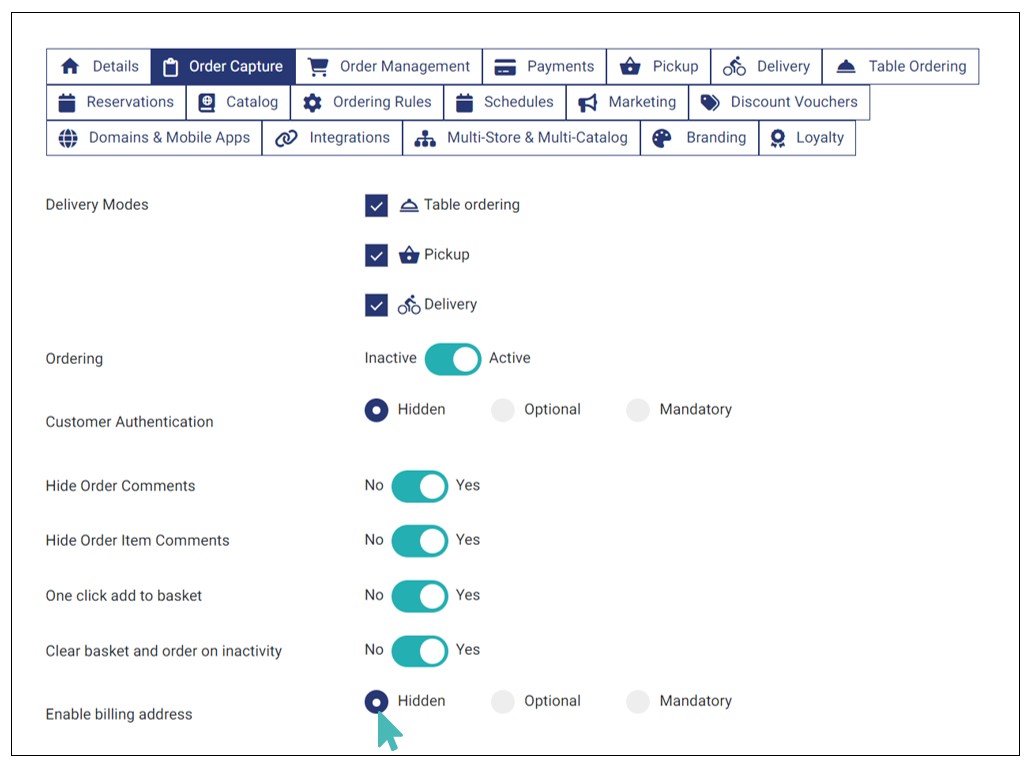
To set billing address details as hidden, go to Settings > Order Capture and scroll down to find Enable billing address. Select Hidden to proceed.
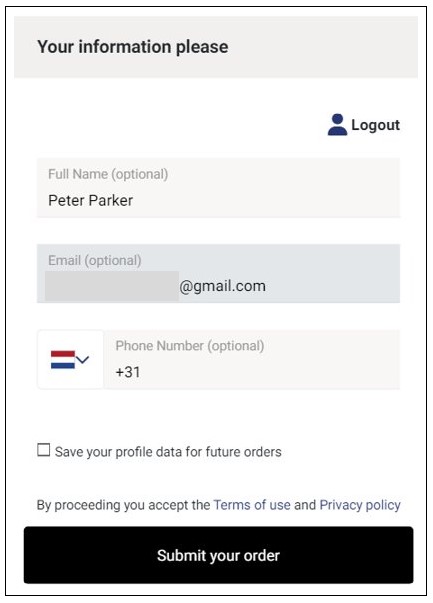
When set as hidden, the billing address fields will not appear on the customer’s checkout page. Therefore, they will not need to provide these details when submitting the order.
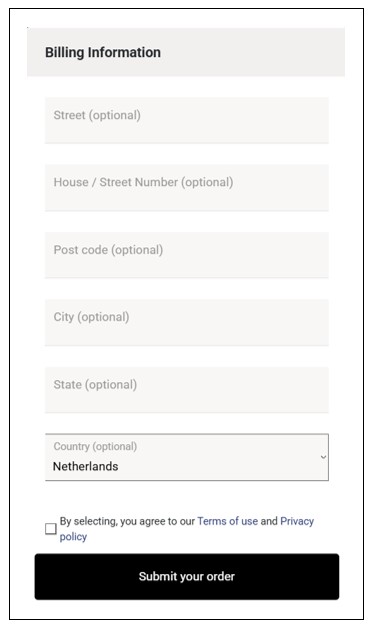
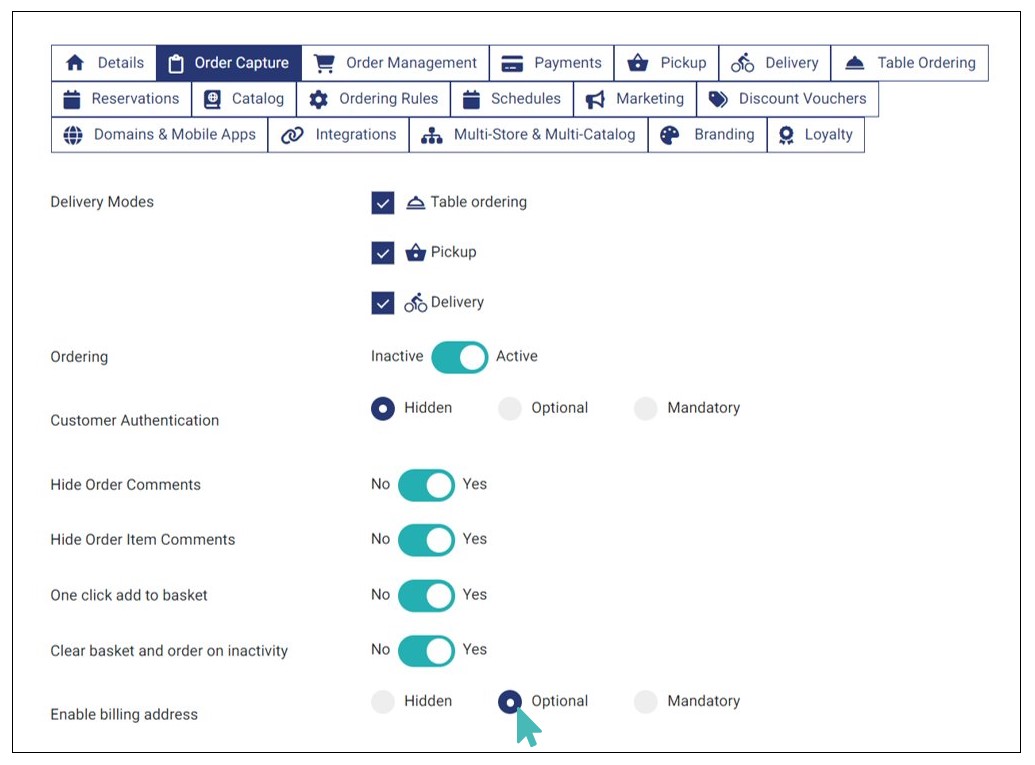
If you choose Optional on the Enable billing address field, the billing address fields will appear but as optional on the checkout page. Therefore, customers can submit the order without these details.
Lastly, you can set billing address as mandatory. Select the Mandatory option on the Enable billing address section.
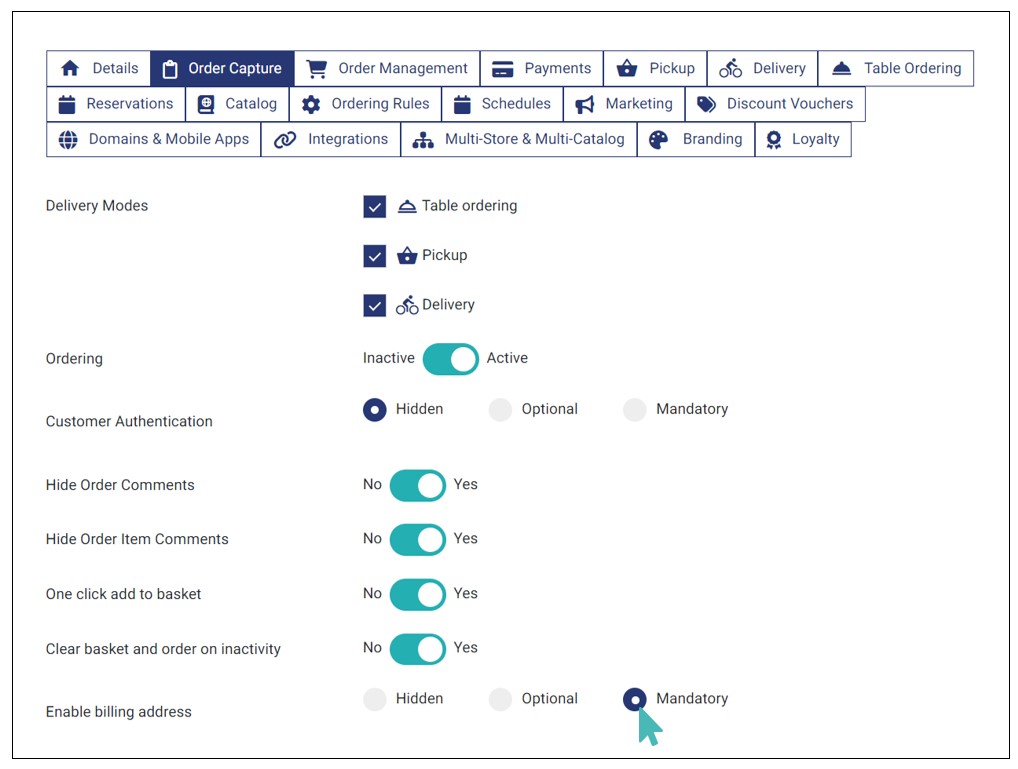
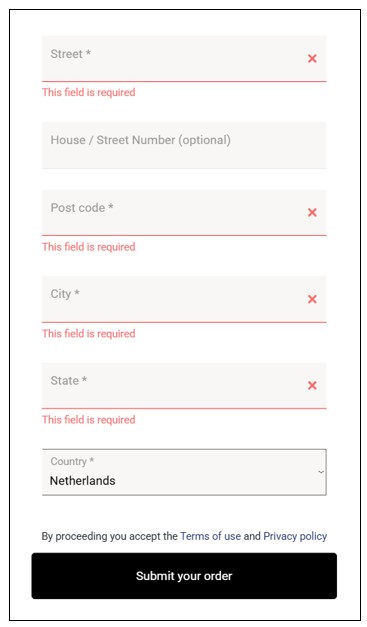
With billing address set as mandatory, customers cannot submit the order without providing their billing information details.
Note
- The House / Street Number field is always optional regardless of whether billing address is set as optional or mandatory.
- The country field is prepopulated with the store’s country.
Customers do not need to manually re-enter their billing information for future orders. They can simply enter their billing information once and save it. GonnaOrder will automatically fill in their billing information when they login (via social media accounts or email) again to place an order in the future.
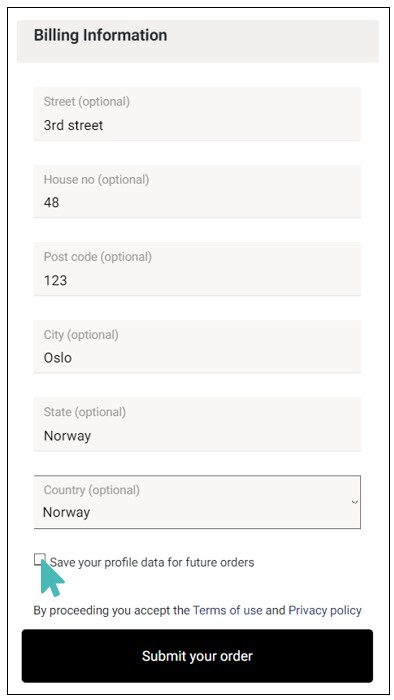
Note
- The billing information is collected as it is required by the payment providers. Therefore, if you have integrated one of our supported payment providers, it’s crucial to set it as Mandatory to streamline the payment process.
- By default, the billing address field is set as hidden for new stores.
Set Terms and Conditions Acceptance Mechanism
User consent is crucial when it comes to handling customer data and complying with various regulatory requirements. GonnaOrder allows you to set how customers can accept the platform’s terms and conditions when running your store. This ensures your GonnaOrder store complies with regulations that govern various payment providers.
You can set terms and conditions acceptance mechanism as Implicit or Explicit. This determines how customers accept your store’s terms and conditions and privacy policy during checkout.
Implicit Consent
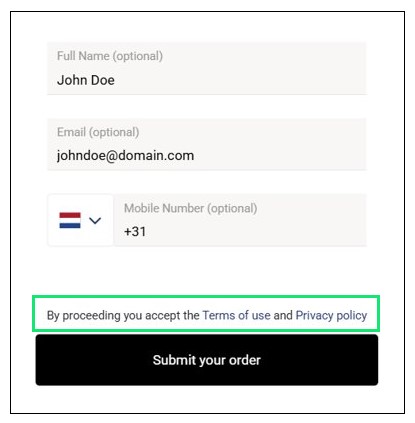
This consent mode enables you to display a message of the terms and conditions acceptance. However, the customer doesn’t need to take any action to accept the terms and conditions during checkout. Instead, when the customer clicks Proceed to Payment or Submit your order, they automatically accept the terms and conditions.
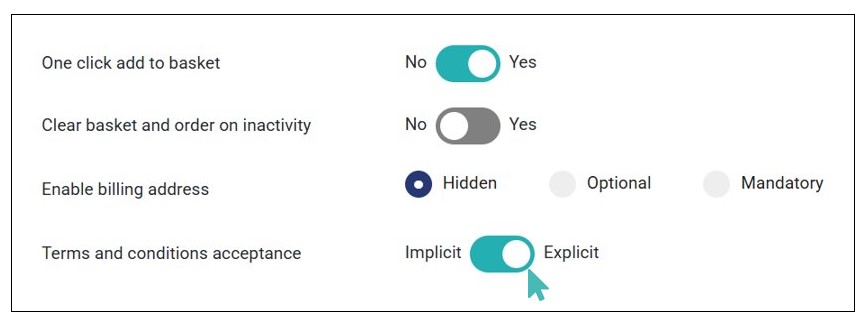
To set implicit as the terms and conditions acceptance mode, navigate to your store Settings > Order Capture. Find the Terms and conditions acceptance setting and toggle the button to Implicit.
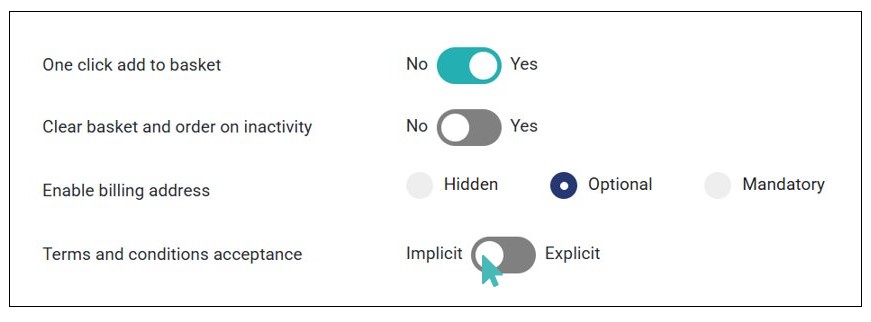
On the checkout page, the customer is notified that by proceeding to payment or submitting the order, they will have accepted the terms and conditions.
Note
By default, the terms and conditions acceptance mode is implicit for new stores.
Explicit Consent
Unlike implicit terms and conditions acceptance, explicit consent requires users to manually check a box before proceeding with the order or payment. To set terms and conditions acceptance as explicit, toggle the button to Explicit.
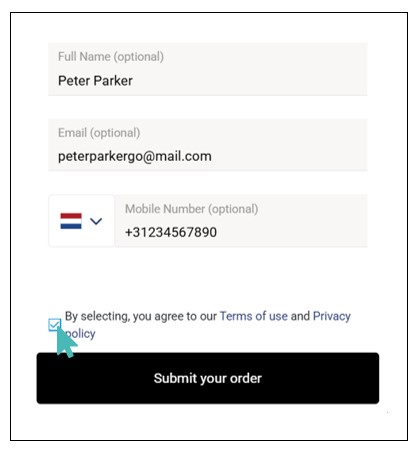
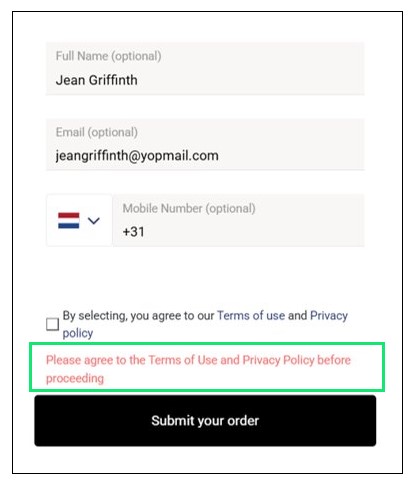
The customer checkout page will have a terms and conditions and privacy policy checkbox that customers must click to proceed with the order (either by submitting or paying for the order). If a customer tries to submit the order without checking the terms and conditions box, they will get a notification informing them that they must accept the terms and conditions. Also, the Submit your order / Proceed to payment buttons will be inactive when the customer is yet to accept the terms and conditions.
Note
- It is important to choose the right terms and conditions acceptance mode for your store as some supported payment providers require explicit or implicit consent.
- The order capture page is not affected by the terms and conditions acceptance setting. Therefore, the T&Cs acceptance message is not displayed on the order capture checkout page.
