Viva Wallet as a payment provider facilitates payments for online and in-person purchases. It is a versatile payment provider allowing you to receive payments through your online store or via physical credit card processing machines in your physical store outlet. You can create a Viva Wallet account or use an existing account to receive payments from your GonnaOrder customers.
| Website | www.vivawallet.com/ |
| Supported Payment methods | Credit and debit cards, Google Pay, Apple Pay, Paypal, and many more. See all supported payment methods. |
| Available countries | Austria, Belgium, Bulgaria, Croatia, Cyprus, Czech Republic, Denmark, Finland, France, Germany, Greece, Hungary, Ireland, Italy, Luxembourg, Malta, Netherlands, Poland, Portugal, Romania, Spain, United Kingdom, Europe. |
| Payment provider logo |  |
On This Page
- Configure Your Viva Wallet Account To Receive Payments From GonnaOrder
- Configure Your Store To Receive Payments With Viva Wallet
- How To Find Your Viva Wallet Merchant ID and API Key
- Add Required Webhooks
- The Viva Wallet Payment Interface
- Configure Your Store for Viva Wallet App Payments
- Configure Your Store With Viva Wallet Payments for Kiosk
- Disconnect Viva Wallet From Your Store
Configure Your Store To Receive Payments With Viva Wallet
To start receiving payments, you must first set up your Viva Wallet account with the required details. These include a domain name, a success URL, and a failure URL. A logo is optional but can help with payment page customization.
The domain name tells Viva Wallet the website where customers will be making payments. All stores must set gonnaorder.com as the domain name regardless of whether you have configured a custom domain for your store.
The success and failure URLs indicate the pages to which the customer goes should their payment succeed or fail. This page is responsible for redirecting the user back to your store after payment.
Lastly, add a logo that will be displayed to customers on the payment page. We recommend that you use your store logo as this is more friendly and familiar to your customers. If you do not have a logo yet, use the GonnaOrder logo or skip it. The Viva Wallet logo will be used on the payment page if you do not upload a file.
Follow these steps to configure your Viva Wallet account:
- Log in to your Viva Wallet account dashboard
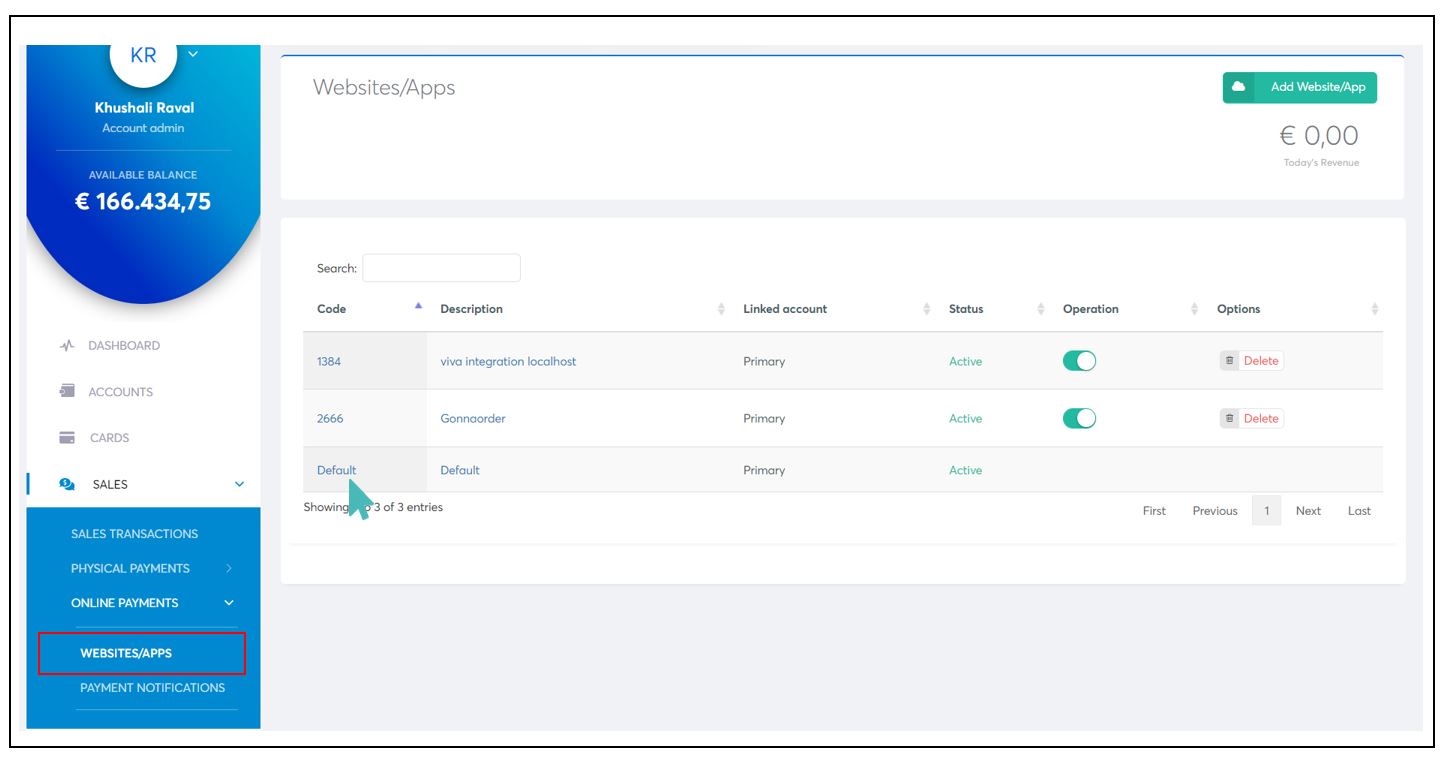
- From the menu on the left, click on Sales >Online Payments >Website/Apps.
- From the Website/Apps section, choose the payment source you would like to update and click on Default on the code column to edit the payment settings. A popup will appear where you can update your payment information.
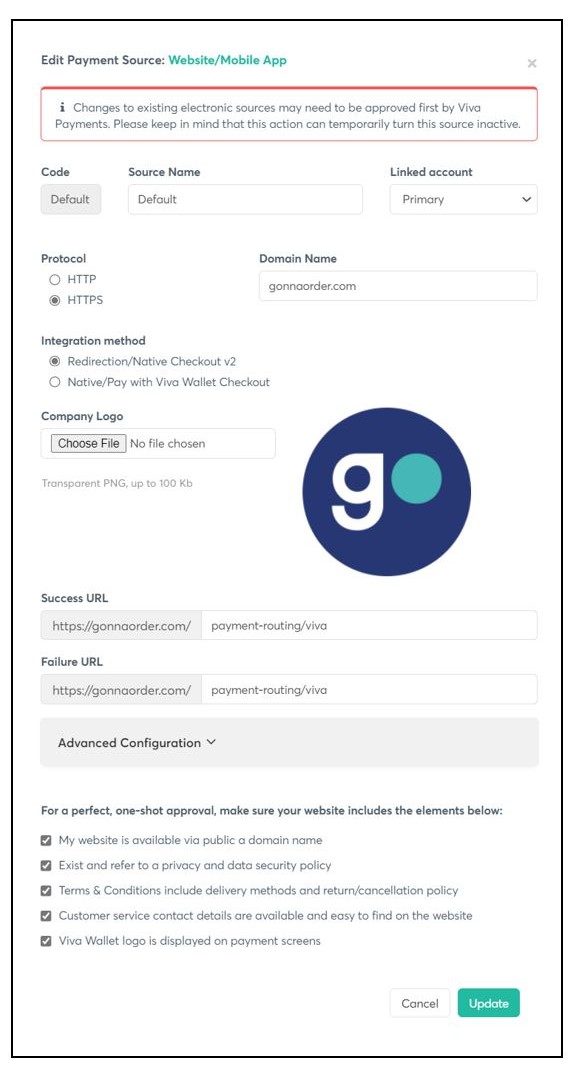
- On the pop-up screen, enter the domain name, upload a logo, and set the Success and failure URLs. Except for the logo, the other values must be used as provided below.
- Mark all the checkboxes towards the bottom of the page and update
Domain name: gonnaorder.com
Success URL: https://www.gonnaorder.com/payment-routing/viva
Failure URL: https://www.gonnaorder.com/payment-routing/viva
Logo: Use your store logo or the GonnaOrder logo
You can also follow the video below to configure your Viva Wallet account.
Configure Your Store To Receive Payments With Viva Wallet
The process in the previous section prepares your Viva Wallet account to receive payments from GonnaOrder. However, that alone is not enough for customers to start paying for orders online or via a physical terminal. You must connect your GonnaOrder store to your Viva Wallet account so that customer payments are sent to the correct receiving account.
GonnaOrder allows you to choose to whether to connect your store to Viva Wallet for online payments or physical terminal payments. This ensures you set up a payment type that best aligns with your business model.
Follow the steps below to connect your store to your Viva Wallet payments account:
- Log in to your GonnaOrder store and navigate to Settings > Payments
- Find Viva Wallet from the list of supported payment providers and click the Connect button next to it.
- Next, choose the preferred payment type and enter your Merchant ID and API Key. See how you can find your Viva Wallet Merchant ID and API Key in the next section.

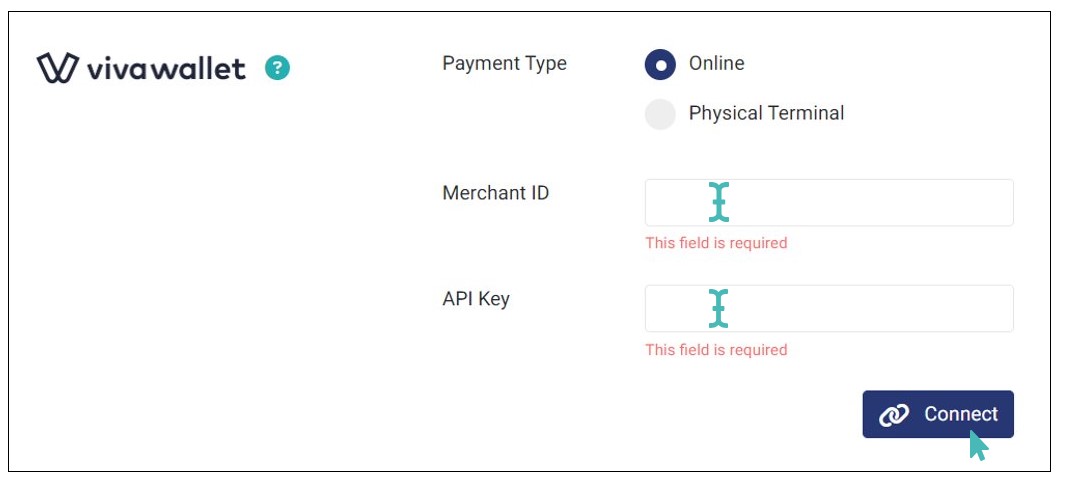
If the integration details your entered are valid, your store will be successfully connected to Viva Wallet. Therefore, it will be ready to receive payments via Viva Wallet. Also, all payments to your store via this provider will be available under your Viva Wallet account dashboard.

IRIS Payment Method: For Greece, Viva Wallet by default enables IRIS as payment method. However this payment method is not recommended for online for GonnaOrder cases. GonnaOrder recommends to disable the IRIS payment. To do this, simply email your Viva Wallet account manager and ask them to disable it for your merchant account. In case you don’t disable it, you may receive payments from Viva Wallet but not see the orders in your GonnaOrder dashboard.
How To Find Your Viva Wallet Merchant ID and API Key
Your merchant ID and API key are available in your Viva wallet account. Follow these steps to retrieve it:
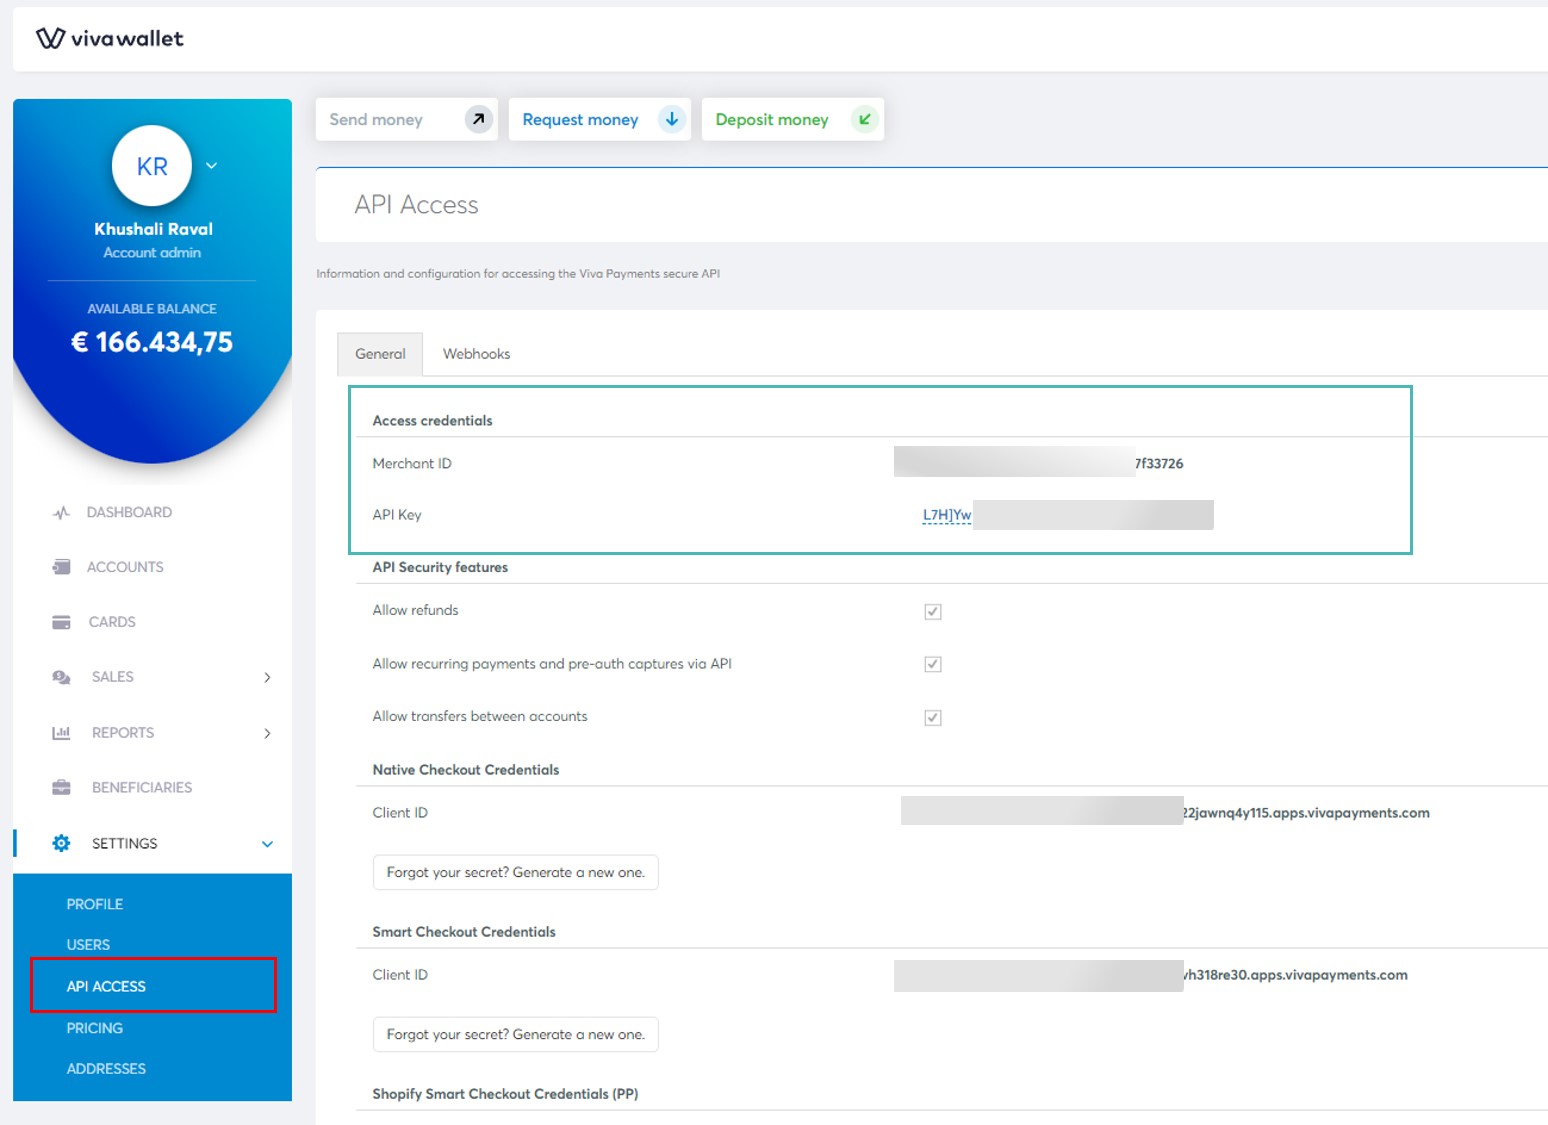
- Log in to your Viva Wallet account dashboard and go to Settings > API Access.
- Locate your merchant ID and API key under Access credentials
- Copy your merchant ID and API Key from the Viva Wallet dashboard and paste it into the respective field in your GonnaOrder payment settings.
For more information about how to find Viva Wallet keys please read Viva Wallet merchant ID guide guide, and their client credentials guide on their website.
Add Required Webhooks
Viva supports webhooks, a simple and powerful solution that allows you to receive notifications each time a specific event takes place. Webhooks are particularly useful for asynchronous events such as asynchronous payments, for example, when the funds of the customer are transferred from his bank account into your Viva account.
To add the required Webhooks. Navigate to your Viva Dashboard. From the left pane, select Settings > API Access > Webhooks.
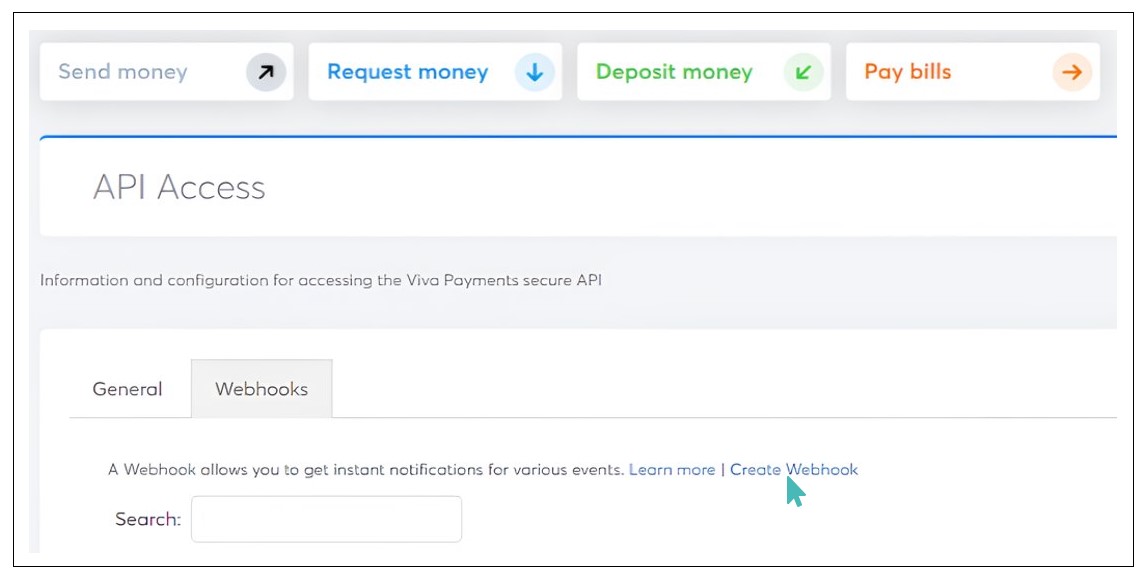
Click Create Webhook. New Webhook dialog appears.
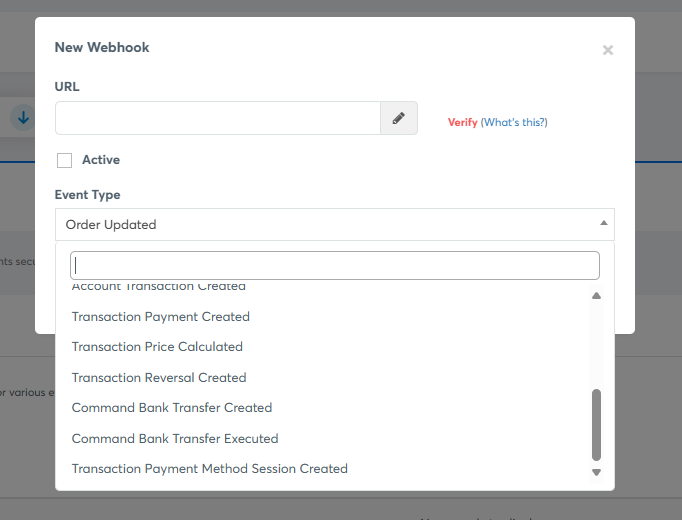
In the URL textbox, enter the below URL.
URL: https://admin.gonnaorder.com/api/v1/webhooks/viva?storeAlias={storeAlias}
Click Verify to authenticate the entered URL. Ensure to check Active checkbox.
From the Event Type dropdown, select Transaction Payment Created. Click Save.
The Viva Wallet Payment Interface
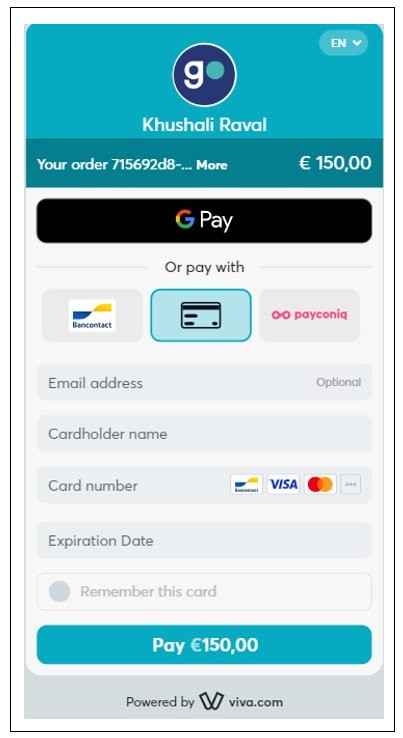
If you have successfully set up Viva Wallet as your payment provider, it will be used when customers seek to pay for their orders online. When the customer clicks Proceed to Payment on the checkout page, they will be redirected to a secure payment interface hosted by Viva Wallet, where they can use any of Viva Wallet’s supported payment methods.
Configure Your Store to Support Viva Wallet App Payments
You can configure Viva Wallet integration to support payment via the Viva Wallet mobile app. This app-to-app integration enhances checkout experience by allowing customers to pay for orders using the Viva Wallet mobile App.
To set up your store to accept Viva Wallet app payments, navigate to Settings > Payments and select Viva Wallet. For the Payment Type, choose Physical Terminal and select App as your preferred Terminal Type.
Next, enter your Merchant ID and API Key and click Connect to complete the integration.
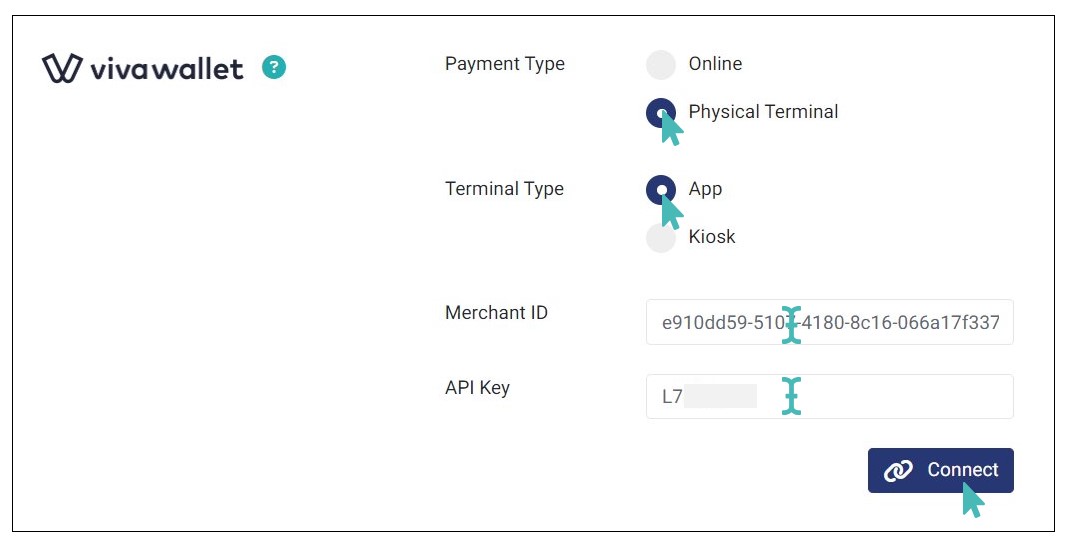
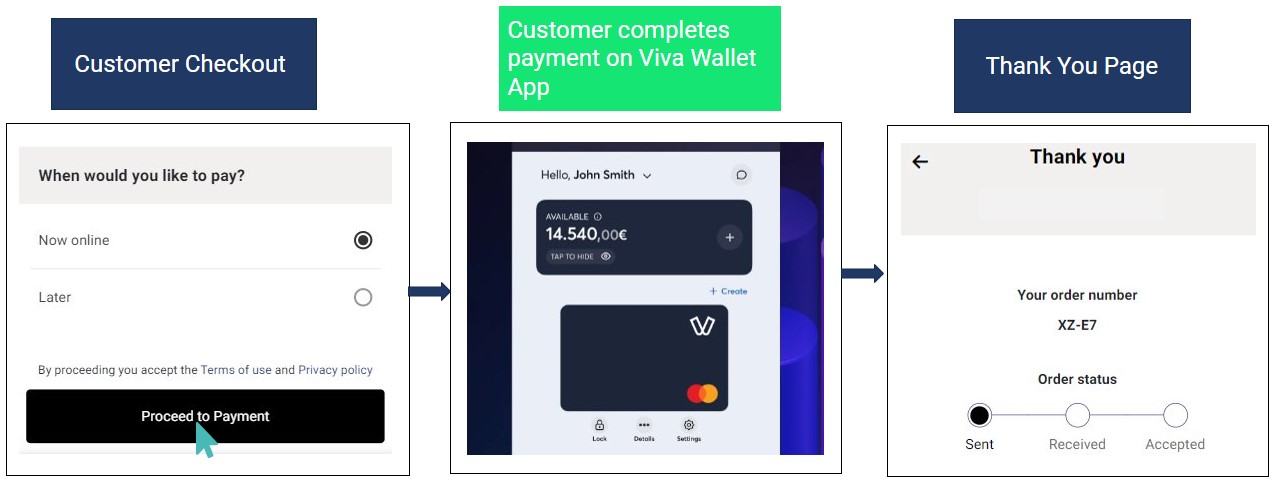
When you configure this integration, customers who use the Viva Wallet mobile app can pay directly using the Viva Wallet android app. On clicking Proceed to payment, the customer is redirected to the Viva Wallet mobile app installed on the device they are using to place the order. Here, they can complete the payment securely. Once the transaction is complete, the app will redirect them back to your store’s order thank you page.
Configure Your Store with Viva Wallet Payments for Kiosk
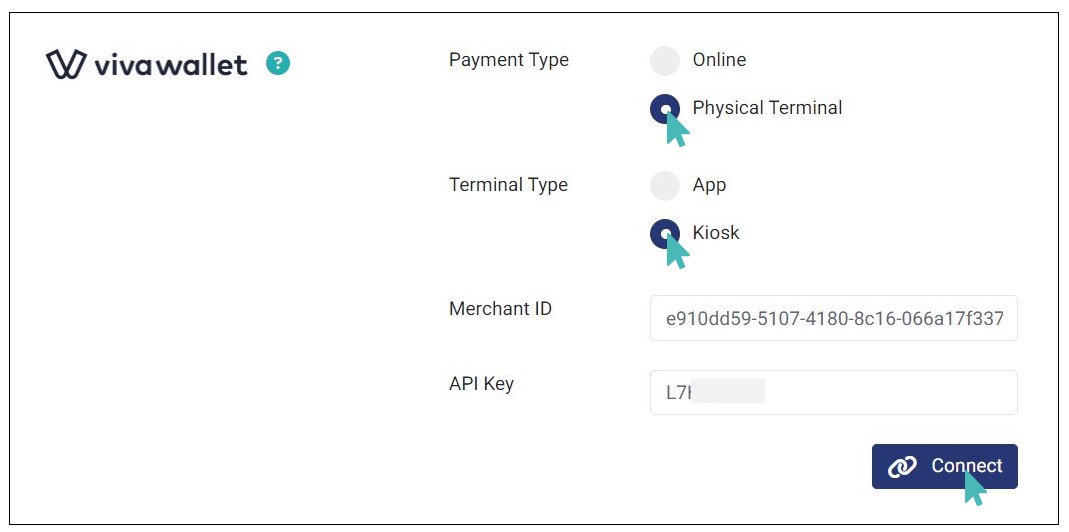
If you’re using GonnaOrder’s android kiosk solution, you can configure your store with Viva Wallet for seamless payments. Simply navigate to Settings > Payments and find Viva Wallet. Click Connect and select Payment Type as Physical Terminal and Terminal Type as Kiosk.
Next, enter your Merchant ID and API Key and Click Connect to complete the integration.
Just like when Configuring Viva Wallet for App Payments, customers can easily checkout and pay for their orders using the mobile app. When the customer clicks Proceed to Payment, they are redirected to the Viva Wallet app installed in the device, where they can complete the payment. Once the transaction is complete, they are redirected back to your store’s thank you page.
Disconnect Viva Wallet From Your Store
You can disconnect Viva Wallet payments from your store at will. You will need to set up another payment provider to continue receiving online order payments from your customers.
