The Pickup and Delivery tabs under Settings are where the store owner can configure settings for the ordering for delivery at home or pickup and takeaway. You can manage delivery orders through GonnaOrder, or connect your store with a suitable delivery service provider to streamline your delivery operations.
On This Page
- Configure Pickup Ordering Settings
- Hide or Show Pickup Address
- Manage Delivery Settings
- Enable Address Auto-Complete for Your Delivery Orders
- Set Floor Number as Hidden, Optional, or Mandatory
- Set Doorbell Name as Hidden, Optional, or Mandatory
- Enable Delivery Zone Restrictions
- Create Post Code Delivery Zones
- Create GPS Radius Delivery Zones
- Create GPS Polygon Delivery Zones
- Schedules for Zones – Available Times
- Control Same Day Ordering for Zones
Configure Pickup Ordering Settings
Why Pickup Settings Are Important
The Pickup mode in GonnaOrder can be used for different purposes. One way to use it is for a customer is ordering within a store. This is for example done by scanning a QR code at the entrance of the store and placing their order while waiting in the queue. Another way to use it would be for a customer that is ordering when they are not physically in the store so that they don’t need to wait for when their order is ready for pickup when the customer reaches the store.
In the first situation, when the customer is already in the store, it often does not make sense to ask a customer for additional email and phone information. A customer could identify themselves to the cashier by mentioning the order number. On the other hand, when the customer is remote, contact information such as email and phone is important. Without these, the store owner cannot reach the customer.
Therefore, a store can decide what information to ask their customers for pickup, depending on the mode they operate.
Configure the Pickup Ordering Settings
From the store Settings on the side menu, select the Pickup tab. Based on your requirements, select if details like Name, Email, or Phone should be Hidden, Optional, or Mandatory on the customer checkout page.
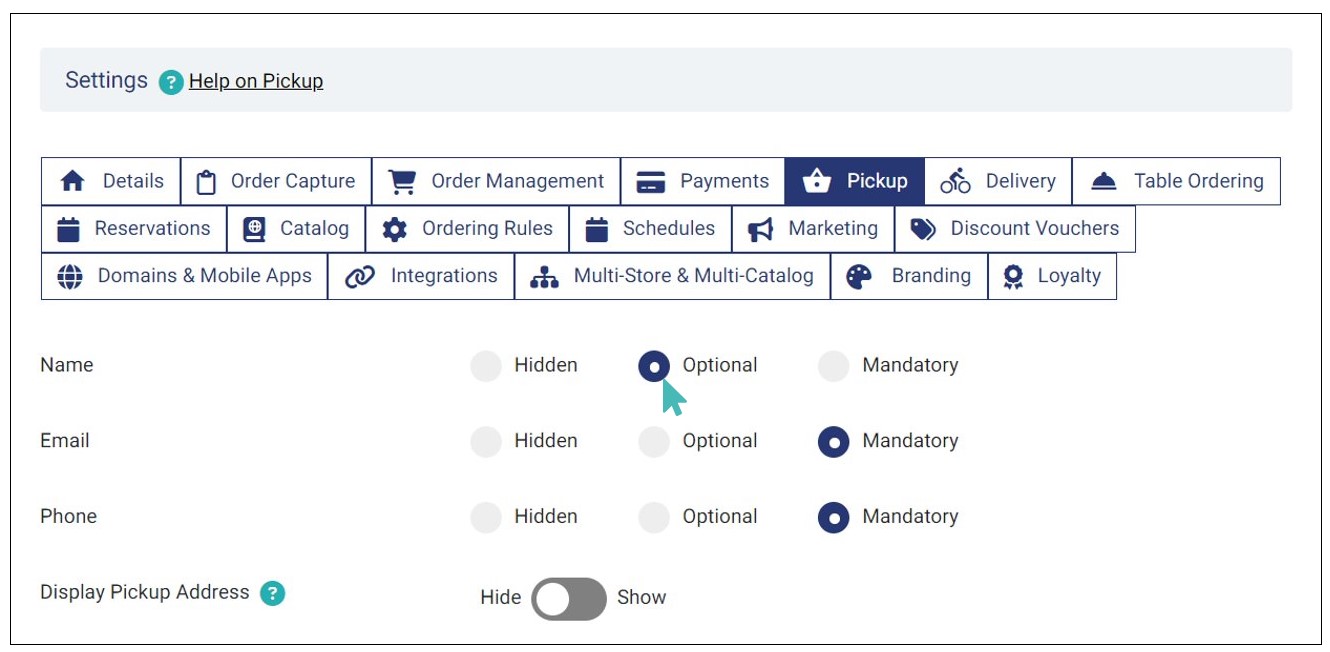
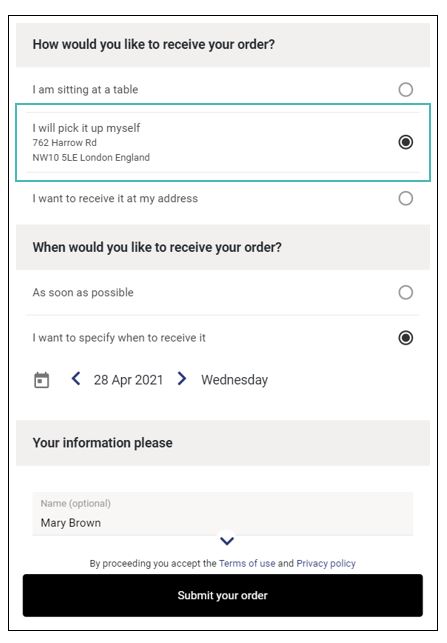
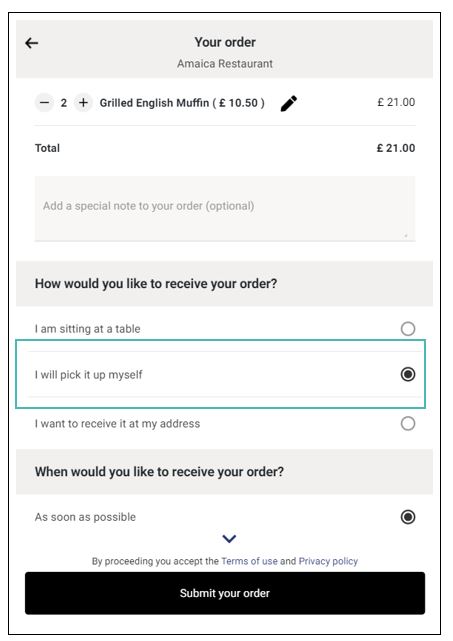
A configuration like the above with a mandatory email and telephone number but an optional name would result in an experience for the customer like the following screen:
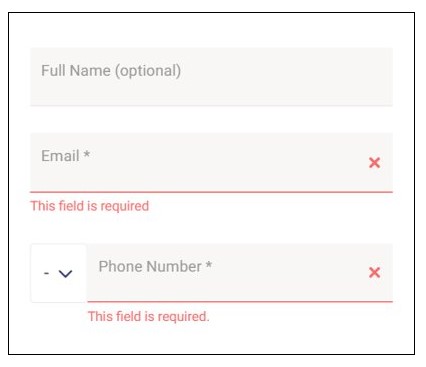
On the other hand, if you set any of the three fields as hidden, it will not appear on the customer checkout page.
Hide or Show Pickup Address
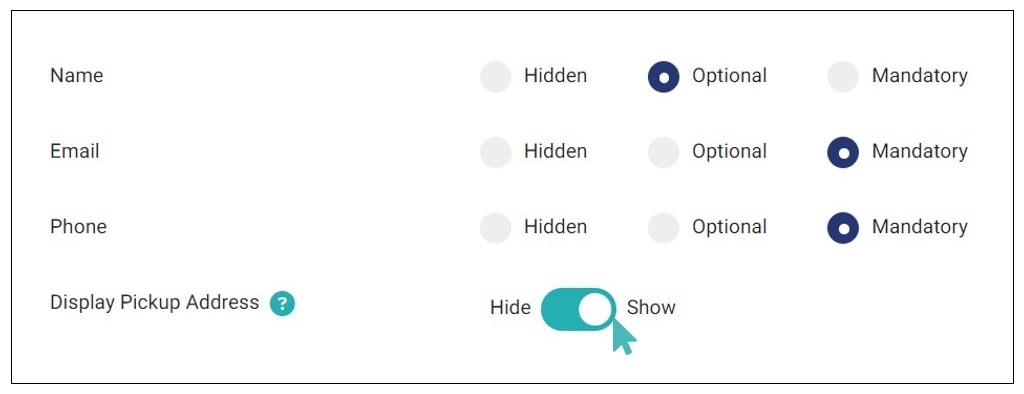
You may choose to display or hide your store address from the customers when they choose their orders. Displaying your store address makes it convenient for new customers to find your physical location but may not be necessary for some stores.
Manage Delivery Settings
GonnaOrder allows you to configure delivery settings as you wish, ensuring you fulfill delivery orders in the best way possible. From setting up delivery fee and delivery fee external ID to creating and managing delivery zones, you can configure your store delivery settings in a way that best suits your business model.
What Are Delivery Fee and Minimum Order Amount Settings?
If you want to provide delivery at the address option for your customer, you can specify different settings that will make deliveries convenient for both the store and the customer.
- Minimum order amount is used when you don’t want to allow delivery orders below a certain amount. This is a quick way to filter orders that would otherwise be expensive to deliver. It can also be a way to encourage customers to add more items in delivery orders and hence increase store revenue.
- Delivery fee is a fee that you can charge the customer for every delivery order. The delivery fee usually doesn’t depend on the order amount. Instead, it depends on the distance from the store to the customer’s address or the time it would take a rider to deliver the order.
- Order amount above which delivery is free is a setting that allows you to offer free delivery services for high-value orders. The setting can be used to encourage customers to include more items in delivery orders hence increasing the store revenue.
- Delivery Fee External ID for every GonnaOrder store that wants to use POS can setup a delivery fee external IDs for each order. When a customer places an order in your store, GonnaOrder will pick the external ID for the delivery mode that is associated with the order and send it along with the order information to your POS and other connected applications.
How to Configure the Delivery Fee and Minimum Order Amount
The delivery fee and minimum order amount fields are optional. You can set a delivery fee without setting the minimum order amount and vice versa. Additionally, the delivery should always be a considerably fair value for all delivery addresses. Regardless, ensure that the delivery fee displayed on your delivery orders aligns with the terms or requirements of your logistics providers if you use third-party delivery services.
Below is an example delivery order configuration that you can use:
Minimum delivery order amount: €20,00
Delivery fee: €2,00
Order amount above which delivery is free: €80,00
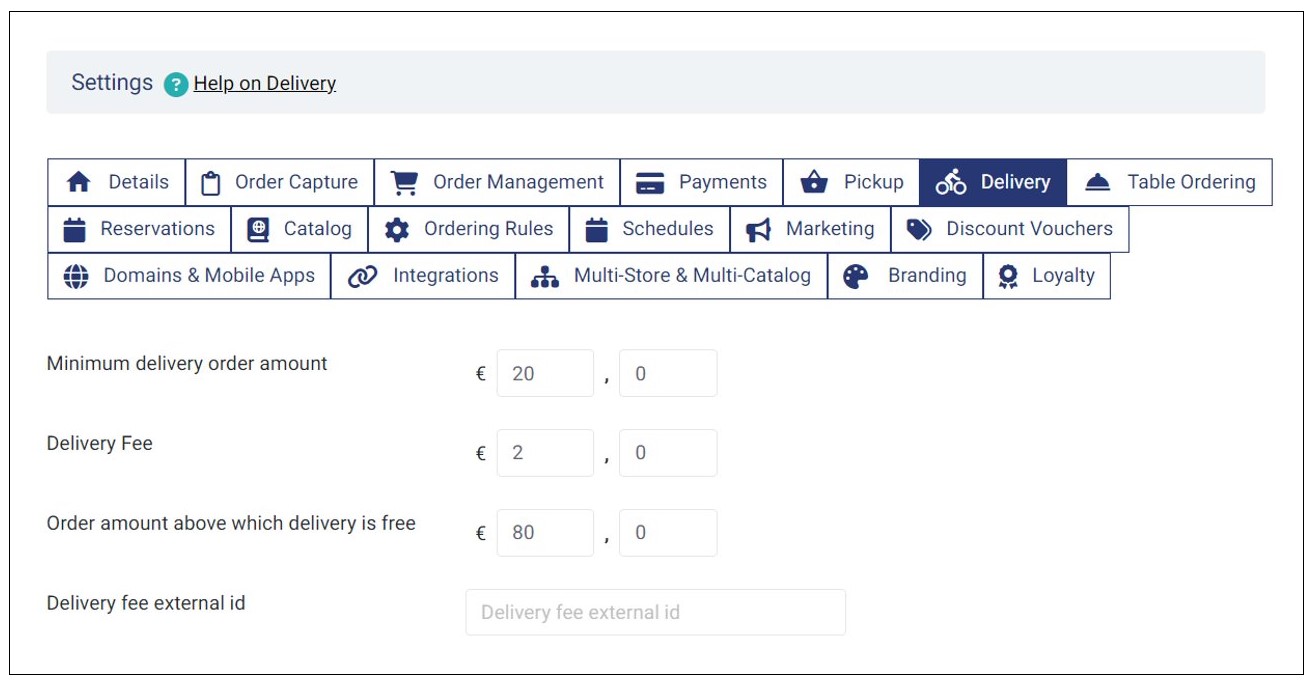
When the above delivery settings are configured, customers placing an order in your store may see various messages on the order screen depending on the order amount.
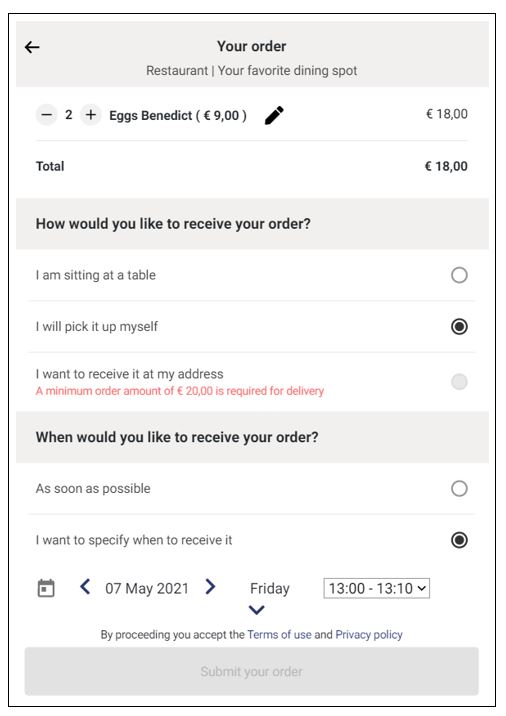
If the total order amount is below €20,00, the user will not be allowed to continue the order. GonnaOrder will disable the delivery option for orders below the minimum delivery order amount and notify the customer that there is a set minimum order amount for delivery.
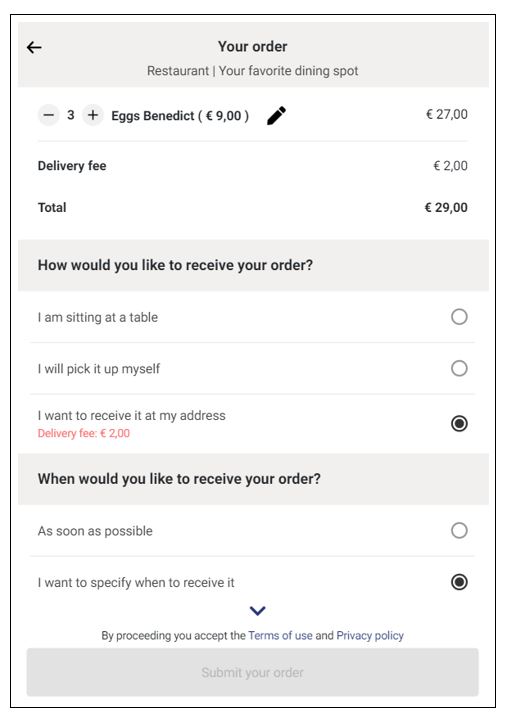
If the order amount is between €20,00 and €80,00, the users will see that the value of the delivery fee is €2,00. Customers can proceed with the order after filling in the delivery address information.
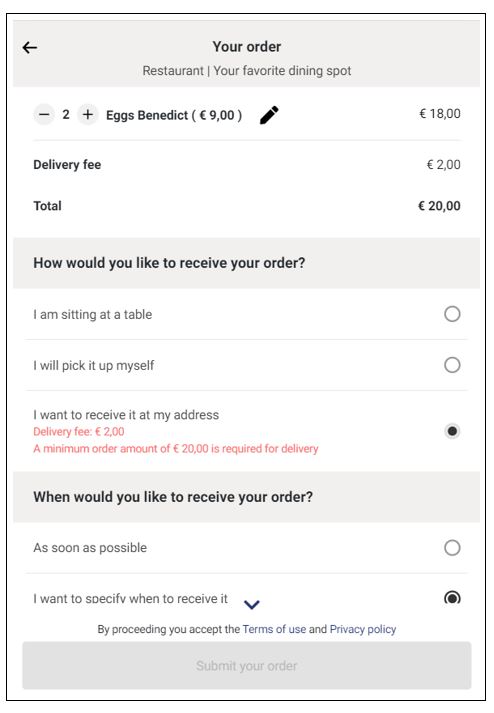
If a customer initially selected items worth between the minimum and maximum order amounts and then decided to remove some items such that the order amount falls below the minimum required for delivery, they would be informed of both the delivery fee and the minimum order amount. This is an exceptional case that happens only when a customer has selected the delivery mode before reducing the order amount.
Another important scenario is that of a closed store. Customers can view your menu and add items to the basket if you have enabled the setting that allows them to request the order desired time in the future. Hence, they will have to pick a date when they would like to receive an order. In a case where customers can request the order’s desired time as soon as possible, they will be notified that the store is closed.
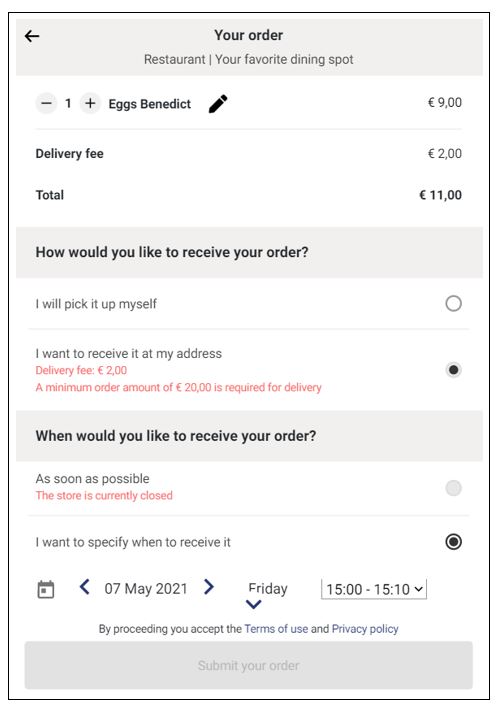
If a store does not charge delivery fees or if the order meets the store’s delivery fee exemption criteria, the customer will not be shown the delivery fee. GonnaOrder does not display prices and charges if they are zero (0). For the above example case, if the order amount is above €80,00 the customer will not be charged any delivery fee, and neither will they see that the delivery fee is 0.
Enable Address Auto-Complete for Your Delivery Orders
You can configure your store to use the address autocomplete feature of Google when your customers enter the street name where they want to receive orders. Overall, this is useful for cities, towns, and even rural areas. However, you may choose not to do that if you operate in a small community where Google address indexing doesn’t work well.
In order to enable this feature, simply toggle the Delivery Address Auto-complete button to Active.
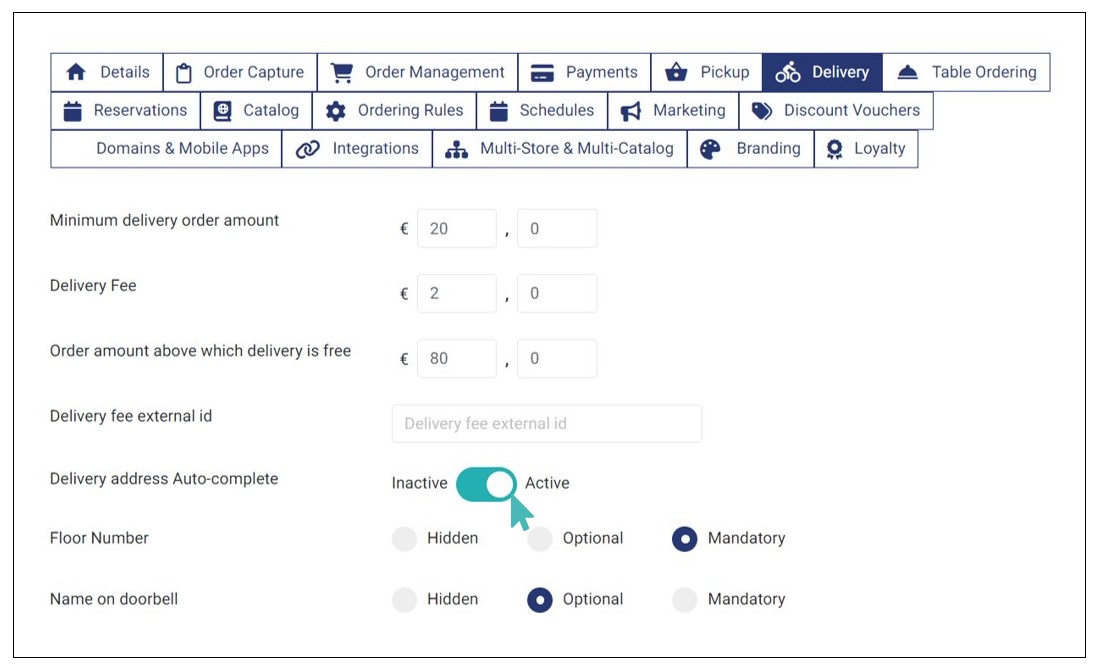
When a customer starts typing their street name on the order page, Google will provide suggestions and they can pick an address by pressing return. As soon as they choose the address, other fields like postcode and city are filled in automatically.
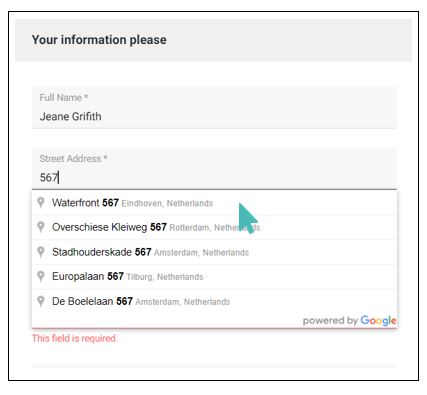
Notice that address autocomplete may not be accurate in some countries. Therefore, customers should cross-check the address to ensure that GonnaOrder filled in the correct address and make corrections where necessary.
Set Floor Number as Hidden, Optional, or Mandatory
GonnaOrder allows you to set the floor number as hidden, optional, or mandatory. This setting comes in handy when you need to know the floor number to which an order will be delivered. It helps your delivery riders to take orders as close to the customer as possible. This is not only convenient for customers, but also may increase their satisfaction with delivery orders thus encouraging them to place more orders in the future which is good for your store revenue.
To set floor number as hidden, optional, or mandatory, navigate to Settings > Delivery and choose the preferred option in the Floor Number section.
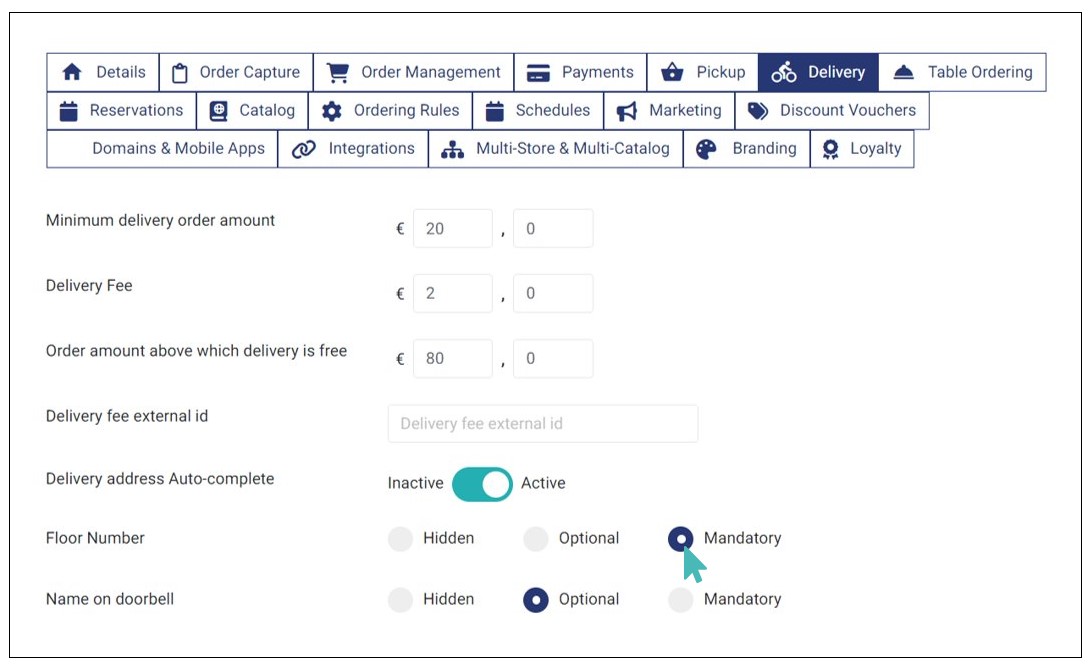
When the floor number is set to mandatory, the order submission page will require all customers who want their order delivered to their address to specify the floor number.
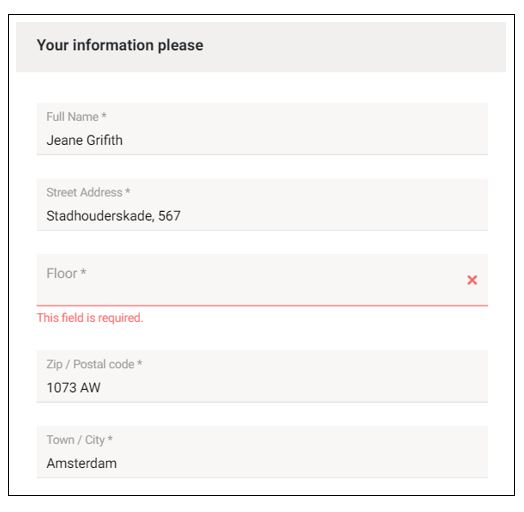
If the floor number setting is set to optional, the customer can submit the order without providing their floor number. However, when you choose hidden, then the floor number field will not appear at all on the customer interface.
Set Doorbell Name as Hidden, Optional, or Mandatory
A doorbell name can help you deliver orders more accurately, especially when you have multiple customers ordering from the same floor. GonnaOrder allows you to set whether customers should include their doorbell name on their delivery orders or not. You can set this requirement as hidden, optional, or mandatory depending on your needs.
To set doorbell name as hidden, optional, or mandatory, navigate to Settings on the side menu and click the Delivery tab. Find the Name on doorbell setting and choose whether this field should be Hidden, Optional, or Mandatory.
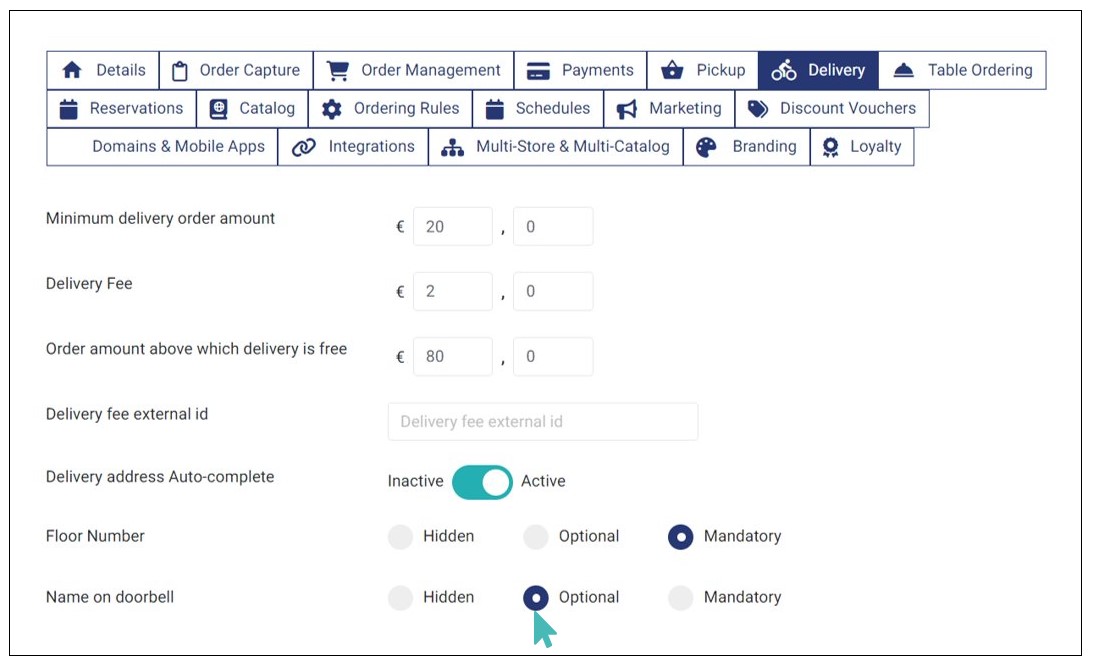
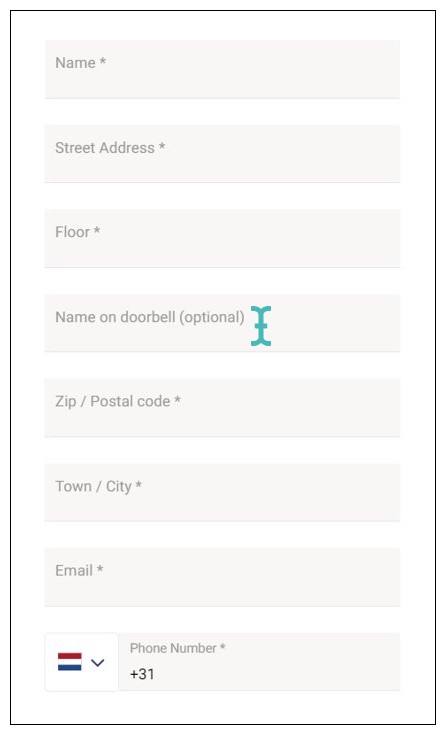
When you set this field as optional, customers can submit the delivery order with or without the doorbell name. However, if you set it as Mandatory, a customer must include the doorbell name when submitting the order. Lastly, if you select Hidden, then the Name on doorbell field will not appear on the customer checkout page.
Enable Delivery Zone Restrictions
Delivery zone restrictions apply to all types of delivery zones. They ensure you only get delivery orders from valid postcodes and GPS coordinates. Additionally, delivery zone restrictions ensure that every new order arriving in your store is associated with the appropriate minimum delivery amount and delivery fee depending on the customer’s postcode or GPS coordinates.
You can enable delivery zone restrictions by navigating to Settings > Delivery and toggling the Delivery zone restrictions button to Restricted.
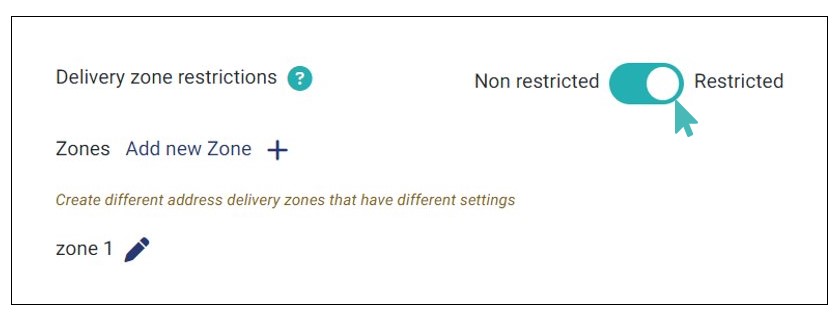
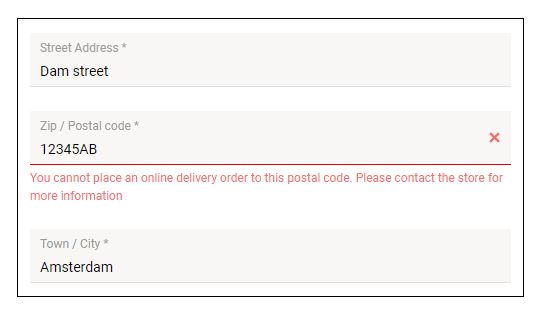
When delivery zone restrictions are enabled, the store will compare the list of supported postcodes or GPS coordinates based on your delivery zones. Delivery orders will only be allowed for those customers that are within one of the store’s delivery zones. Otherwise, the customer will be alerted that their delivery order cannot be accepted.
Create Post Code Delivery Zones
Postcodes are one way to delimit your delivery zones. You will require to list down the postcodes that are eligible for your delivery services for each zone.
If you want to support home delivery for your store, you usually need to work with a specific range of postcodes. First, you may want to restrict your store and only allow orders from specific postcodes. Additionally, you can define different zones, with different sets of postcodes. In this case, you can define different delivery settings per zone, such as an order minimum amount, order delivery fee, and order amount above which delivery is free.
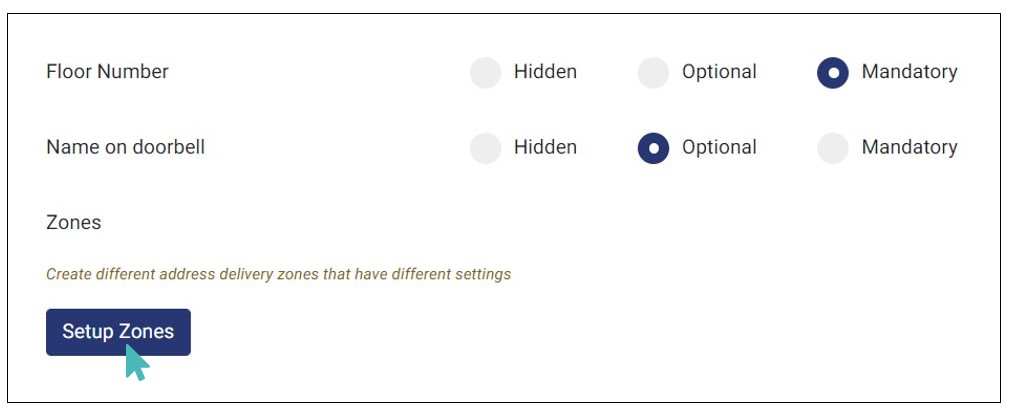
Creating postcode zones for your GonnaOrder store is easy. First, go to the store Settings> Delivery and click on the Setup zones button.
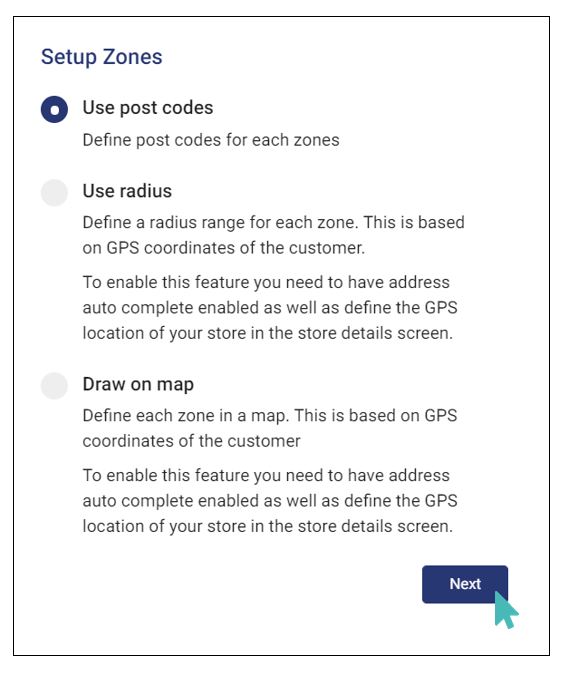
Next, you need to specify that you want to create a postcodes zone on the pop-up that appears on your screen.
Delivery Zone Type Cannot Be Changed
You will not be able to change the delivery zone type once a zone is saved in your store. Additionally, you cannot mix different delivery zone types for the same store. All store zones must be of the same type.
A postcode zone is identified by a name and is associated with a list of postcodes. Each zone can then have different values for the order and pricing settings. Read more below.
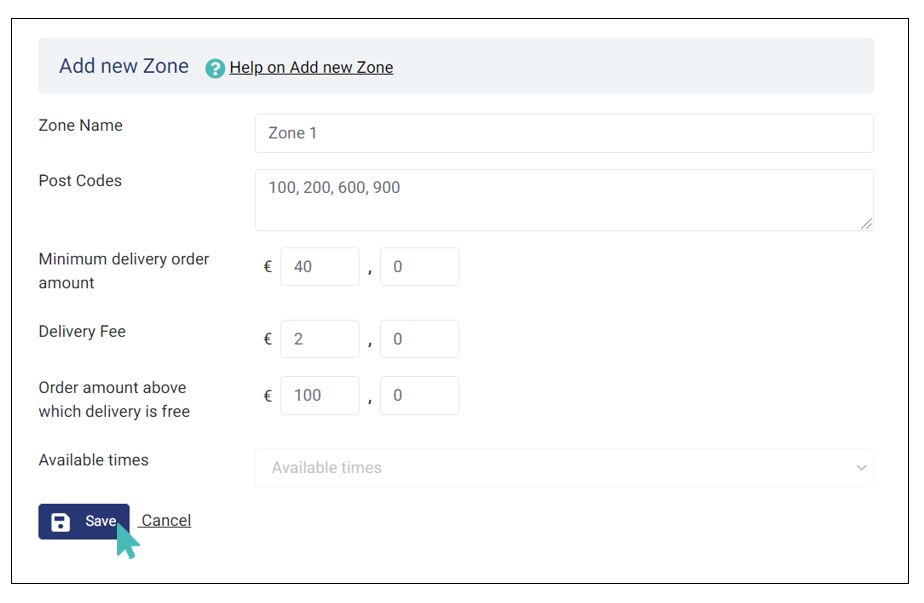
- Zone name: This should be a readable word or string of characters. You should strive to use street names, Estates, roads, and names that customers can easily identify.
- Post Codes: This is a list of postcodes eligible for delivery orders in the current zone. You can list the postcodes separated by commas, or each on a new line.
- Minimum delivery order amount: The minimum order that will be accepted for customers in the current zone.
- Delivery fee: The delivery fee that will be added to orders coming from addresses in the current zone.
- Order amount above which delivery is free: This field indicates the minimum order value for which delivery is done for free. You can leave it blank if you do not offer free delivery for any offers.
To change anything for this zone, click on the edit icon or on the zone and you can change any settings. You can add more zones to your store by following the same instructions.
Add One Post Code To Represent a Series
Instead of writing a long list of postcodes, you can write the first number in the sequence to represent all. For example, if you want to include all the postcodes that start with 100, then simply add 100. This will include addresses like 100, 1001, 10059, 10099, and the like.
Useful Post Code Finding Tools
For the zone feature to work you would need to input a list of postcodes. You can find a list of postcodes in an area using various tools available online. Below are some of the free tools you can try:
Freemaptools.com
A free tool that helps you find addresses within a radius on a map. You can mark locations on the map and find the distance between any two points.
Cybo.com
Cybo is also a free tool to help you find addresses in over 120 countries across the world. With such wide coverage, chances are that Cybo will help you round up addresses to which you can deliver orders.
Create GPS Radius Delivery Zones
GPS radius delivery zones are a way to easily limit the area within which you can deliver orders for a certain fee. A radius zone considers all postcodes within the radius as specified in the zone settings. Every zone must have a minimum radius and maximum radius. GonnaOrder measures these distances automatically on a map based on the store’s GPS coordinates.
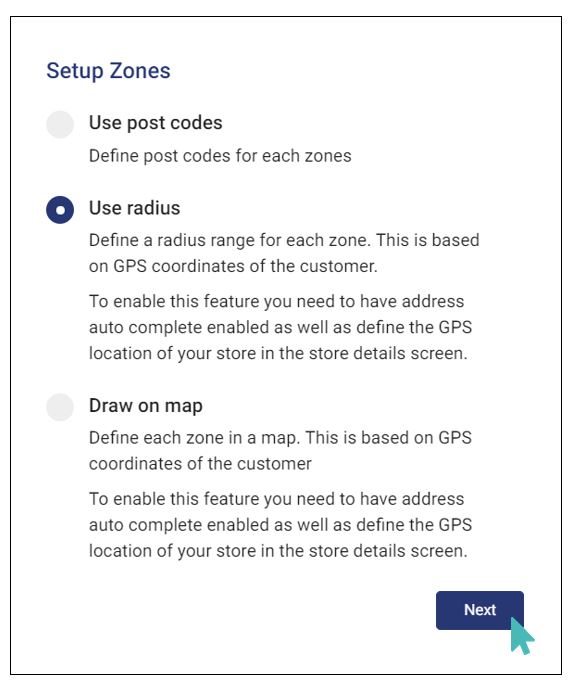
To create a GPS radius delivery zone, you must select the Use radius option on the setup zone screen. GonnaOrder will then allow you to specify the details of the zone as explained hereafter.
A GPS radius delivery zone is identified by the minimum and maximum radius- together they form the zone name. Below are the details of a sample zone.
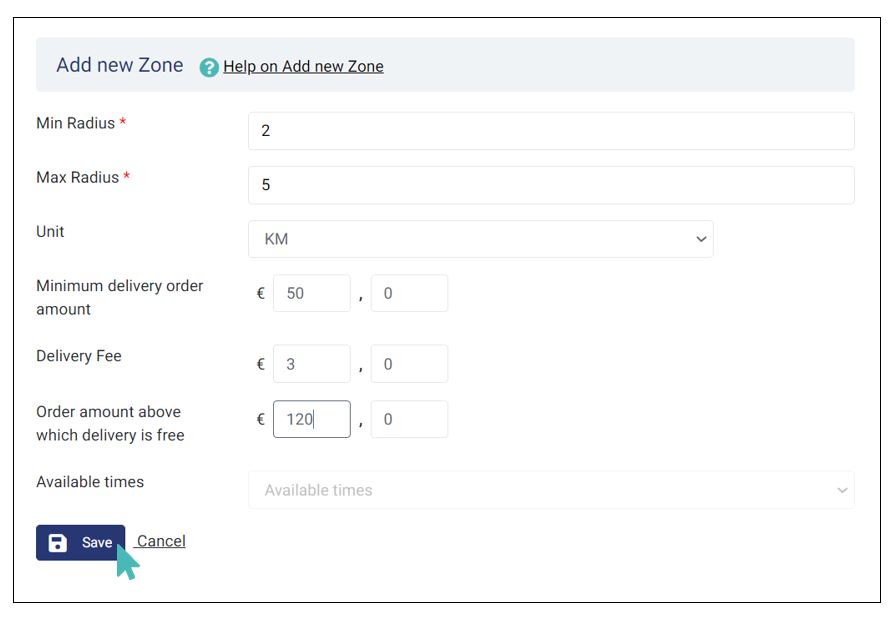
- Minimum radius: This indicates the distance to the closest edge of the delivery zone.
- Maximum radius: The distance from the store to the furthest edge of the delivery zone.
- Unit: The unit of measurement for the minimum and maximum radius. It can either be miles or kilometers.
- Minimum delivery order amount: The minimum order that will be accepted for customers in the current zone.
- Delivery fee: The delivery fee that will be added to orders coming from addresses in the current zone.
- Order amount above which delivery is free: This field indicates the minimum order value for which delivery is done for free. You can leave it blank if you do not offer free delivery for any offers.
GonnaOrder will generate a reference map when you have saved your changes. The map shows all your delivery zones. You can zoom in and out, pinch, or pan the map for a better view. It is also possible to view the map in full screen mode.

Radius Zones Cannot Overlap
Two radius zones cannot overlap. You must select a minimum radius that is less than or equal to the maximum radius of previously created zones.
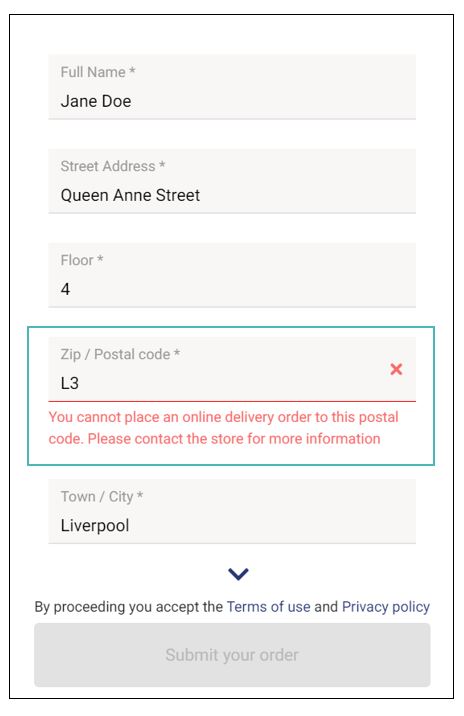
If delivery zone restrictions are enabled for a store with radius delivery zones, then the customer will not be able to place an order from outside the designated store delivery zones. They will instead be notified that they cannot place an online delivery order for the given postcode.
Create GPS Polygon Delivery Zones
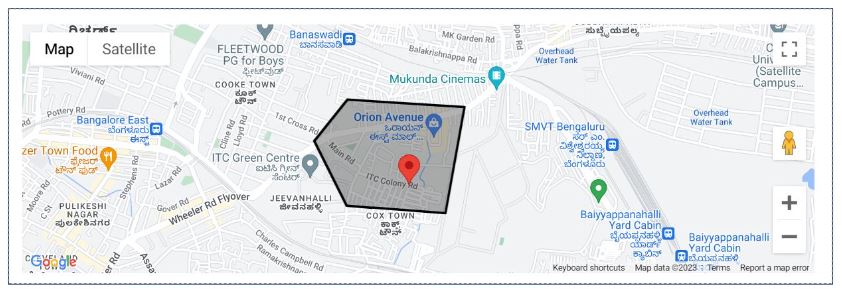
A GPS polygon delivery zone allows you to trace a shape along certain endpoints of a zone. Every endpoint is marked with the corresponding GPS coordinates. Additionally, every two points are connected with a straight line to make a closed shape that forms your delivery zone.
With GPS polygon delivery zones, delivery orders are accepted in your store if a customer’s GPS location falls within the area enclosed by zone endpoints.
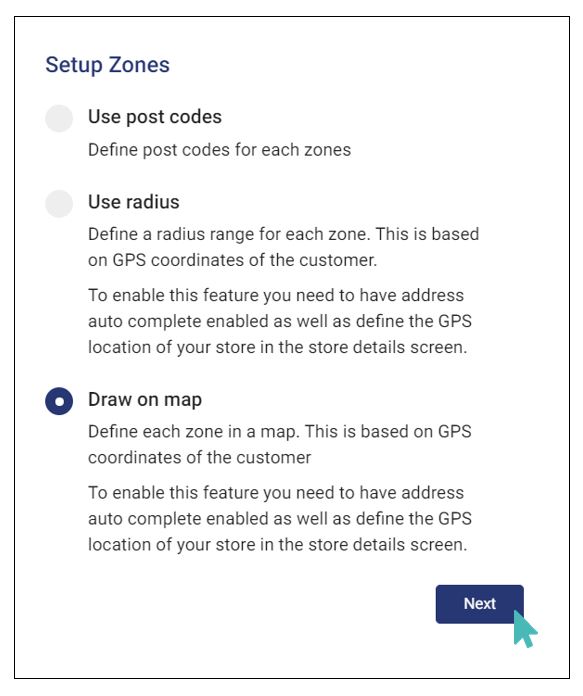
To use GPS polygon zones for your store, you must choose the Draw on map option on the zone type selection panel.
The next section will contain a map showing the location of your store based on your address. You can scroll through the map to determine the suitable zone area and then click on the shape icon to start marking the new zone. You must also provide a name for the zone you want to create.
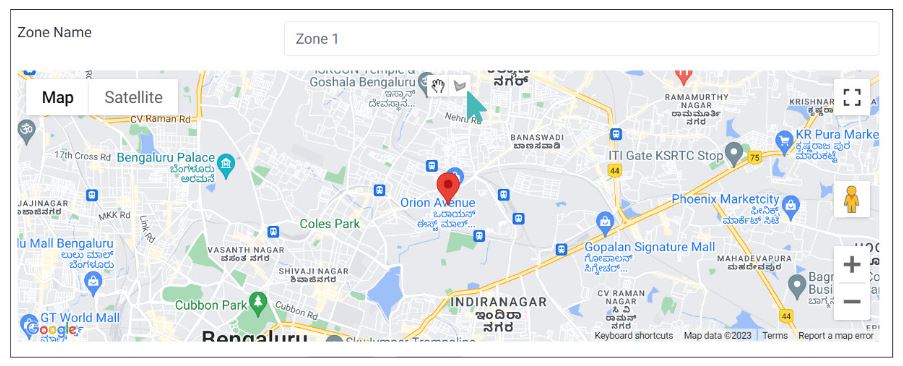
To draw the desired delivery zone, click on a suitable starting point on the map and drag your mouse to the next point. Repeat the click-and-drag procedure for all the points and finish by clicking on the starting point again. At the end of the drawing process, you should have a delivery zone enclosed by a polygon shape on the map. Any closed shape drawn on the provided map will count as a delivery zone.
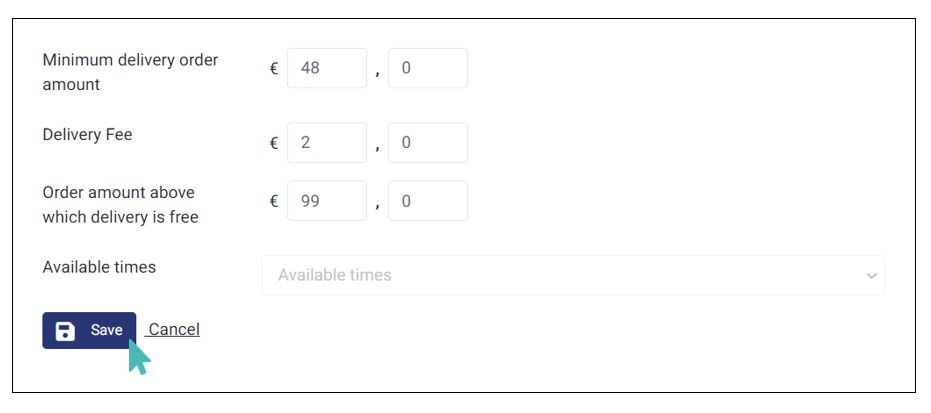
In addition to marking your delivery zone on the map with a polygon shape, you will also need to specify the Minimum delivery order amount, Delivery fee, Order amount above which delivery is free, and a schedule during which orders will be enabled. This is similar to other types of delivery zones.
After saving the GPS polygon zone and its settings, GonnaOrder will create a reference map showing all your existing delivery zones. This gives you a high-level overview of the region covered by your delivery zones. It can also help you decide if you need to expand any of your zones or create a new one.

For every order placed in your store, GonnaOrder will take the user’s delivery address and confirm that it is coming from a GPS location within one of your delivery zones. This applies only when delivery zone restrictions are enabled for the store.
If a customer provides a delivery address that is not within any of your delivery zones, they will be notified that the specified address cannot be found. This prompts them to update the address before submitting the order.
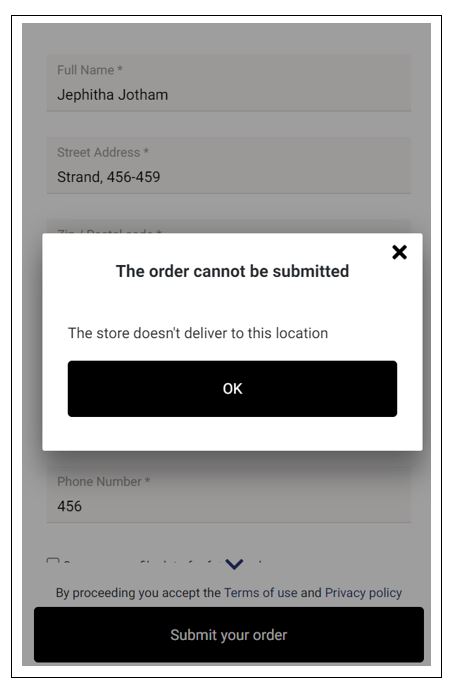
Delivery orders that cannot be associated with any GPS location supported by your delivery zones will not be accepted. The customer will instead be notified that the store does not deliver the specified location.
Create Multiple GPS Polygon Delivery Zones
Your store can have more than one GPS polygon delivery zone. This is especially important in accurately determining appropriate delivery fee for different addresses.
When creating a an additional polygon zone, GonnaOrder will highlight your existing zones with black polygons on your area map. The black polygon patches are meant to help you identify areas that are already covered by an existing delivery zone and hence prevent zone overlap.
The new zone will have point markers and red boundary lines to help you enclose the delivery area. Each new zone should have a unique name and you can also assign or update the zone-specific settings such as minimum delivery amount and the delivery fee.

Schedules for Zones – Available Times
With zones comes the need to satisfy the customers while still maintaining your store operations at a reasonable cost and convenience. There is a need to control when you can receive orders from certain zones. Other than the delivery logistics, there might be other reasons for you to control delivery orders from different zones.
Schedules for zones are similar to general store schedules and opening times. However, schedules for zones are referred to as availability times. They are the times during which orders will be allowed for the selected zone.
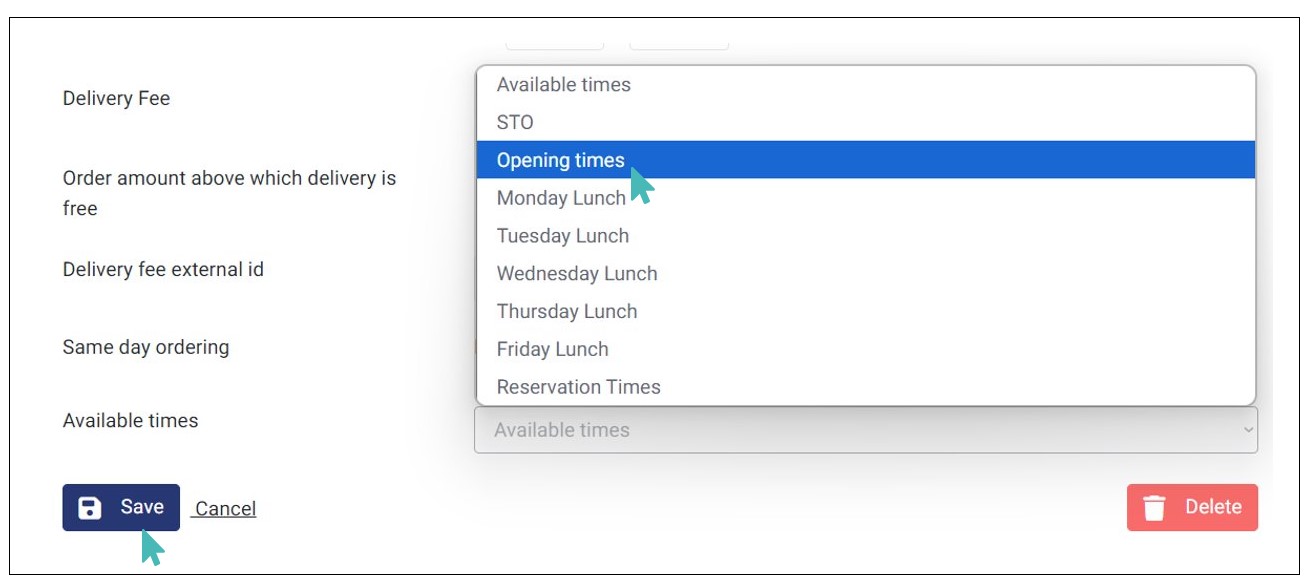
When a schedule is selected for the available times for a particular zone, the store will only accept orders during the times specified in the schedule. A customer will be notified that the store cannot deliver to the zone during the selected day and time if they chose a day or time that is outside the times specified by the associated schedule.
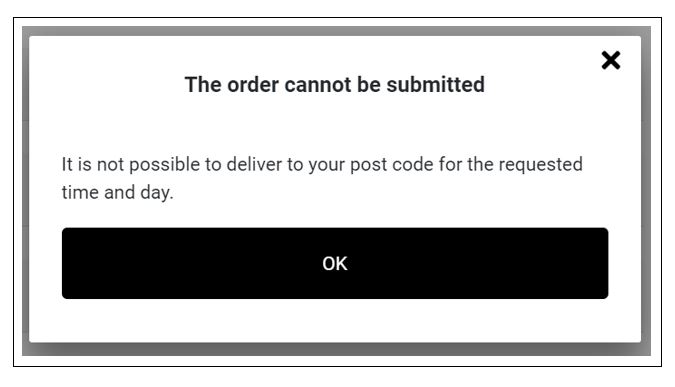
Notice that we have ordering times per mode and that GonnaOrder will look into both Ordering times per mode and available times for the delivery orders when verifying that your store can actually process an order.
You may want to read more about how to manage schedules and opening times so you can learn how schedules are created.
Control Same Day Ordering for Zones
Same-day ordering is a feature that allows you to decide if you want customers to place orders and have them delivered on the same day. When you activate this setting, customers can place orders and have them processed the same day. The same-day ordering setting is only available when you are updating a zone and not during creation.

However, it is not always possible to process all orders on the same day. Naturally, some orders are more complex than others. Additionally, it may not be possible to process and deliver some orders for particular zones on the same day. You may want to disable same-day ordering for zones that are far away from your store for your own convenience.
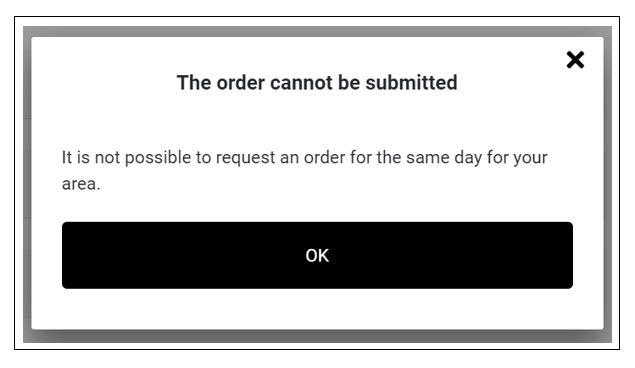
When same-day ordering is disabled for a given zone, no delivery order will go through and customers will be notified that same-day orders are not supported for the respective zone. This is both convenient for you and the customer since you will not have reject orders and customers are well informed during order placement. Customers need to pick a date for the orders.
